Processing Mass Add Attendance by Student
The Attendance Entry by Class/Activity/Range feature enables you to enter the same attendance record for multiple students at once. For example, this would be useful if multiple guardians called and left a message indicating their students are sick and you need to update the attendance records for all those students at once.
Scroll past the video to access the step-by-step instructions.
Before you begin
-
The attendance types and attendance reasons you wish to use must exist.
-
Students must be scheduled into classes.
-
Verify you are in the correct Entity and school year by checking the information at the top left of the screen.
Audio Transcript
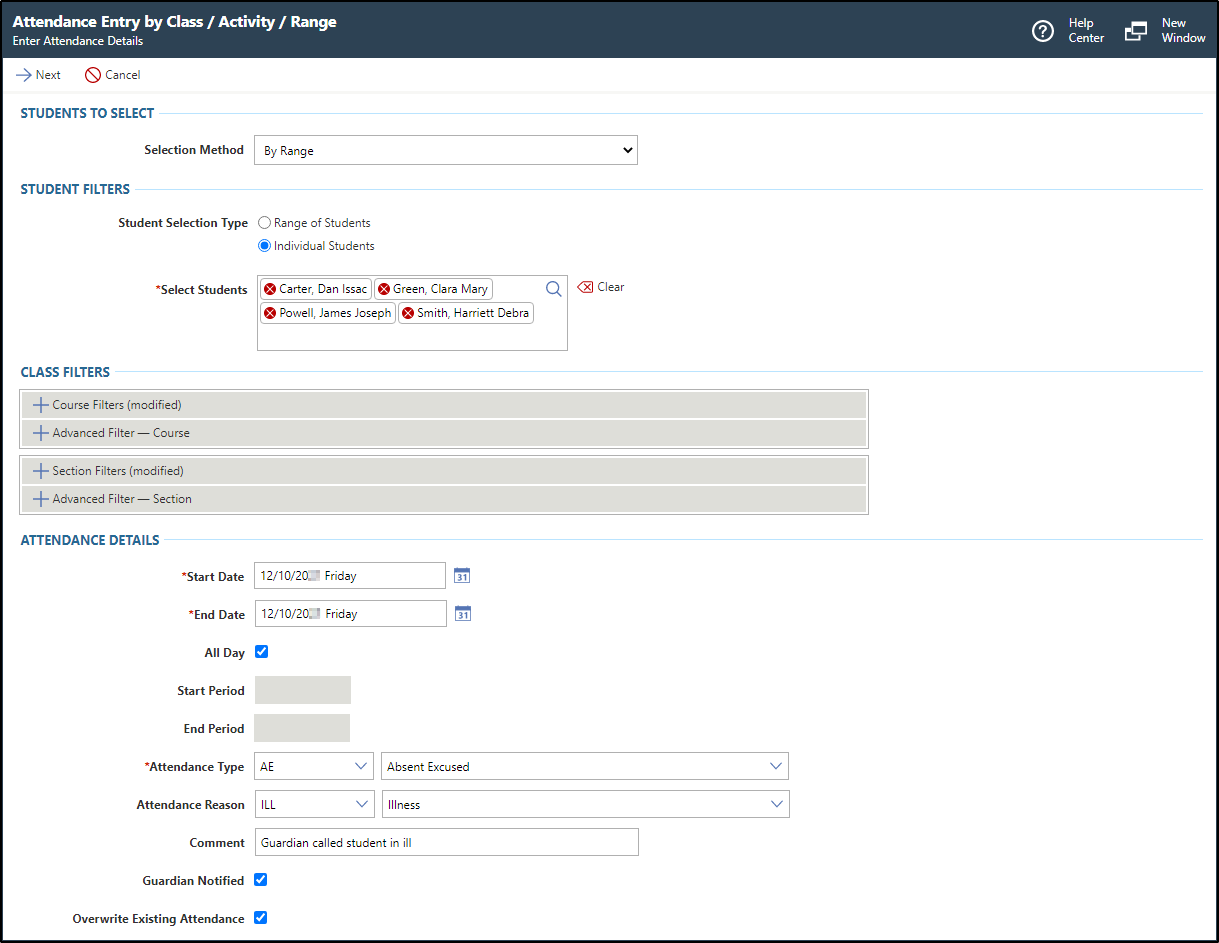
If you ever need to enter the same attendance record for individual students en masse, you can use the Attendance Entry by Class/Activity/Range feature. To begin this process, we will navigate to the Attendance Entry by Class/Activity/Range feature located within the Attendance module. For this example, we’ll add attendance records for two students at once. First, we will change the selection method to By Range, and then change the Student Selection Type to Individual Students. Then, we can select the student who we are adding attendance records for. The date fields default as the current date, which we do not need to change for this example. These attendance records will last all day, so we will check the All Day box. Since these two students were absent today, we will select unexcused absence as the Attendance Type for this example. Let’s select the Next option to proceed to the next screen, where we’ll see all the students whose attendance records will be updated. If we proceed to the next screen, we’ll see all the attendance records that will be added. Since we do not need to update any of these records, we will select Run Process to generate them. Now that you know how to process attendance records en masse by student, you can easily record attendance for specific students at the same time.
If you ever need to enter the same attendance record for individual students en masse, you can use the Attendance Entry by Class/Activity/Range feature. To begin this process, we will navigate to the Attendance Entry by Class/Activity/Range feature located within the Attendance module. For this example, we’ll add attendance records for two students at once. First, we will change the selection method to By Range, and then change the Student Selection Type to Individual Students. Then, we can select the student who we are adding attendance records for. The date fields default as the current date, which we do not need to change for this example. These attendance records will last all day, so we will check the All Day box. Since these two students were absent today, we will select unexcused absence as the Attendance Type for this example. Let’s select the Next option to proceed to the next screen, where we’ll see all the students whose attendance records will be updated. If we proceed to the next screen, we’ll see all the attendance records that will be added. Since we do not need to update any of these records, we will select Run Process to generate them. Now that you know how to process attendance records en masse by student, you can easily record attendance for specific students at the same time.
-
Complete the appropriate fields.
Step Information
Required fields are identified with an asterisk. You must complete required fields before you can save your work.
-
Optional: Verify the box for Overwrite Existing Attendance is checked or unchecked.
Step Information
When checked, any attendance records for the selected students and dates are changed. For example, if students were previously scheduled to go on a field trip, checking this box would update their records appropriately.
When unchecked, any existing attendance records for the selected dates are not modified.
Expected ResultIn the image below, the class attendance record details display individual students where their guardians called in specifying student illnesses.
-
Optional: Verify the box for Overwrite Existing Attendance is checked or unchecked.
Result(s)
You have successfully recorded attendance for multiple students by student range.