Processing Mass Add Attendance by Field Trip
The Attendance Entry by Class/Activity/Range feature allows administrative staff to create the same attendance record for multiple students at once. You could use this process to update attendance records for a group of students who attended a field trip by choosing the Selection Method of "By Field Trip for Grade Levels Selected". Additionally, you can limit students included in this update based on their grade level or by excluding individual students. For example, if you are updating attendance records for students in grades 4 and 5 who attended a field trip to the natural museum of history and one or more students were absent due to illness, you can complete this process and exclude those students from having their attendance record changed.
Scroll past the video to access the step-by-step instructions.
Before you begin
The attendance types and attendance reasons you wish to use must exist.
The field trip you wish to add attendance for must exist.
Students must be scheduled on the field trip you wish to update attendance for.
- Verify you are in the correct Entity and school year by checking the information at the top left of the screen.
Audio Transcript
As an administrative staff, you can go to the Menu, Attendance module, and select the Attendance Entry by Class/Activity/Range feature where you can enter in the same attendance record for multiple students at once. This can be useful when you have multiple students going on the same field trip, so you don’t have to individually enter the same attendance multiple times. With the feature open, we can click on Attendance Entry by Class/Activity/Range. We can use the Selection Method field to choose how we are selecting our students. Since this is for a school field trip, we’ll have to choose the By Field Trip for Grade Levels Selected option. All the other options do not apply for this example but can be used if we were creating attendance entries by grade levels only, by class, activity, method of instruction, or range. The Field Trip field displays based on the Selection Method. This field allows us to choose what field trip these attendance entries are being made for. For this example, our choir students are going on a concert field trip, so let’s choose that from the drop-down list. We can use the Attended Field Trip field as a filter so we can pull students who have the Attended Field Trip field marked for this field trip. Since we want to pull all students, we’ll leave Display All selected. The Permission Slip Returned field also acts as a filter so we can filter for students who have the Permission Slip Date Returned field filled out for this trip. We can leave Display All for this field as well. Next, we’ll verify the Grade Levels field. This field defaults based on the school’s Grade Level Low and high values but can be updated if necessary. Under the Attendance Details heading, we can verify the Start Date and End Date fields. These dates default based on when the selected field trip is scheduled to take place but can be modified if needed. Because this field trip will be an all-day trip, we can check the box for All Day. This indicates that the students going on this trip will be gone from their classes for the entire day. With this checked, the Start Period and End Period fields become unavailable and can be skipped. If we had not checked the All Day box and this field trip was only scheduled to take place for a few hours, we could select which specific periods our students would be gone for. We can now choose the attendance type that will be assigned to our students’ attendance. All the attendance types we have in our system display, but because this is a school-related field trip, we’ll select School Function for our example. Similarly, the Attendance Reason can be selected to help us identify the reason for this attendance. All the attendance reasons set up in our system display and we’ll choose Field Trip. We can enter a comment to provide further information about this attendance record if we’d like. The box for Guardian Notified can be checked to indicate that parents and guardians have been made aware of this trip and their students’ absence. We can choose to check the box for Overwrite Existing Attendance if we want attendance records to be changed. For example, if some students already have attendance marked for a different reason, such as a class activity or early dismissal, we can check this box to overwrite those records and mark that all of the students are attending this field trip. When left unchecked, any existing attendance records for the selected dates will not be modified. For example, if a student is already marked absent due to an illness, we would leave this box unchecked to keep that student’s record in place instead of changing it to a field trip absence. Let’s leave this unchecked for our example. Let’s click Next. All the students that fit our selections from the previous screen display. We could uncheck any of the students if they will not be attending the field trip and will not be needing this attendance record added. We’ll leave them all selected and click Next. Here, we see a review screen of the same students along with additional information regarding parent notification and attendance-related information. Let’s run the process. The total successful records that were created or updated display, and we can click Done to complete the process. Processing field trip-related attendance records en masse can help speed up attendance entries in your system and ensure you know where your students will be going.
As an administrative staff, you can go to the Menu, Attendance module, and select the Attendance Entry by Class/Activity/Range feature where you can enter in the same attendance record for multiple students at once. This can be useful when you have multiple students going on the same field trip, so you don’t have to individually enter the same attendance multiple times. With the feature open, we can click on Attendance Entry by Class/Activity/Range. We can use the Selection Method field to choose how we are selecting our students. Since this is for a school field trip, we’ll have to choose the By Field Trip for Grade Levels Selected option. All the other options do not apply for this example but can be used if we were creating attendance entries by grade levels only, by class, activity, method of instruction, or range. The Field Trip field displays based on the Selection Method. This field allows us to choose what field trip these attendance entries are being made for. For this example, our choir students are going on a concert field trip, so let’s choose that from the drop-down list. We can use the Attended Field Trip field as a filter so we can pull students who have the Attended Field Trip field marked for this field trip. Since we want to pull all students, we’ll leave Display All selected. The Permission Slip Returned field also acts as a filter so we can filter for students who have the Permission Slip Date Returned field filled out for this trip. We can leave Display All for this field as well. Next, we’ll verify the Grade Levels field. This field defaults based on the school’s Grade Level Low and high values but can be updated if necessary. Under the Attendance Details heading, we can verify the Start Date and End Date fields. These dates default based on when the selected field trip is scheduled to take place but can be modified if needed. Because this field trip will be an all-day trip, we can check the box for All Day. This indicates that the students going on this trip will be gone from their classes for the entire day. With this checked, the Start Period and End Period fields become unavailable and can be skipped. If we had not checked the All Day box and this field trip was only scheduled to take place for a few hours, we could select which specific periods our students would be gone for. We can now choose the attendance type that will be assigned to our students’ attendance. All the attendance types we have in our system display, but because this is a school-related field trip, we’ll select School Function for our example. Similarly, the Attendance Reason can be selected to help us identify the reason for this attendance. All the attendance reasons set up in our system display and we’ll choose Field Trip. We can enter a comment to provide further information about this attendance record if we’d like. The box for Guardian Notified can be checked to indicate that parents and guardians have been made aware of this trip and their students’ absence. We can choose to check the box for Overwrite Existing Attendance if we want attendance records to be changed. For example, if some students already have attendance marked for a different reason, such as a class activity or early dismissal, we can check this box to overwrite those records and mark that all of the students are attending this field trip. When left unchecked, any existing attendance records for the selected dates will not be modified. For example, if a student is already marked absent due to an illness, we would leave this box unchecked to keep that student’s record in place instead of changing it to a field trip absence. Let’s leave this unchecked for our example. Let’s click Next. All the students that fit our selections from the previous screen display. We could uncheck any of the students if they will not be attending the field trip and will not be needing this attendance record added. We’ll leave them all selected and click Next. Here, we see a review screen of the same students along with additional information regarding parent notification and attendance-related information. Let’s run the process. The total successful records that were created or updated display, and we can click Done to complete the process. Processing field trip-related attendance records en masse can help speed up attendance entries in your system and ensure you know where your students will be going.
- Click Attendance Entry by Class/Activity/Range near the top right of the screen.Expected Result
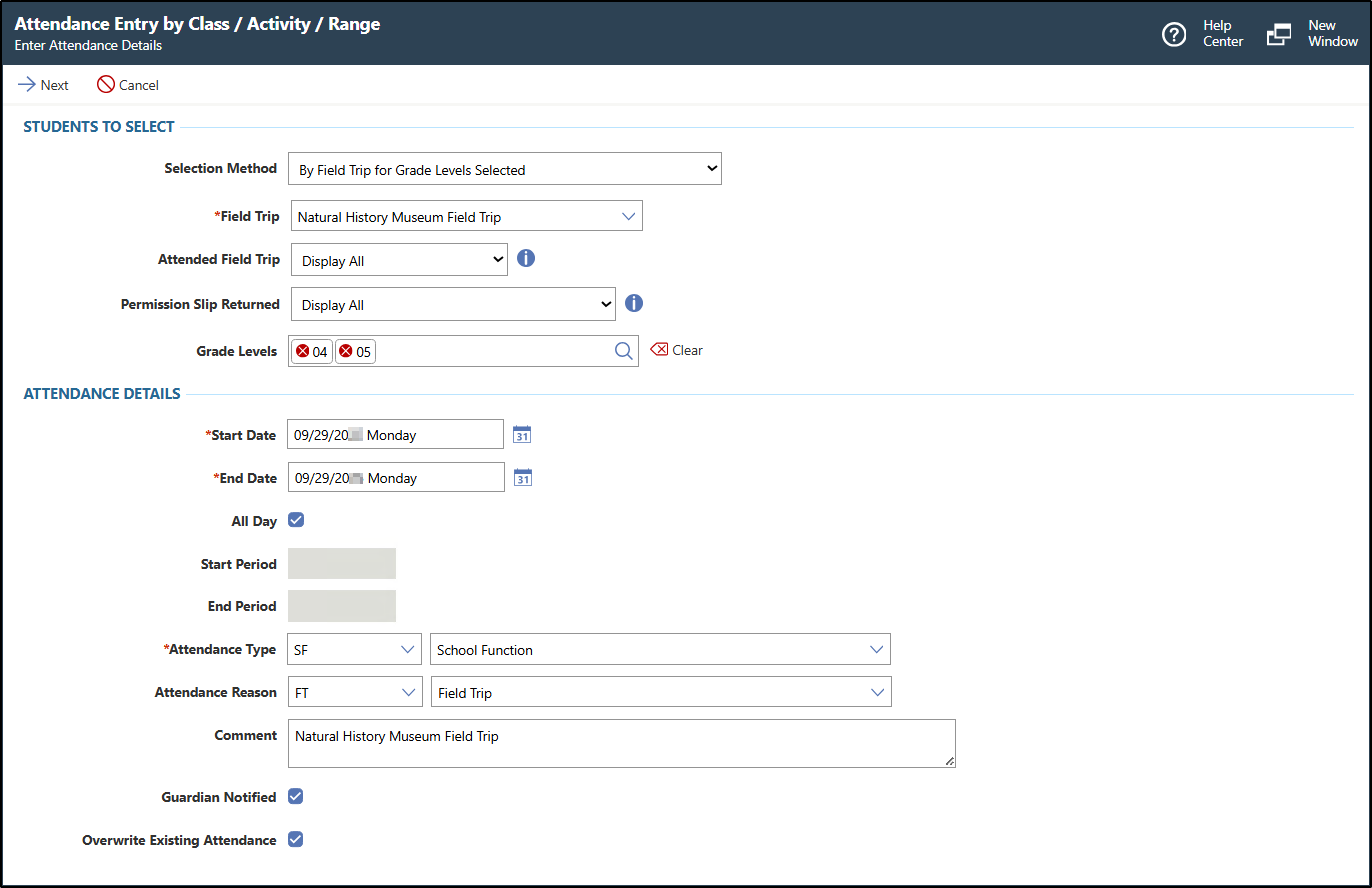
You see the Attendance Entry by Class / Activity / Range screen.
The image below displays an example of an attendance record being added for a natural history museum field trip for fourth and fifth grade students.
- Complete the appropriate fields.Step Information
You must complete required fields before you can save your work. Fields marked as Optional in the documentation are not required to complete.
- Click Next near the top left of the screen.Expected Result
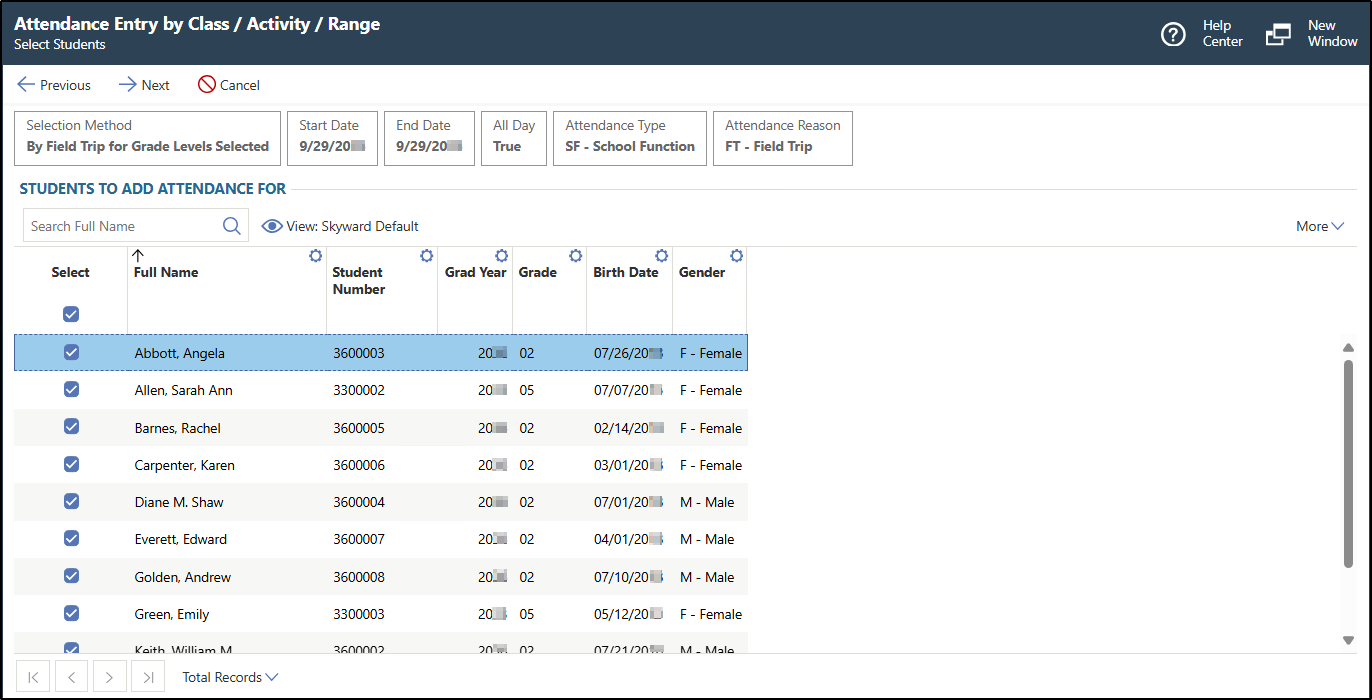
You see a list of students who fit the selection criteria from the previous screen.
The image below displays an example of students selected for attendance to be added for.
- Click Next near the top left of the screen.Expected Result
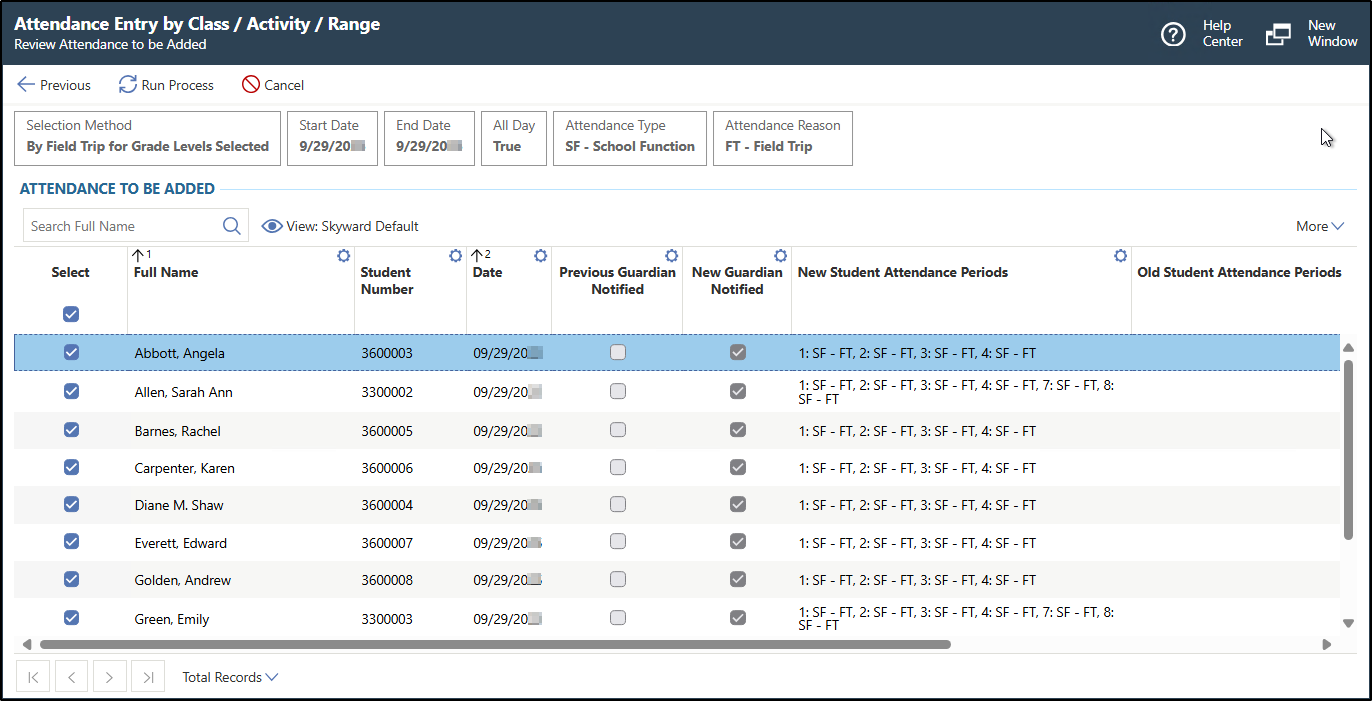
You see the student records to be created or updated, which includes details about any previous attendance records as well as the new details. This allows you to determine whether to overwrite the attendance records that currently exist for the students.
The image below displays an example of the student attendance records to be added.
- Click Next near the top left of the screen.