Processing Mass Add Attendance by Method of Instruction

The Attendance Entry by Class/Activity/Range feature enables you to enter the same attendance record for multiple students at once. For example, this would be useful if students with an in-person Method of Instruction were transitioning to a period of virtual learning and needed attendance records created accordingly.

Scroll past the video to access the step-by-step instructions.

Before you begin

Audio Transcript

If you ever need to enter the same attendance record for multiple students in the same grade who are all taught with the same method of instruction, you can use the Attendance Entry by Class/Activity/Range feature. To begin this process, we’ll navigate to the Attendance Entry by Class/Activity/Range feature located within the Attendance module. For this example, we’ll add attendance records for the in person high school students since they are going on a field trip, so we will first select By Method of Instruction for Grade Levels Selected as the Selection Method. Then, we’ll select In Person as the method of instruction to select students by. The date fields default as the current date, which we do not need to change for this example. Since this field trip will last all day, we will check the All Day box, and since this field trip is sponsored by the high school, we’ll select School Function as the Attendance Type. We’ll also select Field Trip as the Attendance Reason to further define the attendance records. Let’s select the Next option to proceed to the next screen, where we will see all the students whose attendance records will be updated. If we proceed to the next screen, we’ll see all the attendance records that will be added. Since we do not need to update any of these records, we will select Run Process to generate them. Now that you know how to process attendance records by method of instruction for grade levels, you can easily record attendance for students en masse.

If you ever need to enter the same attendance record for multiple students in the same grade who are all taught with the same method of instruction, you can use the Attendance Entry by Class/Activity/Range feature. To begin this process, we’ll navigate to the Attendance Entry by Class/Activity/Range feature located within the Attendance module. For this example, we’ll add attendance records for the in person high school students since they are going on a field trip, so we will first select By Method of Instruction for Grade Levels Selected as the Selection Method. Then, we’ll select In Person as the method of instruction to select students by. The date fields default as the current date, which we do not need to change for this example. Since this field trip will last all day, we will check the All Day box, and since this field trip is sponsored by the high school, we’ll select School Function as the Attendance Type. We’ll also select Field Trip as the Attendance Reason to further define the attendance records. Let’s select the Next option to proceed to the next screen, where we will see all the students whose attendance records will be updated. If we proceed to the next screen, we’ll see all the attendance records that will be added. Since we do not need to update any of these records, we will select Run Process to generate them. Now that you know how to process attendance records by method of instruction for grade levels, you can easily record attendance for students en masse.


  1. Select Menu > Administrative Access > Attendance.
  2. Select Attendance Entry by Class/Activity/Range under Features.
    Expected Result

    You see the Attendance Entry by Class/Activity/Range Run History List.

  3. Click Attendance Entry by Class/Activity/Range near the top right of the screen.
    Expected Result

    You see the Attendance Entry by Class / Activity / Range screen.

  4. Complete the appropriate fields.
    Step Information

    Required fields are identified with an asterisk. You must complete required fields before you can save your work.

    1. Under the Students to Select heading, select the By Method of Instruction for Grade Levels Selected option from the Selection Method drop-down list.
      Expected Result

      The Select Method of Instructions field displays.

    2. Enter one or more Methods Of Instruction in the Select Method of Instructions field or click the Magnifying Glass icon to choose from the drop-down list.
      Step Information

      You can click outside of the selection box once you have made your selections.

    3. Optional: Verify the Grade Levels or enter the correct grade levels.
      Step Information

      This field defaults based on the school's Grade Level Low and Grade Level High values, but can be modified if necessary. The only students who display on the subsequent screens are those in the grade levels you select.

      You can click outside of the selection box once you have made your selections.

    4. Under the Attendance Details heading, verify the Start Date or enter the correct date.
      Step Information

      This defaults to the current date, but can be modified as needed.

    5. Verify the End Date or enter the correct date.
      Step Information

      This defaults to the current date, but can be modified as needed.

      You can modify this field if the absence should span multiple days.

    6. Optional: Verify the box for All Day is checked or unchecked.
      Step Information

      You can use the All Day checkbox instead of using a start and end period for the attendance details. For example, if the seniors are going to be gone on an all-day field trip, the All Day checkbox can be used to add attendance records to each period that day. If students are going to be excused from only one period for a school function, then the Start Period and End Period can be used to signify which period will be missed.

      Expected Result

      When checked, the Start Period and End Period fields are disabled. Skip to sub-step i.

      If you did not check the box, continue to the next sub-step.

    7. Enter the Start Period
      Step Information

      This indicates the period when the attendance record should start.

    8. Enter the End Period.
      Step Information

      This indicates the period when the attendance record should end.

    9. Enter the Attendance Type.
      Step Information

      For example, you could enter Remote Present.

    10. Optional: Enter the Attendance Reason.
    11. Optional: Enter a Comment for the attendance record if you wish to track additional information about the attendance record.
      Step Information

      For example, you could enter "Students moving to eLearning."

    12. Optional: Verify the box for Guardian Notified is checked or unchecked.
      Step Information

      For example, if guardians typically have to be contacted regarding a change in the instructional setting, you would check this box.

      This field can be used as a filter on reports to only print records where the Guardian Notified box was not checked, so that office personnel can generate a list of guardians to call to confirm student absences.

    13. Optional: Verify the box for Overwrite Existing Attendance is checked or unchecked.
      Step Information

      When checked, any attendance records for the selected students and dates are changed. For example, if you previously entered an absence for a student to go to an appointment, but now the student is able to complete their work and still attend the appointment, you could check this box.

      When unchecked, any existing attendance records for the selected dates are not modified.
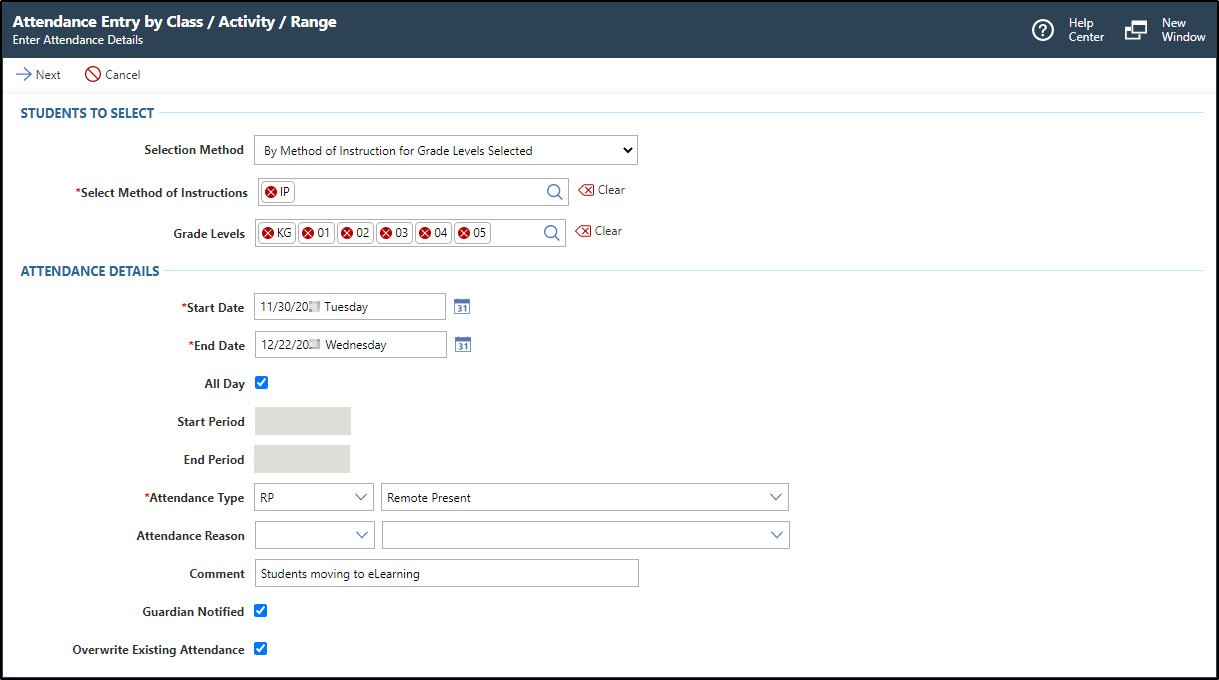
      Expected Result

      In the image below, the class attendance record details display an attendance record of Remote Present being added to students who have an In Person method of instruction from November 30 through December 22.

    14. Click Next near the top left of the screen.
      Expected Result

      You see a list of students who fit the selection criteria from the previous screen.

    15. Uncheck the box to the left of each student you do not wish to add attendance for.
      Step Information

      You can uncheck the box at the top of the Select column to uncheck all students. You can then select individual students you wish to include by checking the box to the left of their name.

    16. Click Next near the top left of the screen.
      Expected Result

      You see the student records to be created or updated, which includes details about any previous attendance records as well as the new details. This allows you to determine whether to overwrite the attendance records that currently exist for the students.

    17. Uncheck the box to the left of each student you do not wish to create or update attendance records for.
      Step Information

      You can uncheck the box at the top of the Select column to uncheck all students. You can then select individual students you wish to include by checking the box to the left of their name.

  5. Click Run Process near the top left of the screen.
    Step Information

    The system creates a run history record each time you process the Attendance Entry by Class/Activity/Range feature.

    If one or more errors exist after processing the feature, you can run the undo mass add attendance run process to revert all attendance records that were originally created with this process.

  6. Click Done near the top left of the screen.
    Expected Result

    You return to the screen you were previously on.

Result(s)

You have successfully recorded attendance for multiple students by method of instruction.