Configuring Attendance Letter Thresholds
Listed below are the sections for configuring attendance letters.
-
Creating Attendance Thresholds
-
Creating Attendance Letter Thresholds
Scroll past the video to access the step-by-step instructions.
Audio Transcript
Configuring attendance letter thresholds allows you to define the dates and number of periods that a student can miss before an attendance letter is generated. To begin the process, let’s head over to the Entity Group Year Configuration setting in the Attendance module. After selecting the Attendance Thresholds tab, we’ll add a new attendance threshold. Since this attendance threshold is being created for attendance letters, the Type option can be left as is. We can then add a description to define the threshold. Count types are methods used to calculate and track student attendance based on different criteria, such as the total number of missed periods, attendance by half or whole days, count based on a minimum number of periods missed in a day, absences in specific classes, or absences in specific periods. The Total count type calculates the total number of missed periods for the selected date range. Each missed period counts as one toward the attendance letter threshold. For example, if a student misses three days and each day has eight periods, the student has 24 total counts. Similarly, if a student misses the first and second periods 12 times, they also have 24 total counts. You would use this option when you want to track overall attendance without distinguishing between different periods or classes. The Total by Attendance Calculation count type calculates attendance based on the half-day and whole-day calculation set up in the calendar. For example, if the calendar is set up so that one to three missed periods count as a half-day absent and four or more missed periods count as a whole-day absent, the student has one day counted toward the attendance letter threshold if they miss three periods on two separate days or four or more periods on one day. We would use this option when you want to track attendance based on predefined calendar rules. The Total Minimum per Day count type uses the number of periods a student is marked with the selected attendance type in one day. If the number meets or exceeds the Number per Day value you set, the student meets the threshold. For example, if a student is absent for three periods in a day and the Number per Day is 3, the student has one day counted toward the attendance letter threshold. We would use this option when you want to ensure a minimum number of periods are missed in a day before counting it toward the threshold. The Class count type tracks the number of times a student is marked with the selected attendance type for a particular class. With this count type, the student can receive a letter for each class when the threshold is met for that class. We would use this option when you want to track attendance for specific classes individually. The Period count type tracks the number of times a student is marked with the selected attendance type for a particular period. With this count type, the student can receive a letter for each period when the threshold is met for that period. We would use this option when you want to track attendance for specific periods individually. Since this attendance threshold should be set up to count the total number of periods that a student is absent, the Count Type field can be left as is. Because we want this letter to count the total number of absences during the fourth quarter only, the Date Type field can be left as Date Range. We'll set our Date Low to the first day of quarter four, and our Date High to the last day of school, since we are configuring an attendance letter threshold for our schools fourth quarter. Only unexcused absences should be used for this example, so we'll select that attendance type in the Attendance Types to Count field. We could select additional attendance types if we want to classify any other attendance record to display on the letter. For our example since we are only using the absent unexcused attendance type we can leave this field as is. Let’s click Save & Add Threshold. Here, we can specify the Attachment Display Name Override, which is how the attendance letter will display in Family Access. We'll check the box for Repeatable so that each time the threshold is met, an additional letter is generated for the student. The Threshold field on this screen allows us to indicate the number of absences that a student must have for an attendance letter to be generated. In our case, we are looking for three days' worth of absences. Since a day in our entity is eight periods, we'll enter a threshold value of 24. If the Repeatable box was left unchecked, a separate threshold would need to be created for 48 periods missed if we wanted a letter generated at that time. The Attendance Letter Template is used to communicate attendance-related information, such as absences or tardiness, to parents, students, or employees, ensuring consistent messaging and documentation. This field defaults to the attendance letter template with the box for Default checked, but can be modified if necessary. If there is not a template available for your entity that is indicated as default, we must select a template. We can then select our Attendance Display Type. If we select Attendance Occurrences, the attendance letter displays a list containing details of each attendance record. Similarly, we could select Threshold Count Totals, if we want the attendance letter to display an overall count of the attendance records meeting the threshold. We could select Counts per Day, if we want the attendance letter to display a count of attendance records for each date where the student had attendance records. The Grid option, enables you to display the student's attendance details in a grid format. Since we want to print the details of each attendance record, the Attendance Display Type field can be left as Attendance Occurrences. If we select None, the report does not contain details about the student’s attendance. We don’t want to include any attendance records over the threshold of 24, so the Include Attendance Over Threshold box can be left unchecked. Moving on, the Language field can be used to indicate the default language that the letter should print in. We can note that English is currently the default language because the Default box is checked. In our case, this is correct. The Greeting field allows us to determine how the attendance letter will be addressed to guardians. This defaults as Dear Parent(s)/Guardian(s) and can be left as is for our example. The body of our letter is the main section of what the letter should say. Let’s enter a message into this field now. We could choose to include a link with this letter if necessary. A message can be entered into the Footer field. Let’s note that guardians can contact their child’s school if they have any questions for the purposes of this video. If necessary, we could use the Insert Field option to pull in a value from the database to customize the letter to each guardian. It’s important to note that this option can be used in our Greeting, Body, and Footer areas of the letter to insert fields as needed. Let’s preview what our letter will look like by selecting the Preview Letter Content option. We have the option to add a translation if we want this letter to be available in a second language. We can click the Add Translation option and repeat these steps as necessary. For the purposes of this video, we won’t be adding a translation. Lastly, we don’t want a discipline record to be created when an attendance letter is generated for a student, so we can leave this box unchecked. Once finished, we can click Save to complete the process. Now that you know how to configure attendance letter thresholds, you can be sure attendance letters are only generated based on the criteria you set.
Configuring attendance letter thresholds allows you to define the dates and number of periods that a student can miss before an attendance letter is generated. To begin the process, let’s head over to the Entity Group Year Configuration setting in the Attendance module. After selecting the Attendance Thresholds tab, we’ll add a new attendance threshold. Since this attendance threshold is being created for attendance letters, the Type option can be left as is. We can then add a description to define the threshold. Count types are methods used to calculate and track student attendance based on different criteria, such as the total number of missed periods, attendance by half or whole days, count based on a minimum number of periods missed in a day, absences in specific classes, or absences in specific periods. The Total count type calculates the total number of missed periods for the selected date range. Each missed period counts as one toward the attendance letter threshold. For example, if a student misses three days and each day has eight periods, the student has 24 total counts. Similarly, if a student misses the first and second periods 12 times, they also have 24 total counts. You would use this option when you want to track overall attendance without distinguishing between different periods or classes. The Total by Attendance Calculation count type calculates attendance based on the half-day and whole-day calculation set up in the calendar. For example, if the calendar is set up so that one to three missed periods count as a half-day absent and four or more missed periods count as a whole-day absent, the student has one day counted toward the attendance letter threshold if they miss three periods on two separate days or four or more periods on one day. We would use this option when you want to track attendance based on predefined calendar rules. The Total Minimum per Day count type uses the number of periods a student is marked with the selected attendance type in one day. If the number meets or exceeds the Number per Day value you set, the student meets the threshold. For example, if a student is absent for three periods in a day and the Number per Day is 3, the student has one day counted toward the attendance letter threshold. We would use this option when you want to ensure a minimum number of periods are missed in a day before counting it toward the threshold. The Class count type tracks the number of times a student is marked with the selected attendance type for a particular class. With this count type, the student can receive a letter for each class when the threshold is met for that class. We would use this option when you want to track attendance for specific classes individually. The Period count type tracks the number of times a student is marked with the selected attendance type for a particular period. With this count type, the student can receive a letter for each period when the threshold is met for that period. We would use this option when you want to track attendance for specific periods individually. Since this attendance threshold should be set up to count the total number of periods that a student is absent, the Count Type field can be left as is. Because we want this letter to count the total number of absences during the fourth quarter only, the Date Type field can be left as Date Range. We'll set our Date Low to the first day of quarter four, and our Date High to the last day of school, since we are configuring an attendance letter threshold for our schools fourth quarter. Only unexcused absences should be used for this example, so we'll select that attendance type in the Attendance Types to Count field. We could select additional attendance types if we want to classify any other attendance record to display on the letter. For our example since we are only using the absent unexcused attendance type we can leave this field as is. Let’s click Save & Add Threshold. Here, we can specify the Attachment Display Name Override, which is how the attendance letter will display in Family Access. We'll check the box for Repeatable so that each time the threshold is met, an additional letter is generated for the student. The Threshold field on this screen allows us to indicate the number of absences that a student must have for an attendance letter to be generated. In our case, we are looking for three days' worth of absences. Since a day in our entity is eight periods, we'll enter a threshold value of 24. If the Repeatable box was left unchecked, a separate threshold would need to be created for 48 periods missed if we wanted a letter generated at that time. The Attendance Letter Template is used to communicate attendance-related information, such as absences or tardiness, to parents, students, or employees, ensuring consistent messaging and documentation. This field defaults to the attendance letter template with the box for Default checked, but can be modified if necessary. If there is not a template available for your entity that is indicated as default, we must select a template. We can then select our Attendance Display Type. If we select Attendance Occurrences, the attendance letter displays a list containing details of each attendance record. Similarly, we could select Threshold Count Totals, if we want the attendance letter to display an overall count of the attendance records meeting the threshold. We could select Counts per Day, if we want the attendance letter to display a count of attendance records for each date where the student had attendance records. The Grid option, enables you to display the student's attendance details in a grid format. Since we want to print the details of each attendance record, the Attendance Display Type field can be left as Attendance Occurrences. If we select None, the report does not contain details about the student’s attendance. We don’t want to include any attendance records over the threshold of 24, so the Include Attendance Over Threshold box can be left unchecked. Moving on, the Language field can be used to indicate the default language that the letter should print in. We can note that English is currently the default language because the Default box is checked. In our case, this is correct. The Greeting field allows us to determine how the attendance letter will be addressed to guardians. This defaults as Dear Parent(s)/Guardian(s) and can be left as is for our example. The body of our letter is the main section of what the letter should say. Let’s enter a message into this field now. We could choose to include a link with this letter if necessary. A message can be entered into the Footer field. Let’s note that guardians can contact their child’s school if they have any questions for the purposes of this video. If necessary, we could use the Insert Field option to pull in a value from the database to customize the letter to each guardian. It’s important to note that this option can be used in our Greeting, Body, and Footer areas of the letter to insert fields as needed. Let’s preview what our letter will look like by selecting the Preview Letter Content option. We have the option to add a translation if we want this letter to be available in a second language. We can click the Add Translation option and repeat these steps as necessary. For the purposes of this video, we won’t be adding a translation. Lastly, we don’t want a discipline record to be created when an attendance letter is generated for a student, so we can leave this box unchecked. Once finished, we can click Save to complete the process. Now that you know how to configure attendance letter thresholds, you can be sure attendance letters are only generated based on the criteria you set.
- To create attendance thresholds, complete the following sub-steps.Step InformationCreating an attendance Threshold enables you to set a range or number of dates the attendance letter thresholds apply to. Typically, the attendance threshold dates match the dates for each Attendance Term or the start and end of the school year.
- Click Add Attendance Threshold near the top right of the screen.
Expected Result
You see the Add Attendance Threshold screen.
You must complete required fields before you can save your work. Fields marked as Optional in the documentation are not required to complete.
The image below displays example information for an attendance threshold with a Type of "Attendance Letter" to count for unexcused absence attendance types.
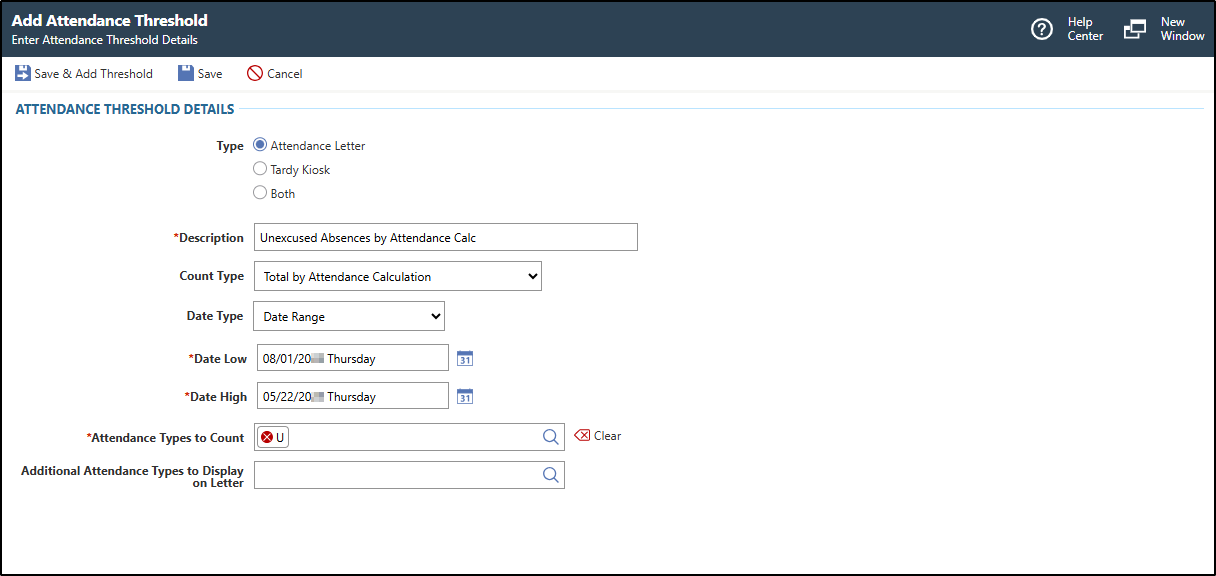
Option Description Save & Add Threshold Saves the attendance threshold and you see the Add Threshold screen. Skip to step 2, sub-step g.
Save Saves your changes and you return to the Attendance Thresholds tab of the Entity Group Year Configuration Details screen. You can add a threshold at a later time. Expected ResultYou have successfully created an attendance threshold.
- Click Add Attendance Threshold near the top right of the screen.
- To create attendance letter thresholds, complete the following sub-steps.Step Information
Creating an attendance letter threshold enables you to set a maximum number of absences or tardies a student can have before an attendance letter is generated.
Before you begin, attendance letter templates must exist.
- Optional: Under the Threshold Details heading, enter an Attachment Display Name Override.Step Information
This determines how the attendance notification will display in Family Access. For example, if you wish for the letter regarding attendance threshold information to have a different attachment display name when you run attendance letters than the attachment name for the rest of the letters included in the attendance letter run, you would enter a name in this field.
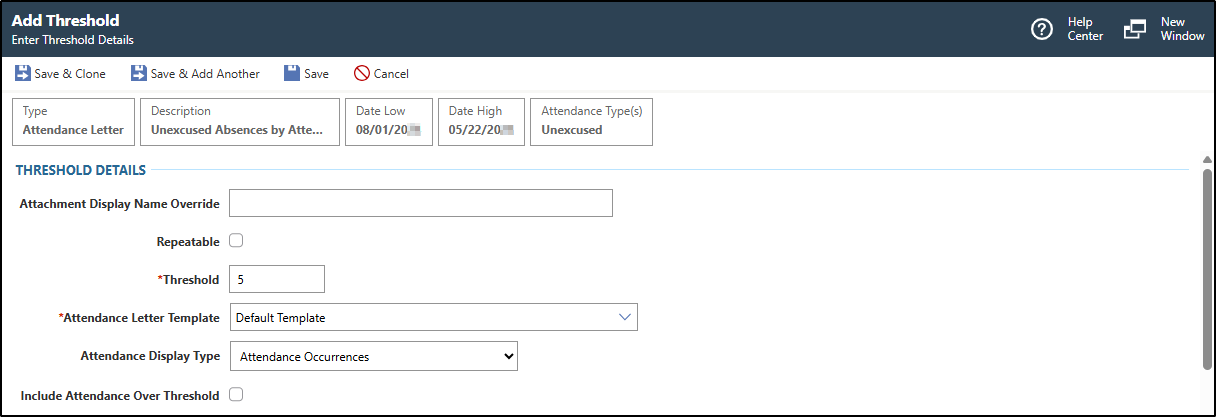
- Under the Attendance Letter Content heading, in the Translation area, verify the Language or enter the correct language.Step Information
This defaults to English, but can be modified if necessary. This identifies the translation language of the attendance letter.
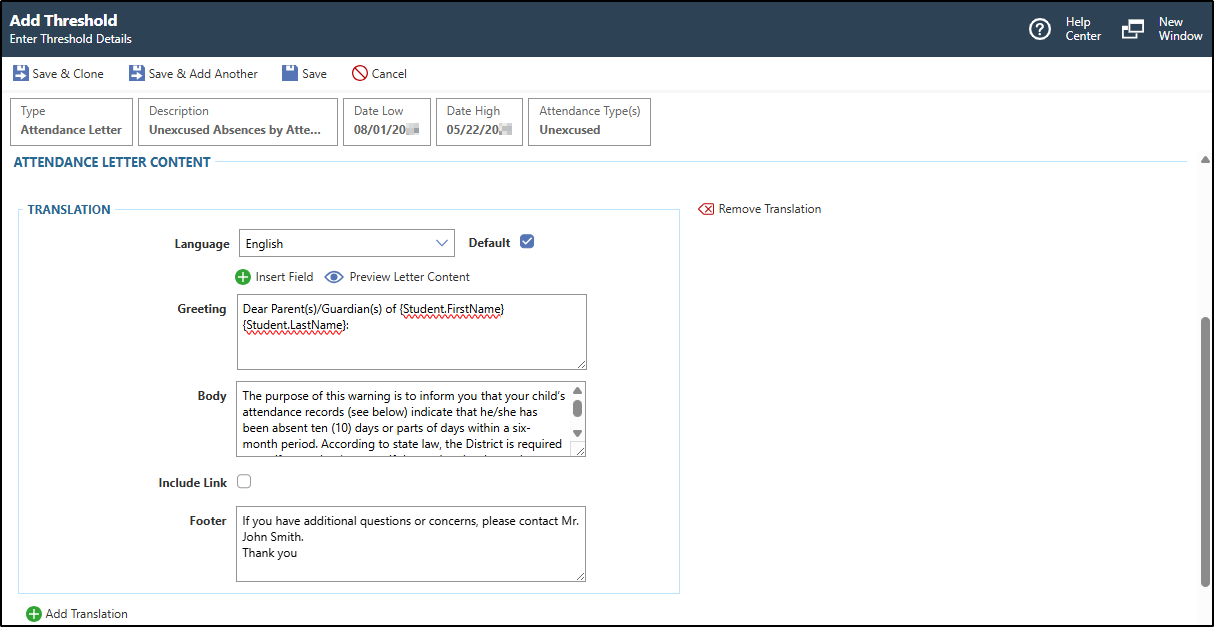
Option Description Save & Clone Saves the threshold and the Add Threshold screen refreshes to display details you entered. This is helpful if you wish to create multiple attendance letter thresholds with different information in the attendance letters based on the threshold being met. The fields default based on the threshold you created and cloned. Refer to step 2, sub-step g as necessary. Save & Add Another Saves the threshold and the Add Threshold screen refreshes so you can add another. Save Saves the threshold and you return to the Attendance Thresholds tab of the Entity Group Year Configuration Details screen, which displays the threshold you created under the Attendance Thresholds heading. Expected ResultYou have successfully created an attendance letter threshold.
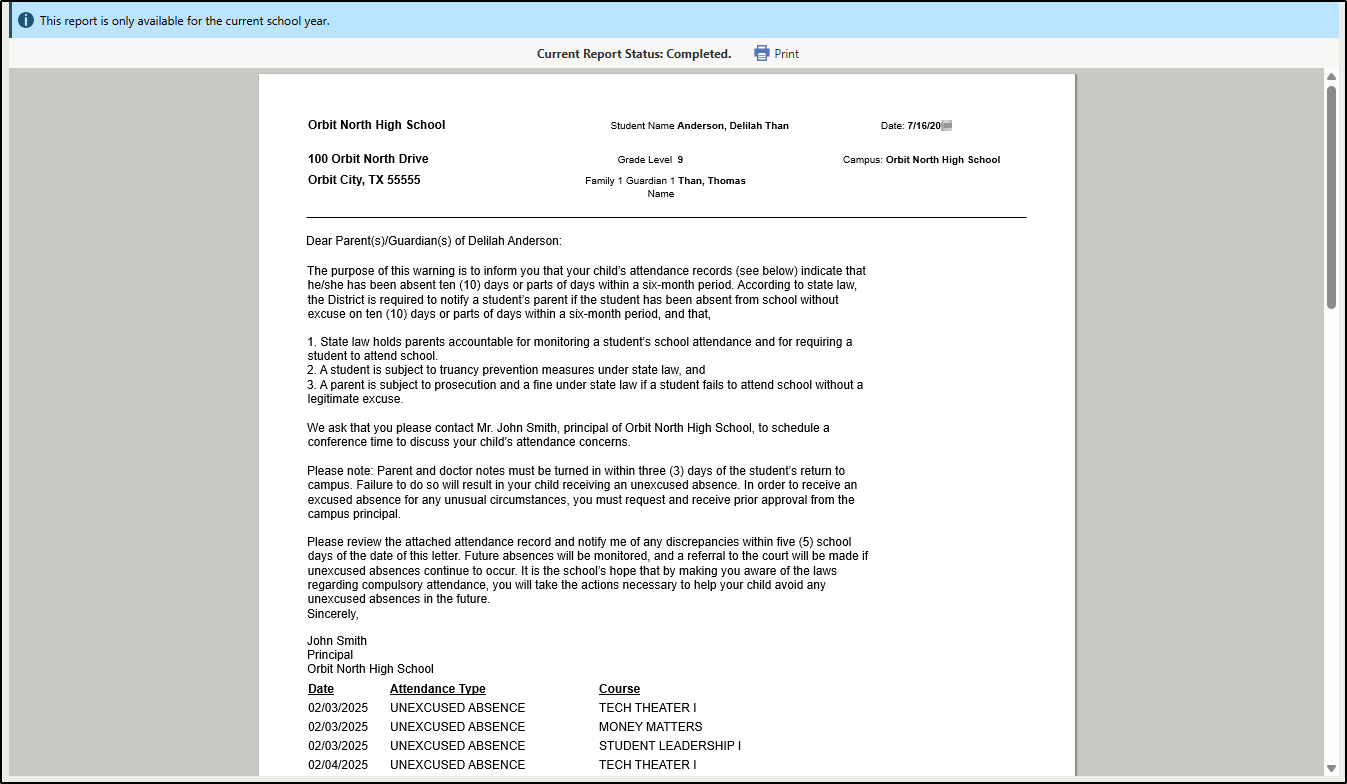
The image below displays an example of an attendance letter that a guardian would see in Family Access when a student meets an attendance letter threshold.
- Optional: Under the Threshold Details heading, enter an Attachment Display Name Override.
Result(s)
You have successfully created an attendance threshold and an attendance letter threshold.