Configuring Discipline Records Based Upon Attendance Letters
Configuring discipline records based on attendance letters enables administrators who manage attendance information to determine whether a discipline record should be created when a student meets the threshold already determined in the attendance threshold record.
Scroll past the video to access the step-by-step instructions.
Before you begin
-
A threshold must already exist.
-
Verify you are in the correct Entity and school year by checking the information at the top left of the screen.
Audio Transcript
Configuring records based on attendance letters allows you to determine whether a discipline record should be created when a student meets the threshold determined in the attendance threshold record. Let’s begin by navigating to the Entity Group Year Configuration setting within the Attendance module. Within the Attendance Thresholds tab, we’ll open the attendance threshold we want to configure discipline records for. Let’s scroll down to view the current thresholds attached to this attendance threshold. We’ll open the desired threshold now. We see the threshold details and can scroll down. Under the Discipline Details heading, we’ll check the box for Create Discipline Record. We’ll scroll down again to view more fields. Within the Offense field, we need to select the offense that the student committed. Next, let’s enter an incident description to further define the incident. If a student uses the Tardy Kiosk and a tardy slip is created, and they also hit a threshold that creates a discipline record, the message we enter in the Discipline Slip Comment field will print as the first line within the discipline slip below the tardy slip. Let’s enter a comment now. Let’s check the Generate Action box and then scroll down. In the Action field, we’ll specify the action the student needs to serve. For this example, we’ll choose detention. We’ll select the individual or staff member for the Staff Authorized By field now. Let’s also specify the total hours students must serve their detention within the Duration to Serve field. Within the Incident Action Detail Comment field, we can enter a comment to specify the details of the action and how the student should serve. The Generate Action Detail box can be checked so we can assign specific detention days. We’ll scroll down to see more fields. Let’s indicate the total hours students must serve per day within the Duration to Serve per Day field. Students must serve their detention after school, so let’s enter 4:00 p.m. for the Serving Time field. Students can serve their detention during any day of the week, so let’s check the boxes for Monday through Friday. Students also have the option to serve their detention today, so let’s check the Allow Discipline on Current Day box. We’ll specify the location students must serve. They can only serve their detention within the 401 entity, so let’s indicate that in the Serving Building field. Let’s indicate the specific room detention will be held in. Once we’ve completed all our configurations, we can click Save Changes. Now that you know how to configure discipline records based upon attendance letters, you can ensure that when students meet specific attendance thresholds, discipline records will be created.
Configuring records based on attendance letters allows you to determine whether a discipline record should be created when a student meets the threshold determined in the attendance threshold record. Let’s begin by navigating to the Entity Group Year Configuration setting within the Attendance module. Within the Attendance Thresholds tab, we’ll open the attendance threshold we want to configure discipline records for. Let’s scroll down to view the current thresholds attached to this attendance threshold. We’ll open the desired threshold now. We see the threshold details and can scroll down. Under the Discipline Details heading, we’ll check the box for Create Discipline Record. We’ll scroll down again to view more fields. Within the Offense field, we need to select the offense that the student committed. Next, let’s enter an incident description to further define the incident. If a student uses the Tardy Kiosk and a tardy slip is created, and they also hit a threshold that creates a discipline record, the message we enter in the Discipline Slip Comment field will print as the first line within the discipline slip below the tardy slip. Let’s enter a comment now. Let’s check the Generate Action box and then scroll down. In the Action field, we’ll specify the action the student needs to serve. For this example, we’ll choose detention. We’ll select the individual or staff member for the Staff Authorized By field now. Let’s also specify the total hours students must serve their detention within the Duration to Serve field. Within the Incident Action Detail Comment field, we can enter a comment to specify the details of the action and how the student should serve. The Generate Action Detail box can be checked so we can assign specific detention days. We’ll scroll down to see more fields. Let’s indicate the total hours students must serve per day within the Duration to Serve per Day field. Students must serve their detention after school, so let’s enter 4:00 p.m. for the Serving Time field. Students can serve their detention during any day of the week, so let’s check the boxes for Monday through Friday. Students also have the option to serve their detention today, so let’s check the Allow Discipline on Current Day box. We’ll specify the location students must serve. They can only serve their detention within the 401 entity, so let’s indicate that in the Serving Building field. Let’s indicate the specific room detention will be held in. Once we’ve completed all our configurations, we can click Save Changes. Now that you know how to configure discipline records based upon attendance letters, you can ensure that when students meet specific attendance thresholds, discipline records will be created.
- Under the Discipline Details heading, verify the box for Create Discipline Record is checked.Step Information
You must check the box in order to configure discipline records based on attendance letters.
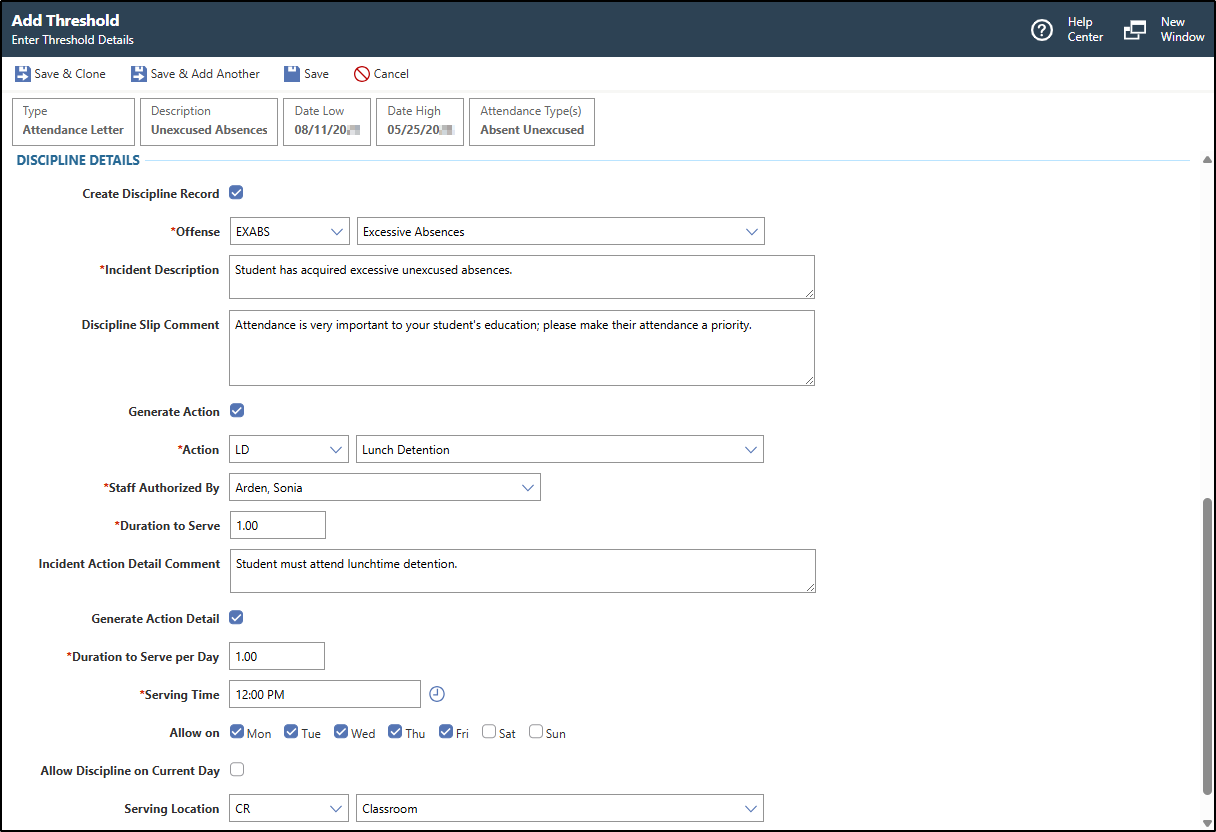
The image below displays example information for creating an incident record with a lunch detention action for a student when they meet the threshold.
 Expected Result
When checked, the Offense, Incident Description, Discipline Slip Comment, and Generate Action fields display.