Configuring Tardy Kiosk Thresholds

Configuring tardy kiosk thresholds within an attendance Threshold allows administrators who manage attendance information to keep track of students' tardy attendance records over a range of dates. You must first create an attendance Threshold to identify the date range during which student attendance should be analyzed, and to determine the Attendance Type or types that will count towards the threshold. Once you specify an attendance threshold, you can add tardy kiosk thresholds to determine the range or number of tardies a student can accumulate before reaching the threshold, as well as if disciplinary action should be assigned to the student. Using attendance thresholds in conjunction with the Tardy Kiosk creates a tardy count that pulls onto the tardy slips that are generated when a student checks in as tardy, and allows discipline records to automatically generate when a student meets the threshold if the discipline details are configured.
When setting up the discipline details within a threshold, you can determine the Offense a student should receive after reaching the attendance threshold, and the Action that should be taken for the offense. Setting up the system to automatically generate a discipline record and action detail is an optional but efficient way to keep track of attendance related offenses and actions. Then, when a student reaches the attendance threshold, the system can automatically create an Incident record for the student based on the discipline details you configured on the threshold. For example, you could create an attendance threshold for the attendance type of Tardy. You could then create a threshold low of 5 and a high of 8, with an excessive tardy offense and a detention action. In this example, for students who receive between five and eight tardy attendance records, the system automatically generates an incident record for them to serve a detention.
Listed below are the sections for creating tardy kiosk thresholds.
  • Creating Attendance Thresholds

  • Creating Tardy Kiosk Thresholds

  1. To create attendance thresholds, complete the following sub-steps.
    Step Information
    1. Verify you are in the correct Entity and school year by checking the information at the top left of the screen.
    2. Select Menu > Administrative Access > Attendance.
    3. Select Entity Group Year Configuration under Settings.
      Expected Result

      You see the General tab of the Entity Group Year Configuration Details screen.

    4. Select the Attendance Thresholds tab at the left of the screen.
      Expected Result

      You see existing attendance thresholds.

    5. Click Add Attendance Threshold near the top right of the screen.
      Expected Result

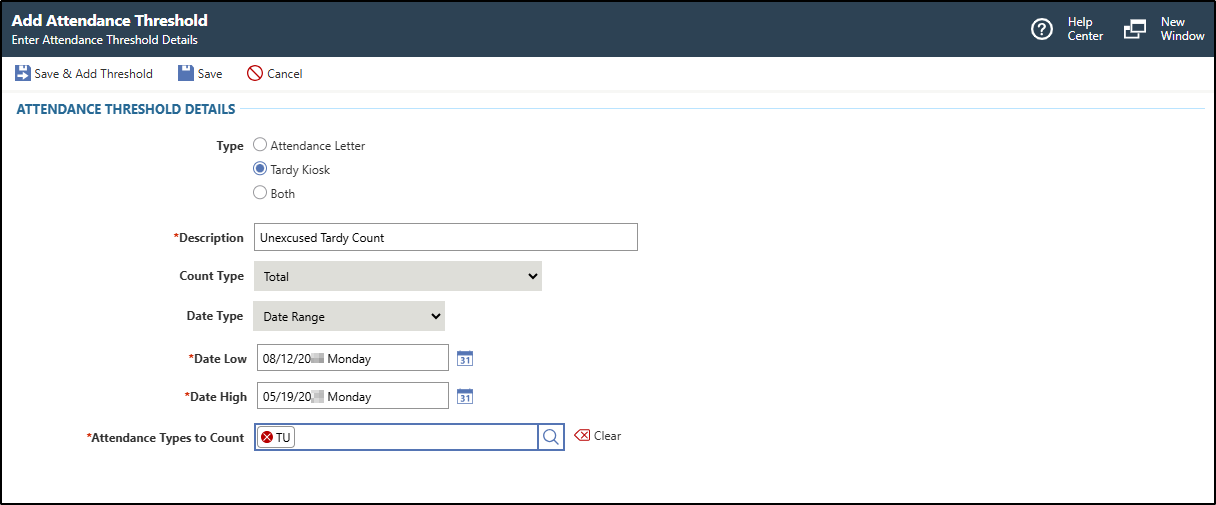
      You see the Add Attendance Threshold screen.

      The image below displays example information for an attendance threshold with a Type of "Tardy Kiosk" to count for unexcused tardy attendance types.

      You must complete required fields before you can save your work. Fields marked as Optional in the documentation are not required to complete.

    6. Select the Tardy Kiosk radio button for the Type.
      Step Information

      If you wish to add a threshold that can be used by both the tardy kiosk and attendance letters, you can follow the steps in the Configuring Attendance Letters topic.

      Expected Result

      When selected, the Count Type and Date Type fields are disabled, and the Additional Attendance Types to Display on Letter field no longer displays.

    7. Enter a Description for the attendance threshold.
      Step Information

      For example, you could enter "Unexcused Tardy Count".

    8. Verify the Count Type is correct.
      Step Information

      This defaults to Total and cannot be modified.

      The Total type calculates the total of the Attendance Type you specify for the date range on the attendance threshold. Each individual period the student is marked tardy for will count as one toward the tardy kiosk threshold.
    9. Verify the Date Type is correct.
      Step Information

      This defaults to Date Range and cannot be modified.

    10. Enter the Date Low or click the Calendar 31 icon to choose a date using the calendar.
      Step Information
      This is the earliest date an attendance record can have in order for students' records to count towards meeting the attendance threshold. Typically, this date would be the start date of each Attendance Term or the start date of the school year.
    11. Enter the Date High or click the Calendar 31 icon to choose a date using the calendar.
      Step Information

      This is the latest date an attendance record can have in order for students' records to count towards meeting the attendance threshold. Typically, this date would be the end date of each attendance term or the end date of the school year.

    12. Enter one or more Attendance Types to Count or click the Magnifying Glass icon to choose from the drop-down list.
      Step Information

      For example, if you are configuring an attendance threshold specifically for tardy attendance records, you would enter the Tardy attendance type. You should enter the attendance type that is configured to be used by the tardy kiosk, which can be located on the Tardy Kiosk tab within the Entity Group Year Configuration in the Attendance module.

      You can click outside of the selection box once you have made your selections.

    13. Choose one of the options near the top left of the screen to save your work.
    OptionDescription
    Save & Add ThresholdSaves the attendance threshold and you see the Add Threshold screen. Skip to step 2 sub-step g.
    SaveSaves your changes and you return to the Attendance Thresholds tab of the Entity Group Year Configuration Details screen. You can add a threshold at a later time.
    Expected Result

    You have successfully created an attendance threshold.

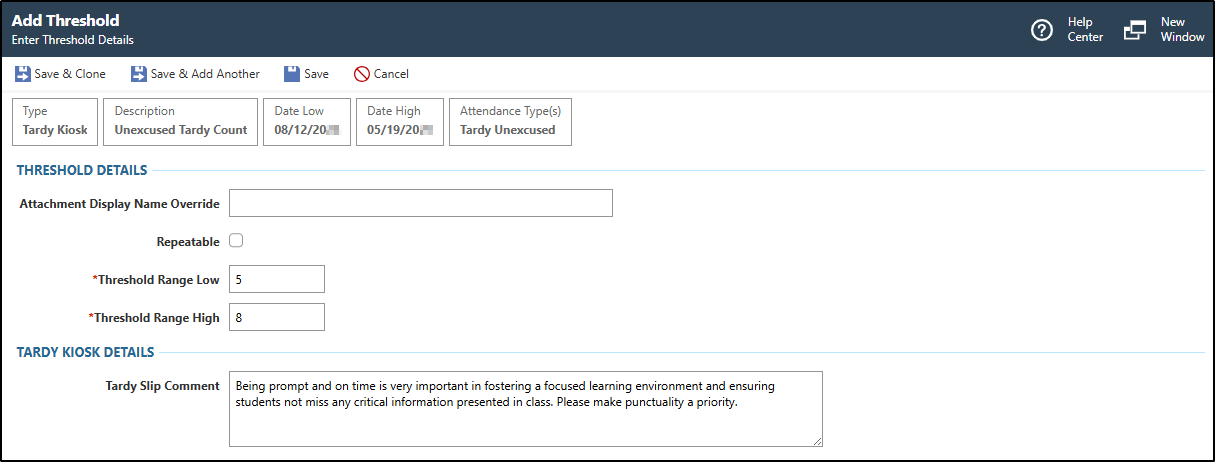
  2. To create tardy kiosk thresholds, complete the following sub-steps.
    Step Information
    Creating a tardy kiosk Threshold enables you to set the number of tardies students must have before they reach the threshold, and before a discipline record is generated if you configure discipline details. Multiple tardy kiosk thresholds can be created for the same attendance threshold. This allows you to issue additional or different discipline actions as a student receives more tardy records.
    1. Verify you are in the correct Entity and school year by checking the information at the top left of the screen.
    2. Select Menu > Administrative Access > Attendance.
    3. Select Entity Group Year Configuration under Settings.
      Expected Result

      You see the General tab of the Entity Group Year Configuration Details screen.

    4. Select the Attendance Thresholds tab at the left of the screen.
      Expected Result

      You see existing attendance thresholds.

    5. Click the Open icon to the left of the attendance threshold you wish to add a tardy kiosk threshold to.
      Step Information

      You must select a record that has a Type of "Tardy Kiosk". If you wish to add a threshold that can be used by both the tardy kiosk and attendance letters, you can follow the steps in the Configuring Attendance Letters topic.

      Expected Result

      You see the General tab of the Attendance Threshold screen.

    6. Under the Thresholds heading, click Add Threshold near the right of the screen.
      Expected Result

      You see the Add Threshold screen.

      You must complete required fields before you can save your work. Fields marked as Optional in the documentation are not required to complete.

    7. Optional: Under the Threshold Details heading, verify the Attachment Display Name Override is blank.
      Step Information

      This field has no effect when the attendance threshold has a Type of "Tardy Kiosk".

      The threshold details displays example information for a threshold range between five and eight for unexcused tardies.
    8. Optional: Verify the box for Repeatable is checked or unchecked.
      Step Information
      This indicates whether the threshold can be met multiple times. For example, if you configure the creation of discipline records based on the threshold and the box for Repeatable is checked, then each time the threshold is met, another discipline record will be generated for the student or students. For example, if the attendance threshold count is based on an Attendance Type of T - Tardy, and the threshold is five, a discipline incident record each time they reach five periods with a tardy attendance record.
      Expected Result

      If you checked the box, the Threshold Range Low and Threshold Range High fields no longer display. Additionally, the Threshold fields displays. Continue to the next sub-step.

      If you did not check the box, skip to sub-step j.

    9. Enter the Threshold.
      Step Information

      This is the number of tardies that triggers the tardy slip notification or discipline record. Skip to sub-step l.

    10. Enter the Threshold Range Low for the tardy kiosk threshold.
      Step Information

      For example, you could enter 5 to indicate the student has met the tardy kiosk threshold once they have five counts of the attendance types attached on the attendance threshold.

    11. Enter the Threshold Range High for the tardy kiosk threshold.
      Step Information

      For example, you could enter 8 to indicate for each count of the selected attendance types between five and eight, the student will meet the tardy kiosk threshold. In this example, once the student has passed eight tardy occurrences, this threshold no longer applies. This enables you to set up additional thresholds with more severe discipline actions as a student receives more tardy records.

    12. Optional: Under the Tardy Kiosk Details heading, enter a Tardy Slip Comment.
      Step Information

      This is the message that prints on the tardy slip when a student is marked as tardy by the tardy kiosk. For example, you could enter "Being prompt and on time is very important in fostering a focused learning environment and ensuring students not miss any critical information presented in class. Please make punctuality a priority."

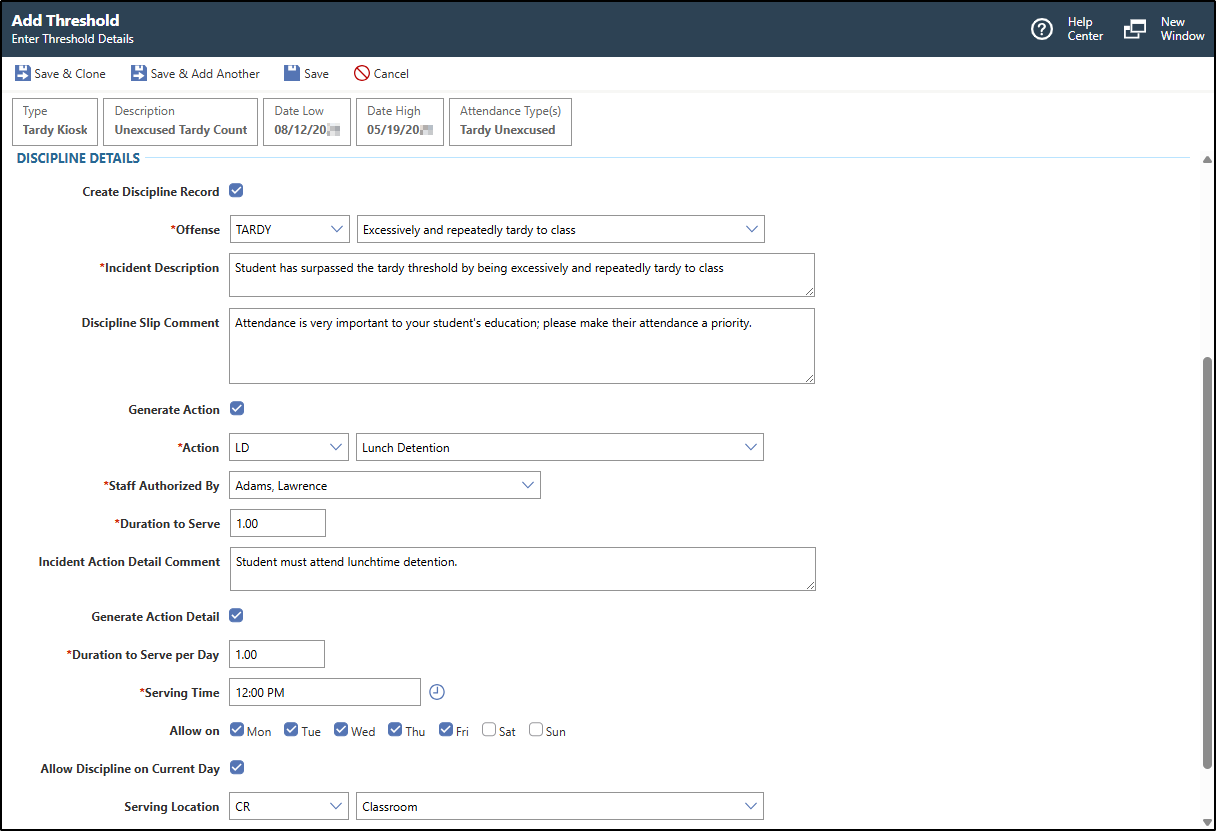
    13. Optional: Under the Discipline Details heading, verify the box for Create Discipline Record is checked or unchecked.
      Step Information

      When checked, an incident record will be automatically created for a student when they meet the threshold based on the discipline details you configure for the threshold.

      You would leave this box unchecked if you do not wish to create a discipline record when the student acquires a number of tardies that falls within the attendance threshold. For example, if you use attendance thresholds only for the purpose of counting tardies and generating tardy slip notifications with no disciplinary action, you would leave this box unchecked.

      The image below displays example information for creating an incident record with a lunch detention action for a student when they meet the threshold.

      Expected Result

      When checked, the Offense, Incident Description, Discipline Slip Comment, and Generate Action fields display. Continue to the next sub-step.

      If you do not check the box, skip to sub-step ad.

    14. Enter the Offense or click the Down Arrow icon to choose from the drop-down list.
      Step Information

      For example, you could enter TARDY.

    15. Enter the Incident Description.
      Step Information

      For example, you could enter "Student has surpassed the tardy threshold by being excessively and repeatedly tardy to class."

    16. Optional: Enter the Discipline Slip Comment.
      Step Information

      This is a message for the student's guardian. For example, you could enter "Attendance is very important to your student's education; please make their attendance a priority."

    17. Optional: Verify the box for Generate Action is checked or unchecked.
      Step Information

      You would check the box if you wish for an action to be attached to the discipline record that is generated when the student reaches the threshold.

      Expected Result

      If you checked the box, the Action, Staff Authorized By, Duration to Serve, Incident Action Detail Comment, and Generate Action Detail fields display.

      If you did not check the box, skip to sub-step ad.

    18. Enter the Action or click the Down Arrow icon to choose from the drop-down list.
      Step Information

      For example, you could enter Lunch Detention.

    19. Enter the individual for the Staff Authorized By field or click the Down Arrow icon to choose from the drop-down list.
      Step Information

      This identifies the staff member who authorized the action that will generate when the discipline records are created. For example, you could enter a discipline officer within your school.

    20. Verify the Duration to Serve or enter the correct amount.
      Step Information

      This field defaults based on the default duration set up on the Action code you selected but can be modified if necessary. This identifies the length of time the student must serve for the action.

    21. Optional: Enter the Incident Action Detail Comment.
      Step Information

      This field can be used to specify the details of the action and how it is served.

    22. Optional: Verify the box for Generate Action Detail is checked or unchecked.
      Step Information

      For example, you could leave this box unchecked if a discipline officer must review the action before a date is assigned for the action to be served. Alternatively, if a date detail should automatically be assigned to the action for students to serve, you would check this box .

      Expected Result

      When checked, the Duration to Serve per Day, Serving Time, Allow on, Allow Discipline on Current Day, Serving Location, and Serving Building fields display. Continue to the next sub-step.

      If you did not check the box, skip to sub-step ad.

    23. Enter the Duration to Serve per Day.
      Step Information

      This identifies the length of time the student must serve each day for the action.

    24. Enter the Serving Time or click the Clock icon to enter the current time.
      Step Information

      This indicates the time at which the student must serve their action. For example, if the student must serve an action of Lunch Detention at noon, you could enter 12:00 PM.

    25. Optional: Verify the box or boxes for each day the action can be served for are checked or unchecked in the Allow on field.
      Step Information

      For example, if the action can be served Monday through Wednesday, you would check the boxes for Monday, Tuesday, and Wednesday.

    26. Optional: Verify the box for Allow Discipline on Current Day is checked or unchecked.
      Step Information

      You would check this box if you wish for the action to be able to be assigned and served on the same day the student meets the threshold. For example, if a student is marked as tardy at 8:00 AM and meets the tardy threshold, and you configured a discipline action of Lunch Detention to be assigned a Serving Time of 12:00PM on the tardy kiosk threshold, the student could be assigned the action detail to serve their lunch detention on the same day.

    27. Optional: Enter the Serving Location or click the Down Arrow icon to choose from the drop-down list.
      Step Information

      This indicates the location where the student must serve the action. For example, you could enter Classroom.

    28. Optional: Enter the Serving Building or click the Down Arrow icon to choose from the drop-down list.
      Step Information

      This indicates the building where the student must serve the action. For example, you could enter School Building.

      Expected Result

      Entering a building displays the Serving Room field. Continue to the next sub-step.

      If you did not enter a serving building, skip to sub-step ad.

    29. Optional: Enter the Serving Room or click the Down Arrow icon to choose from the drop-down list.
      Step Information

      This indicates the specific room where the student must serve the action. For example, you could enter Detention Room 112.

    30. Choose one of the options near the top left of the screen to save your work.
    OptionDescription
    Save & CloneSaves the threshold and the Add Threshold screen refreshes to display details you entered. This is helpful if you wish to create different levels of tardy kiosk thresholds that contain similar information. The fields default based on the threshold you created and cloned. Refer to step 2, sub-step g as necessary.
    Save & Add AnotherSaves the threshold and the Add Threshold screen refreshes so you can add another.
    SaveSaves the threshold and you return to the Attendance Threshold screen, which displays the threshold you created under the Thresholds heading.
    Expected Result

    You have successfully created a tardy kiosk threshold.

Result(s)

You have successfully created attendance thresholds and tardy kiosk thresholds.