Configuring Tardy Kiosk

You can configure a tardy kiosk to record attendance for students who arrive to school late. Once you set up the system to use the tardy kiosk, you must also determine the Attendance Type and Reason that are used to create a student's attendance record. To determine what information prints on students' tardy slips, you must configure the tardy kiosk. Configuring the tardy kiosk enables your students to generate their own tardy attendance records when they enter their Student Number into the kiosk. All students' attendance records are located in the Attendance tab group of their Student Profile. For example, if a student is running late, they may need a tardy slip to be admitted to class. Using the tardy kiosk, the student can enter their student number and print their tardy slip for admittance into class.

Before you begin

  1. Select Menu > Administrative Access > Attendance.
  2. Select Entity Group Year Configuration under Settings.
    Expected Result

    You see the General tab of the Entity Group Year Configuration Details screen.

  3. Select the Tardy Kiosk tab at the left of the screen.
    Expected Result

    You see an option to enable the tardy kiosk.

  4. Under the Tardy Kiosk Details heading, check the box for Use Tardy Kiosk.
    Expected Result

    When checked, additional fields for configuring the tardy kiosk display.

  5. Under the Tardy Kiosk Defaults heading, enter the Attendance Type or click the Down Arrow icon to choose from the drop-down list.
    Step Information

    This is the attendance type recorded for students when they use the tardy kiosk. The attendance type you select overwrites the student's current attendance for that attendance period. For example, a student using the Tardy Kiosk could be considered an Unexcused Tardy.

    The attendance type is printed on the tardy slip.

  6. Enter the Attendance Reason or click the Down Arrow icon to choose from the drop-down list, if appropriate.
    Step Information

    This is the reason indicated on the student record when they use the tardy kiosk. For example, you could select a reason of Late.

    The attendance reason is printed on the tardy slip.

  7. Enter an Attendance Comment if appropriate.
    Step Information

    This comment is used when the student's attendance record is created. For example, you could enter, "Record created by tardy kiosk."

  8. Under the Attendance Types To Restrict heading, enter one or more Existing Attendance Types to Restrict or click the Magnifying Glass icon to choose from the drop-down list, if appropriate.
    Step Information

    This field enables you to prevent the tardy kiosk from updating existing attendance records that were created with the attendance types you select. For example, you might choose Excused to indicate that any excused absences cannot be overwritten by the tardy kiosk.

    You can click outside of the selection box once you have made your selections.

    Expected Result

    If you selected Existing Attendance Types to Restrict, the Default Tardy Kiosk Message for Restricted Attendance Types and Override fields display. Continue to the next step.

    If you did not select Existing Attendance Types to Restrict, skip to step 10.

  9. Verify the Default Tardy Kiosk Message for Restricted Attendance Types or check the box for Override if necessary. If you checked the box, enter the appropriate Tardy Kiosk Message for Restricted Attendance Types Override.
    Step Information

    For example, you could enter, "Please report to the Attendance Office to obtain a tardy pass."

  10. Under the Tardy Kiosk Cutoff heading, choose the appropriate Tardy Kiosk Cutoff Type from the drop-down list.
    Expected Result

    If you selected No Cutoff Time, no additional fields display. Skip to step 19.

    If you selected Specific Time, the Specific Time, Default Tardy Kiosk Message for Cutoff Type, and Override fields display. Skip to step 12.

    If you selected # Minutes After Period Start, the # Minutes, Default Tardy Kiosk Message for Cutoff Type, and Override field displays. Skip to step 13.

    If you selected Attendance Window, the Start Time, End Time, Default Tardy Kiosk Message for Cutoff Type, and Override fields display. Skip to step 14.

    If you selected Duration, the # Minutes After Period Start, Duration (Minutes), Default Tardy Kiosk Message for Cutoff Type, and Override fields display. Skip to step 16.

    If you selected By Period, the Tardy Kiosk Cutoff Type for each period displays. Continue to the next step.
  11. Choose the appropriate Tardy Kiosk Cutoff Type for each Period.
    Expected Result

    If you selected No Cutoff Time, no additional fields display. Skip to step 19.

    If you selected Specific Time, the Specific Time field displays. Continue to the next step.

    If you selected # Minutes After Period Start, the # Minutes field displays. Skip to step 13.

    If you selected Attendance Window, the Start Time and End Time fields display. Skip to step 14.

    If you selected Duration, the # Minutes After Start and Duration (Minutes) fields display. Skip to step 16.

    You can also click Preview Cutoff Messages to view the Default Cutoff Message Preview window, which displays how the cutoff messages will look for each Tardy Kiosk Cutoff Type and for each period. When you are finished previewing the cutoff messages, click Close near the bottom right of the window.

  12. Enter a Specific Time to cut off the Tardy Kiosk attendance entry or click the Clock icon to enter the current time.
    Step Information

    For example, you could enter 08:00 a.m. to indicate Tardy Kiosk entries will not be accepted after 08:00 a.m. each day.

    Skip to step 18.

  13. Enter the number of minutes in the # Minutes field to identify how many minutes after a period begins when students are no longer able to use the Tardy Kiosk.
    Step Information

    For example, you could enter 10 to indicate students have until 10 minutes after the start of the period to enter their tardy attendance records. Once the cutoff time is reached, students cannot add or modify tardy attendance records.

    Skip to step 18.

  14. Enter the Start Time or click the Clock icon to enter the current time.
    Step Information

    For example, you could enter 08:00 a.m. to indicate students can begin entering tardy attendance records at 08:00 a.m. each day.

  15. Enter the End Time or click the Clock icon to enter the current time.
    Step Information

    For example, you could enter 09:00 a.m. to indicate all tardy attendance records should be entered by students by 09:00 a.m. each day.

    Skip to step 18.

  16. Enter the number of minutes in the # Minutes After Period Start field.
    Step Information

    For example, if you do not want students to enter tardy attendance records until five minutes after the period has started, you would enter 5.

    If you selected By Period for the Tardy Kiosk Cutoff Type, this field is labeled # Minutes After Start.

  17. Enter the Duration (Minutes).
    Step Information

    For example, if you want students to enter tardy attendance records within 10 minutes, you would enter 10.

  18. Verify the Default Tardy Kiosk Message for Cutoff Type or check the box for Override if necessary. If you checked the box, enter the appropriate Tardy Kiosk Message for Cutoff Type Override.
    Step Information

    If you selected By Period for the Tardy Kiosk Cutoff Type, you can check the box for Override to the right of the Default Tardy Kiosk Message for Cutoff Type field and enter the appropriate Tardy Kiosk Message for Cutoff Type Override.

  19. Under the Tardy Slip Print Options heading, enter the Tardy Slip Title if appropriate.
    Step Information

    For example, you could enter Hall Pass.

  20. Check the box for the appropriate Include on Slip options.
    Step Information

    You can use the Select checkbox if you wish to check or uncheck all options.

  21. Check the appropriate Include Signature Line box to indicate the name types you would like to include signature lines for.
    Step Information

    You can use the Select checkbox if you wish to check or uncheck all options.

  22. Choose one of the options near the top left of the screen to save your work.
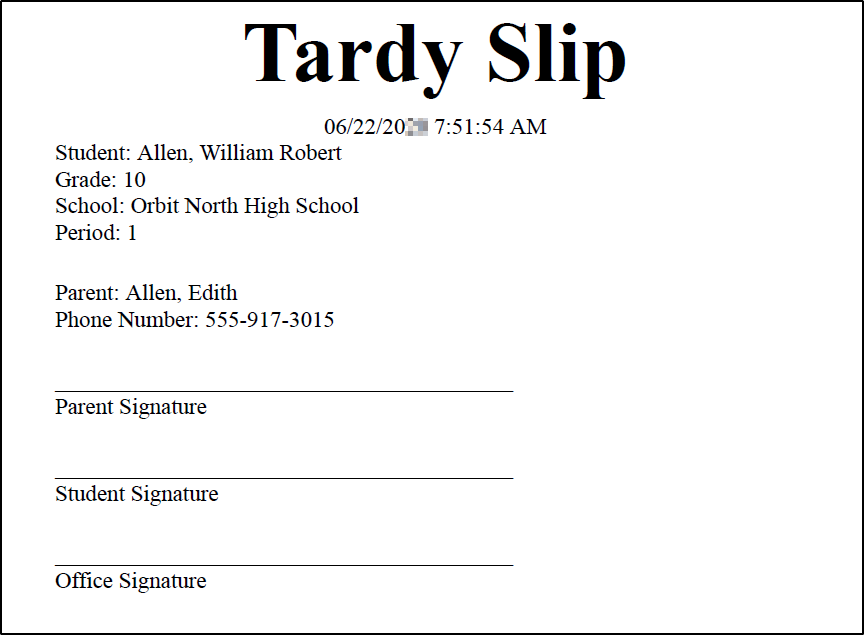
    OptionDescription
    Save & Back Saves the kiosk configurations and you return to the General tab of the Entity Group Year Configuration Details screen.
    Save Changes Saves the kiosk configurations and you remain on the Tardy Kiosk tab of the Entity Group Year Configuration Details screen.
    Expected Result

    The following image displays a tardy slip printed from a kiosk.