Creating Report Line on Report
You can only create report sections and lines on a user-created report. If necessary, a Skyward report can be cloned in order to make changes to the layout. You can add as many report lines as necessary by referencing the Report Designer options.
Scroll past the video to access the step-by-step instructions.
Before you begin
-
If you would like to add a totals line, a sort must be created for the criteria you would like to calculate totals for.
Audio Transcript
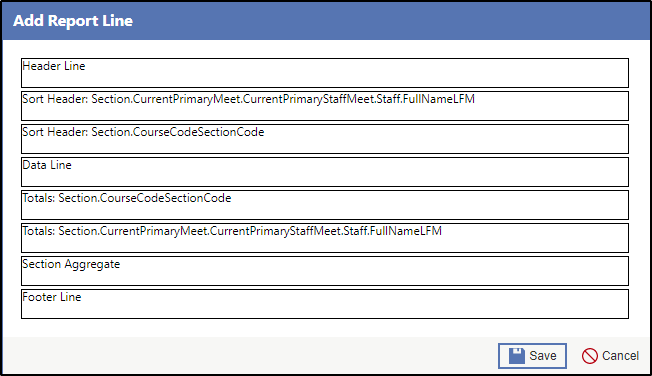
Welcome to adding lines to a report. To do this, we'll navigate within the Menu, to the Reporting module, where we'll select Report Manager under Features. Once we've identified the report we need to add lines to, we can select Design Report from the Record Options. Adding additional report lines to a report allows you to better organize the information so that users reading the output of the report have a better idea of what they're looking at and can more easily interpret the information they see. To do this, we'll select the Add Report Line button which looks like the paper with the plus icon. Depending on how the section of your report is configured, that you're adding a line to, you may see different options in the Add Report Line screen. Header lines allow you to add additional headers to organize the different header fields that you see at the top of your report. Sort headers only display if you have sorts set up within your section. You'll see sort header lines available for each sort that has been configured. Since my section has two sorts for student grade and full name, I have two different sort headers available. A sort header will create a new header that displays every time the sort value changes. So if I wanted a new header to display with each grade level of the students that print below it, I could add a sort header for grade. A data line allows you to add additional lines just like the main data line that always displays on the report. Total lines are based on the sorts that are set up as well, so that's why we have the same totals available as we have for the sort headers. These allow you to do aggregate functions within the line for the different fields that are included within the data above. Section aggregates are just like total lines where you can do aggregate math or aggregate calculations within the line but instead of being based on the sort values, these are based on the entire section. These are especially helpful to show counts or totals within detail sections that you might have on your report. Adding footer lines allows you to include additional details at the bottom of your report. For our example, I'm going to add a totals line for student grade. Once you select your line you can go ahead and click Save. When your line is selected, especially if you have an aggregate line, you can then add your additional fields to that. If I wanted to show a count within my aggregate line, I could add a field and then go to the Aggregate Type and select my Labeled Count. If necessary, I could adjust the field to make sure all information will fit within that area. Once you've added the line you wish and updated the columns that display within the line, go ahead and click Save Changes. Thanks for learning about adding lines to a report.
Welcome to adding lines to a report. To do this, we'll navigate within the Menu, to the Reporting module, where we'll select Report Manager under Features. Once we've identified the report we need to add lines to, we can select Design Report from the Record Options. Adding additional report lines to a report allows you to better organize the information so that users reading the output of the report have a better idea of what they're looking at and can more easily interpret the information they see. To do this, we'll select the Add Report Line button which looks like the paper with the plus icon. Depending on how the section of your report is configured, that you're adding a line to, you may see different options in the Add Report Line screen. Header lines allow you to add additional headers to organize the different header fields that you see at the top of your report. Sort headers only display if you have sorts set up within your section. You'll see sort header lines available for each sort that has been configured. Since my section has two sorts for student grade and full name, I have two different sort headers available. A sort header will create a new header that displays every time the sort value changes. So if I wanted a new header to display with each grade level of the students that print below it, I could add a sort header for grade. A data line allows you to add additional lines just like the main data line that always displays on the report. Total lines are based on the sorts that are set up as well, so that's why we have the same totals available as we have for the sort headers. These allow you to do aggregate functions within the line for the different fields that are included within the data above. Section aggregates are just like total lines where you can do aggregate math or aggregate calculations within the line but instead of being based on the sort values, these are based on the entire section. These are especially helpful to show counts or totals within detail sections that you might have on your report. Adding footer lines allows you to include additional details at the bottom of your report. For our example, I'm going to add a totals line for student grade. Once you select your line you can go ahead and click Save. When your line is selected, especially if you have an aggregate line, you can then add your additional fields to that. If I wanted to show a count within my aggregate line, I could add a field and then go to the Aggregate Type and select my Labeled Count. If necessary, I could adjust the field to make sure all information will fit within that area. Once you've added the line you wish and updated the columns that display within the line, go ahead and click Save Changes. Thanks for learning about adding lines to a report.
-
Click the Add Report Line icon near the top
right of the section.
-
Click Save near the bottom right of the window.
Result(s)
For more detailed information, please refer to the "Creating Report Line on Report" article in the Help Center.