The Attendance Entry by Class/Activity/Range
feature enables you to enter the same attendance record for multiple students at once.
You can create the record for students in the specified grade level or levels. You can
choose to create the attendance record for one or multiple Periods
and school year by checking the information at the top left of the screen.
Audio Transcript
If you ever need to enter the same attendance record for multiple
students in the same grade at once, you can use the Attendance Entry by
Class/Activity/Range feature. To begin this process, we’ll navigate to the Attendance
Entry by Class/Activity/Range feature located within the Attendance module and select
the Attendance Entry by Class/Activity/Range option. For this example, we will add
attendance records for grade 9 since they are going on a field trip, so we’ll remove all
other grades from the Grade Levels field. The date fields default as the current date,
which we do not need to change for this example. Since this field trip will last all
day, we will check the All Day checkbox, and since this field trip is sponsored by the
high school, we’ll select School Function as the Attendance Type. We’ll also select
Field Trip as the Attendance Reason to further define the attendance records. Let’s
select the Next option to proceed to the next screen, where we will see all the students
whose attendance records will be updated. If we proceed to the next screen, we’ll see
all the attendance records that will be added. Since we do not need to update any of
these records, we’ll select Run Process to generate these records. Now that you know how
to process attendance records by grade level, you can easily record attendance for
students en masse.
Select Menu > Administrative Access > Attendance.
Select Attendance Entry by Class/Activity/Range under Features.
Expected Result
You see the Attendance Entry by Class/Activity/Range Run History List.
Click Attendance Entry by Class/Activity/Range near the top right of the screen.
Expected Result
You see the Attendance Entry by Class / Activity / Range screen.
Complete the appropriate fields.
Step Information
Required fields are identified with an asterisk. You must complete required fields before you can save your work.
Under the Students to Select
heading, select the Grade Levels Selected option from the Selection Method
drop-down list.
Expected Result
The Include Cross Entity Course Scheduled Students field
displays.
Uncheck the box for Include Cross Entity Course
Scheduled Students if appropriate.
Step Information
For example, you would leave this box checked if you are
adding attendance for students and need to include those who are taking
classes in your Entity
Optional: Verify the Grade Levels or enter the correct grade levels.
Step Information
This field defaults based on the school's Grade Level Low and Grade Level High values, but can be modified if necessary. The only students who display on the subsequent screens are those in the grade levels you select.
You can click outside of the selection box once you have made your selections.
Under the Attendance Details heading, verify the Start Date or enter the correct date.
Step Information
This defaults to the current date, but can be modified as needed.
Verify the End Date or enter the correct date.
Step Information
This defaults to the current date, but can be modified as needed.
You can modify this field if the absence should span multiple days.
You can use the All Day checkbox instead of using a start and end period for the attendance details. For example, if the seniors are going to be gone on an all-day field trip, the All Day checkbox can be used to add attendance records to each period that day. If students are going to be excused from only one period for a school function, then the Start Period and End Period can be used to signify which period will be missed.
Expected Result
When checked, the Start Period and End Period fields are disabled. Skip to sub-step i.
If you did not check the box, continue to the next
sub-step.
Enter the Start Period
Step Information
This indicates the period when the attendance record should start.
Enter the End Period.
Step Information
This indicates the period when the attendance record should end.
For example, since typically a guardian would have to
return a permission slip for a field trip, you would check this box.
This field can be used as a filter on reports to only print records where the Guardian Notified box was not checked, so that office personnel can generate a list of guardians to call to confirm student absences.
Optional: Verify the box for Overwrite Existing Attendance is checked or unchecked.
Step Information
When checked, any attendance records for the selected students and dates are changed. For example, if you previously entered an absence
record for the cross country team to be gone during periods seven and eight
for a competition, but now the seniors will be missing the whole day for a
class trip, you would check the box to overwrite existing attendance to
indicate that the cross country runners in the senior class will actually be
absent for the class trip.
When unchecked, any existing attendance records for the selected dates are not modified. For example, if a student was previously marked as
absent for an illness, and you are creating a record for the senior class to
be absent for the whole day class trip, checking this box will mistakenly
mark this student as absent due to a class trip, even if the student was
actually home sick.
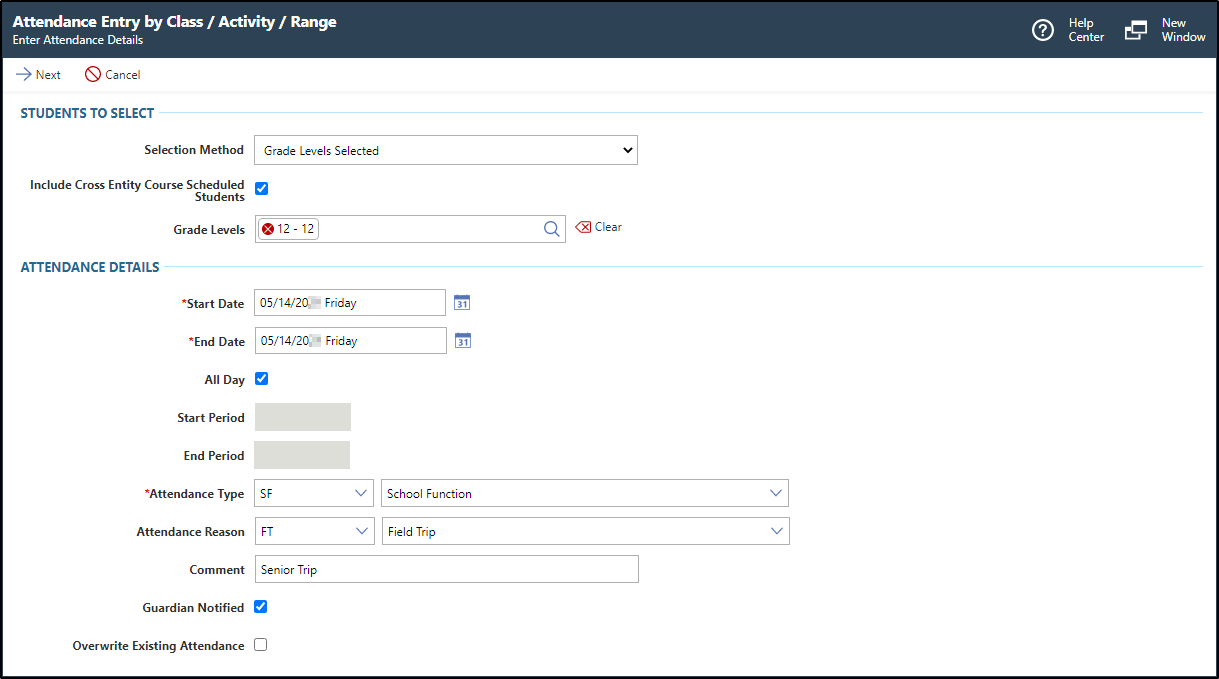
Expected Result
In the image below, the class attendance record details
display a senior class field trip for the whole day.
Click Next near the top left of the screen.
Expected Result
You see a list of students who fit the selection criteria from the previous screen.
Uncheck the box to the left of each student you do not wish to add attendance for.
Step Information
For example, you might uncheck the box for a student who
will be on a family vacation this day instead of the field trip.
You can uncheck the box at the top of the Select column to uncheck all students. You can then select individual students you wish to include by checking the box to the left of their name.
Click Next near the top left of the screen.
Expected Result
You see the student records to be created or updated, which includes details about any previous attendance records as well as the new details. This allows you to determine whether to overwrite the attendance records that currently exist for the students.
Uncheck the box to the left of each student you do not wish to create or update attendance records for.
Step Information
You can uncheck the box at the top of the Select column to uncheck all students. You can then select individual students you wish to include by checking the box to the left of their name.
Click Run Process near the top left of the screen.
Step Information
The system creates a run history record each time you process the Attendance Entry by Class/Activity/Range feature.
If one or more errors exist after processing the feature, you
can run the undo mass add attendance run process to revert all
attendance records that were originally created with this process.
Click Done near the top left of the screen.
Expected Result
You return to the screen you were previously on.
Result(s)
You have successfully recorded attendance for multiple
students by grade.