Entering Attendance by Seating Chart in Teacher Access
The Daily Attendance area in Teacher Access enables you to record attendance for the current day for students using a seating chart layout, which is a visual representation of your classroom. You can record attendance unless the attendance office has already entered attendance for a student for the class and date. For example, if a student's parent has called the office to report their child is sick for the day, you cannot override that attendance entry made by office staff.
For each class, students are assumed to be present unless marked otherwise by you or the office. Even if all students are present today for the class, you must still save the attendance for the day to indicate that attendance has been taken. When viewing the Attendance Class List, you can select the option to Mark All Students Present at the bottom of each class tile if this option has been enabled administratively. This makes taking attendance easier if all students are present.
If you are teaching two classes in two separate rooms during one period, you will not be able to use the seating chart to take attendance because there are two rooms listed for the period. For example, a drama teacher might oversee the building of a set and the practicing of lines in two separate rooms during one period. In situations like this, you must use the Student List instead of the seating chart.
Scroll past the video to access the step-by-step instructions.
Before you begin
-
A seating chart must exist.
Audio Transcript
You can enter daily attendance in Teacher Access through a seating chart layout. This is a visual representation that shows where your students sit for a class you teach. Let’s begin by navigating to the Daily Attendance feature within the Attendance module. All the classes we teach display. We’ll notice that our Group By option is set to Class and we’ll leave it as is since the course we are taking attendance for was configured with the Seating Chart Grouping option set to By Class when the seating chart was first created. If we were taking attendance for a course that had the Seating Chart Grouping option set to Period when we first created the seating chart, we’d need to update this selection to Period in order to take attendance with the seating chart option. Let’s select the course we want to enter attendance for. Based on how attendance was taken last, we’ll see this screen display as a list or chart. Because we want to take attendance via seating chart, we’ll select that option for the Attendance Mode field. Here, we’ll see all our students display with their associated seats in the classroom. Based on the Attendance Control option in the Daily Attendance Settings screen, we’ll see the attendance options for each student display as either drop-down lists or radio buttons. For this example, our attendance option is set as drop-down lists. By default, all the students are marked as Present but can be updated as needed. Rebecca Anderson did not come to class today, so let’s update her attendance to Absent. Julie Adams came to class late, so we’ll note that she was tardy. All the other students were present today, so we’ll leave them as is and click Save and Back. We return to the Attendance Class List and can see that attendance has been taken for our class, which cannot be updated. Now that you know how to enter daily attendance through a seating chart in Teacher Access, you can be sure that you can keep track of attendance for each class you teach.
Procedure
You can enter daily attendance in Teacher Access through a seating chart layout. This is a visual representation that shows where your students sit for a class you teach. Let’s begin by navigating to the Daily Attendance feature within the Attendance module. All the classes we teach display. We’ll notice that our Group By option is set to Class and we’ll leave it as is since the course we are taking attendance for was configured with the Seating Chart Grouping option set to By Class when the seating chart was first created. If we were taking attendance for a course that had the Seating Chart Grouping option set to Period when we first created the seating chart, we’d need to update this selection to Period in order to take attendance with the seating chart option. Let’s select the course we want to enter attendance for. Based on how attendance was taken last, we’ll see this screen display as a list or chart. Because we want to take attendance via seating chart, we’ll select that option for the Attendance Mode field. Here, we’ll see all our students display with their associated seats in the classroom. Based on the Attendance Control option in the Daily Attendance Settings screen, we’ll see the attendance options for each student display as either drop-down lists or radio buttons. For this example, our attendance option is set as drop-down lists. By default, all the students are marked as Present but can be updated as needed. Rebecca Anderson did not come to class today, so let’s update her attendance to Absent. Julie Adams came to class late, so we’ll note that she was tardy. All the other students were present today, so we’ll leave them as is and click Save and Back. We return to the Attendance Class List and can see that attendance has been taken for our class, which cannot be updated. Now that you know how to enter daily attendance through a seating chart in Teacher Access, you can be sure that you can keep track of attendance for each class you teach.
- To update a student's attendance to something other than Present, choose the appropriate attendance option for each student.
Students are marked as Present by default. The attendance options for each student display in a drop-down list or as radio buttons, depending on the Attendance Control option you selected on the Daily Attendance Settings screen. Even if you are entering perfect attendance, you must save. This indicates to you and the office that you have taken attendance for this class.
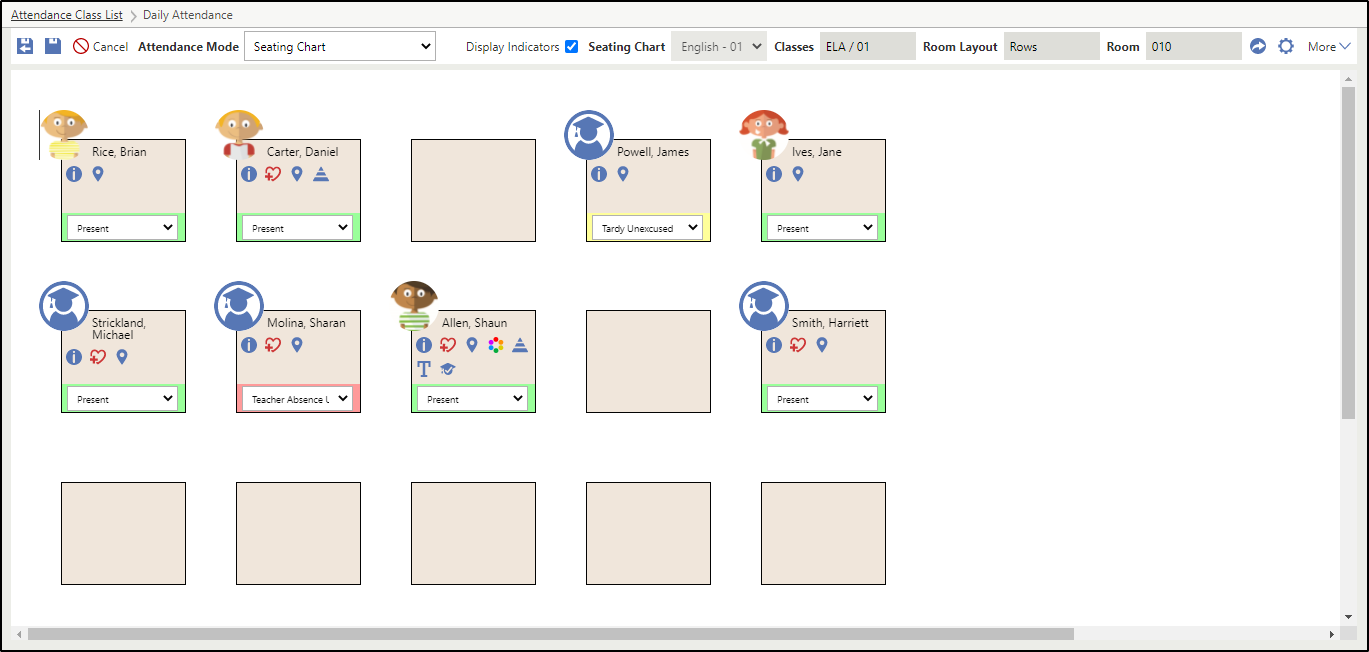
If you are using the seating chart to take attendance for a specific Section, only the student desks that belong to the selected section can be modified. All students in that period but in another section will have read-only attendance.The image below displays the Daily Attendance screen, which displays the seating chart for ELA. The Attendance Control for the seating chart is set to Drop Down in this example, so drop-down menus display for each student's seat where you can indicate attendance for that student.
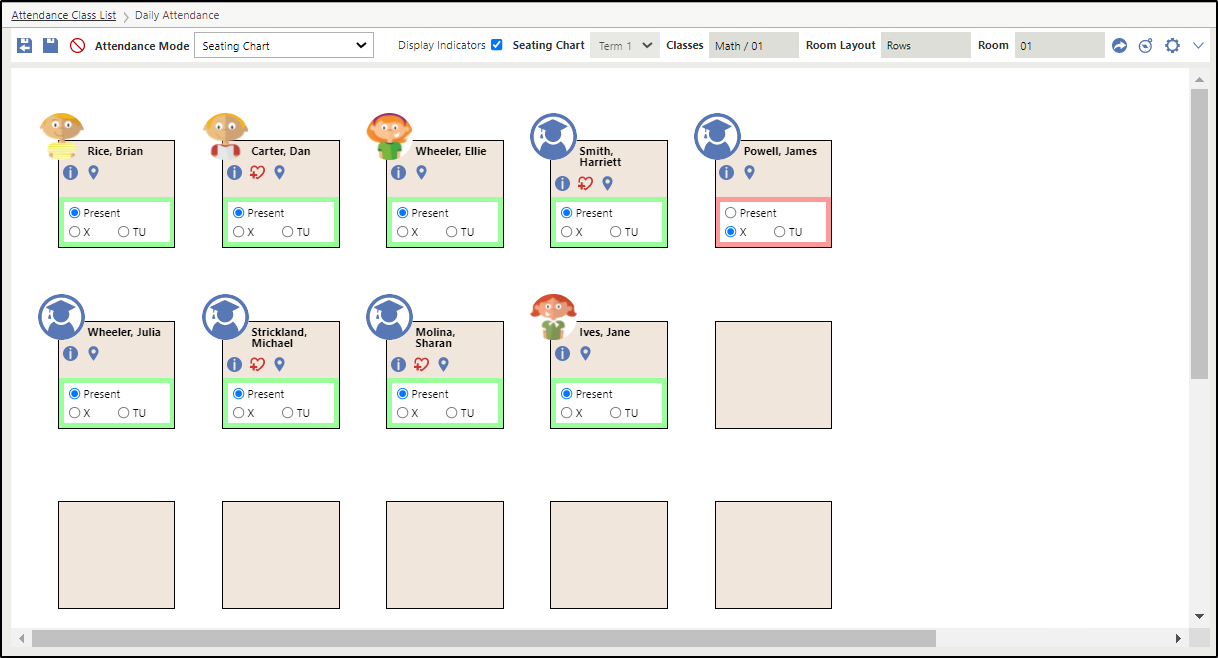
The image below displays the Daily Attendance screen, which displays the seating chart for Math 1. The Attendance Control for the seating chart is set to Radio Buttons in this example, so radio buttons display for each student's seat where you can indicate attendance for that student. You can click Legend near the top right of the screen to view Attendance Type information.