Entering Daily Attendance in Teacher Access
The Daily Attendance area in Teacher Access enables you to record attendance for the current day for students using the Student List, which displays students in the section in list format. You can record attendance unless the attendance office has already entered attendance for a student for the class and date. For example, if a student's parent has called the office to report their child is sick for the day, you cannot override that attendance entry made by office staff.
For each class, students are assumed to be present unless marked otherwise by you or the office. Even if all students are present today for the class, you must still save the attendance for the day to indicate that attendance has been taken. When viewing the Attendance Class List, you can select the option to Mark All Students Present at the bottom of each class tile if this option has been enabled administratively. This makes taking attendance easier if all students are present.
Alternatively, you can record attendance using the seating chart, which shows the classroom in a grid that you create based on your classroom's layout. If you are teaching two classes in two separate rooms during one period, you will not be able to use the seating chart to take attendance because there are two rooms listed for the period. For example, a drama teacher might oversee the building of a set and the practicing of lines in two separate rooms during one period. In situations like this, you must use the Student List instead of the seating chart.
If necessary, you can go back into attendance for a class for the current day. You can change a student's attendance if the office has not recorded attendance for the student and the Restrict Teacher Attendance Updates option has not been enabled administratively. If this option is enabled, you can only record attendance once, and any updates must be made administratively. You can also configure the display settings and additional columns.
Scroll past the video to access the step-by-step instructions.
Audio Transcript
As a teacher, you can enter daily attendance for students enrolled in your classes. We’ll begin by navigating to the Daily Attendance feature within the Attendance module. Here, we’ll see all the courses we are currently teaching. If all our students are present, we can use the Mark All Students Present option near the bottom of the tile if this option has been configured. If not, we can click on the desired course tile to record attendance. We see the Absent, Tardy, and Present columns that allow us to mark attendance for each individual student. For our example, all the students were present except for Robert Adams. He came to class late, so we’ll select the Tardy radio button. Within the Comments column, we’ll click the Plus icon to add a comment. We’ll enter a teacher comment into the appropriate field. We can then determine whether we want to hide this comment in Family Access, Student Access, or both. For this example, we’ll leave these boxes unchecked. Let’s click Done to add this comment and then save our changes. For our example, we get the Confirm Perfect Attendance prompt. Depending on how the Entity Group Year Configuration setting within the Attendance module is configured, we’ll need to verify that the attendance we are submitting is accurate. We’ll click Yes, Confirm to finalize our attendance. Now that you know how to enter daily attendance in Teacher Access, you can be sure that you can submit attendance for your students.
Procedure
As a teacher, you can enter daily attendance for students enrolled in your classes. We’ll begin by navigating to the Daily Attendance feature within the Attendance module. Here, we’ll see all the courses we are currently teaching. If all our students are present, we can use the Mark All Students Present option near the bottom of the tile if this option has been configured. If not, we can click on the desired course tile to record attendance. We see the Absent, Tardy, and Present columns that allow us to mark attendance for each individual student. For our example, all the students were present except for Robert Adams. He came to class late, so we’ll select the Tardy radio button. Within the Comments column, we’ll click the Plus icon to add a comment. We’ll enter a teacher comment into the appropriate field. We can then determine whether we want to hide this comment in Family Access, Student Access, or both. For this example, we’ll leave these boxes unchecked. Let’s click Done to add this comment and then save our changes. For our example, we get the Confirm Perfect Attendance prompt. Depending on how the Entity Group Year Configuration setting within the Attendance module is configured, we’ll need to verify that the attendance we are submitting is accurate. We’ll click Yes, Confirm to finalize our attendance. Now that you know how to enter daily attendance in Teacher Access, you can be sure that you can submit attendance for your students.
-
To update a student's attendance to something other than Present, select the appropriate radio button or Attendance Type code from the drop-down list to the right of the Student Number.
If there are multiple Attendance Type codes set up for an attendance column, a drop-down list displays instead of a radio button. For example, in the image below, there are Attendance Type codes for Absent Unexcused and Teacher Absence Unexcused, which display in the drop-down list under the Absent Type column.
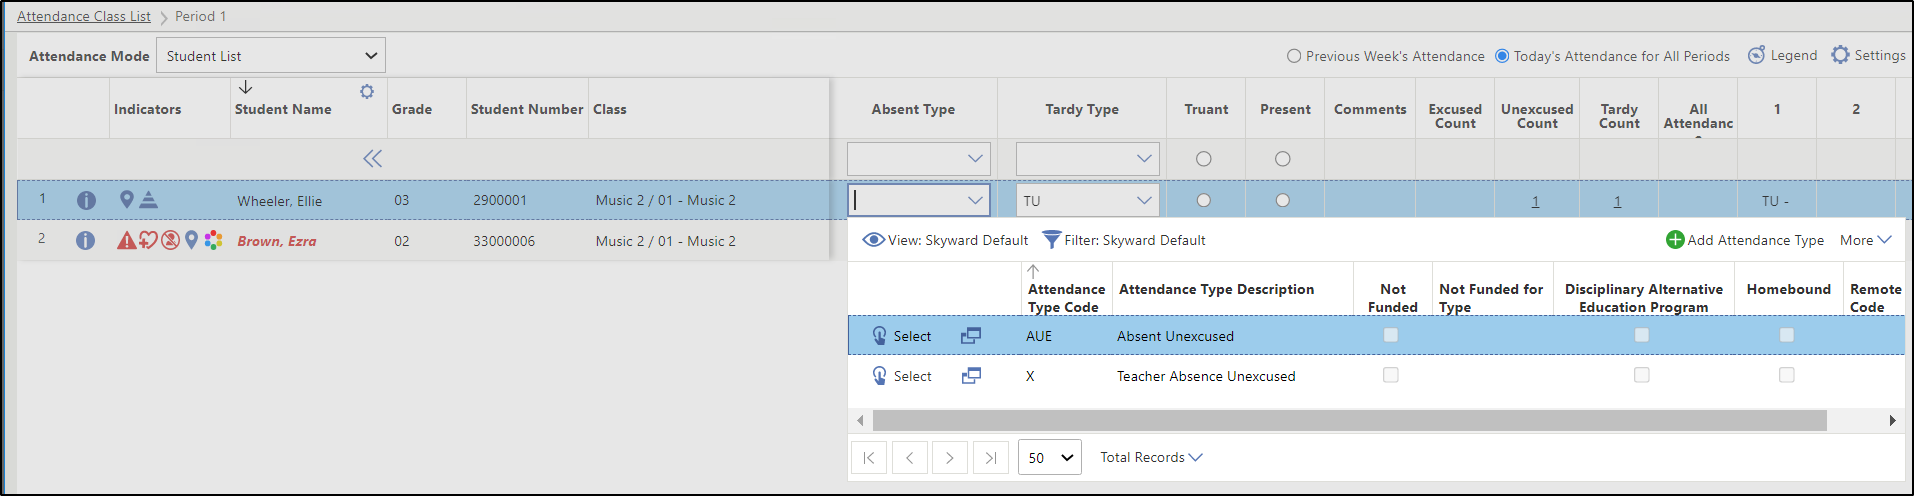
If you wish to add the same attendance code to all students at once, you can select the appropriate radio button or the appropriate option from the drop-down list under an attendance column. For example, in the image below, attendance can be applied to all students using the drop-down list under the Absent Type column or can be indicated using the radios buttons under the Tardy and Present columns.

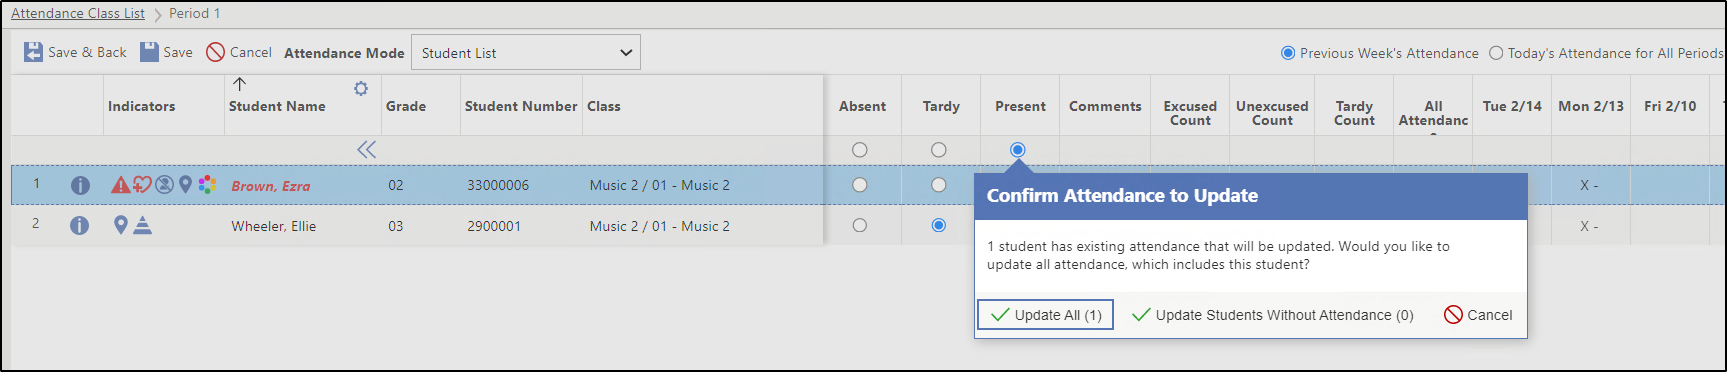
If you select an attendance radio button or drop-down option to add attendance for all students at once, and you have one or more students who already have attendance records that were saved in Teacher Access, the Confirm Attendance to Update window displays. From this window, you can either override the previously entered student attendance, or update attendance for all students besides the ones who have previously entered attendance. This option will not overwrite any administratively entered attendance records. For example, in the image below, the Confirm Attendance to Update window displays with the options to update attendance for all students or to only update students without attendance.
If you wish to add a comment to the daily attendance record, continue to the next step.
If you do not wish to add a comment to the daily attendance record, skip to step 14.
Results
For more detailed information, please refer to the "Entering Daily Attendance In Teacher Access" article in the Help Center.