Configuring Report Section Sorts
Sorting the data that appears on your reports makes it possible to organize the information in a way that is most useful to you. For example, if you run a report of users in your system and wish to have the list appear in alphabetical order, this configuration can be set in the Section Sorts area of the Report Designer. Additionally, you can change the order of the sort, such as sorting first by last name, and second by first name. You can also choose to page break on a field; for example, you can set up the report so there is a page break each time the building changes. You can set up the section sorts to create a prompt so the individual users can decide to page break when they run the report.
You can only configure report section sorts on a user-created report. If necessary, a Skyward report can be cloned in order to make changes to the layout.
Scroll past the video to access the step-by-step instructions.
Audio Transcript
You’ve already created your custom report to include every bit of data you’re looking for. Now, you want to organize that data in a way that’s most useful to you. Let’s begin by navigating to the Report Manager feature within the Reporting module. We’ll select the My Reports tab. Under the Reports heading, we’ll click the drop-down next to the previously made report we’d like to adjust and then select the Design Report option. We’ll then locate the main section of the report we wish to sort and select the Sort icon. Keep in mind that depending on the layout of your screen, the Selected Columns area may display to the right of the Available Columns list, and you may not have to scroll to see all options. All of the fields included in the data line appear in the Available Columns area, and the default sort for User ID appears in the Selected Columns list. We can click the Add option next to the field name to identify a new sort for the section. We can repeat this for any field names that need to be utilized as sorts. We’ll notice that any field names added after our initial sort are listed below in the Selected Columns area. We also have the options to edit the field name by clicking on the Pencil icon, modify the sort direction to ascending or descending, and choose whether each section of the record should trigger a page break. If we don’t want to page break for a sort, the Keep Together boxes can be used to create a page break when the next group of records for a sort does not fit at the bottom of a page. We can also choose to select the Create Bookmark boxes next to certain sorts of our report if we’d like. This option can be used to create bookmarks within the downloaded PDF versions of our report once we run it and can then serve as a navigation tool. Let’s scroll down. The Add Prompt for Sort Order box allows us to determine if we want to let the user running the report decide how fields on the report get sorted. We’ll leave this unchecked. Additionally, we can use the Move Up and Move Down options to change the order in which the highlighted field is used to sort records on the report. If we wish to remove a field from the section sort, we can select Remove next to the field. Once we’re satisfied with the specifications we’ve made, we’ll click Save. Let’s click Save And Run Report. We can see our report display based on our configurations. Now that you know how to configure report section sorts, you can customize your reports and organize them to your liking.
You’ve already created your custom report to include every bit of data you’re looking for. Now, you want to organize that data in a way that’s most useful to you. Let’s begin by navigating to the Report Manager feature within the Reporting module. We’ll select the My Reports tab. Under the Reports heading, we’ll click the drop-down next to the previously made report we’d like to adjust and then select the Design Report option. We’ll then locate the main section of the report we wish to sort and select the Sort icon. Keep in mind that depending on the layout of your screen, the Selected Columns area may display to the right of the Available Columns list, and you may not have to scroll to see all options. All of the fields included in the data line appear in the Available Columns area, and the default sort for User ID appears in the Selected Columns list. We can click the Add option next to the field name to identify a new sort for the section. We can repeat this for any field names that need to be utilized as sorts. We’ll notice that any field names added after our initial sort are listed below in the Selected Columns area. We also have the options to edit the field name by clicking on the Pencil icon, modify the sort direction to ascending or descending, and choose whether each section of the record should trigger a page break. If we don’t want to page break for a sort, the Keep Together boxes can be used to create a page break when the next group of records for a sort does not fit at the bottom of a page. We can also choose to select the Create Bookmark boxes next to certain sorts of our report if we’d like. This option can be used to create bookmarks within the downloaded PDF versions of our report once we run it and can then serve as a navigation tool. Let’s scroll down. The Add Prompt for Sort Order box allows us to determine if we want to let the user running the report decide how fields on the report get sorted. We’ll leave this unchecked. Additionally, we can use the Move Up and Move Down options to change the order in which the highlighted field is used to sort records on the report. If we wish to remove a field from the section sort, we can select Remove next to the field. Once we’re satisfied with the specifications we’ve made, we’ll click Save. Let’s click Save And Run Report. We can see our report display based on our configurations. Now that you know how to configure report section sorts, you can customize your reports and organize them to your liking.
- Click the Sort icon near the top right of the appropriate Main Section or Details Section you wish to sort.
The image below displays the Section Sorts window for a monthly birthday report, with the default sort for the primary key of Name ID. For this report, you can include additional sorts for the fields of Birth Date, Birth Month, Full Name (FML), and Gender.
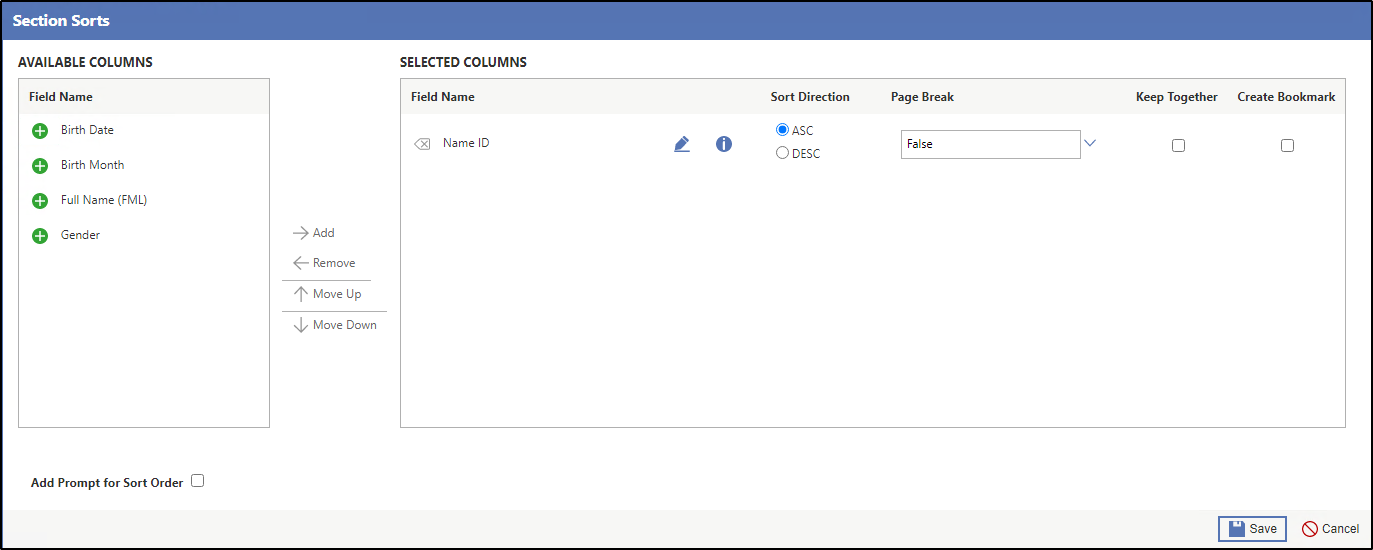
The primary key sort always displays and cannot be deleted or moved up or down under the Selected Columns heading.
Result(s)
For more detailed information, please refer to the "Configuring Report Section Sorts" article in the Help Center.