Creating Report Filter

You can create a report filter for a report in the software to limit what data displays when the report is run. If you choose to add a filter, it is applied every time a user runs the report. You can choose to filter on fields related to the Main Section or Details Section you selected before creating the filter. For example, you could create a filter for student entity year if you wish to limit the result to student enrolled in the current year. If you wish for users to provide input on the information filtered when a report is generated, you should create a report prompt. If you wish to include all data on the report, you can leave the filter blank.

You can only configure report filters on a user-created report. If necessary, a Skyward report can be cloned in order to make changes to the layout.

Scroll past the video to access the step-by-step instructions.

Before you begin

  • You must know how to utilize the filter builder.

  • The report must exist in the system.

Audio Transcript

Let's create a report filter. To do this we'll need to navigate to the Reporting module, the Report Manager, and locate the report we want to modify. And click the drop-down and design the report. Once we've gotten to the report we need to modify, we can then see the details section and the filter we need to create. From here it's important to pay attention to a few of the options. Such as the And, Or, feature, along with the ability to add rows or additional groups if you need to have a different functionality for that and/or statement. For this example, we're going to create a report that excludes all names that are also businesses. So, let's add a new row. We'll select the filter that's appropriate for this, which is the Business. Once you have your field selected, you'll see the condition types. These condition types are dependent upon the field that you have selected. As the Business field is a binary, or yes/no, we'll see the following fields. We'd like to go ahead and select False, so that way only businesses with a false flag will be displaying, meaning the names are not a business. You'll save your filter and then save the report itself, so that way all the changes you made will be available when you run the report.

Let's create a report filter. To do this we'll need to navigate to the Reporting module, the Report Manager, and locate the report we want to modify. And click the drop-down and design the report. Once we've gotten to the report we need to modify, we can then see the details section and the filter we need to create. From here it's important to pay attention to a few of the options. Such as the And, Or, feature, along with the ability to add rows or additional groups if you need to have a different functionality for that and/or statement. For this example, we're going to create a report that excludes all names that are also businesses. So, let's add a new row. We'll select the filter that's appropriate for this, which is the Business. Once you have your field selected, you'll see the condition types. These condition types are dependent upon the field that you have selected. As the Business field is a binary, or yes/no, we'll see the following fields. We'd like to go ahead and select False, so that way only businesses with a false flag will be displaying, meaning the names are not a business. You'll save your filter and then save the report itself, so that way all the changes you made will be available when you run the report.


  1. Select Menu > Administrative Access > Reporting.
  2. Select Report Manager under Features.
  3. Click the drop-down icon to the left of the report you wish to modify.

    If the report has a checkmark under the Skyward Maintained column heading, it cannot be modified.

    Alternatively, you can click the Open icon and click Design Report near the top right of the screen. Skip to step 5.

  4. Select Design Report from the menu.
  5. Click the Filter icon near the top right of the section you wish to filter.
  6. Complete the appropriate fields.
    1. Check the box for Limit Results to Selected Entity/District if appropriate.

      The checkboxes available for filtering are based on the module and object of the section you are building a filter for.

      If your district is not utilizing limited position distribution setup, skip to sub-step c.

    2. Check the box for Apply Limited Position Distributions if appropriate.

      If the object for the section is not valid for use with the apply limit, the field will not display. For example, objects such as Account will not display this checkbox.

    3. Click Add Row near the bottom left of the window.

      Before adding a row to the filter builder, you may need to click the Add Group option near the bottom left of the window to create groups of criteria that are used to filter records for the report, as well as verify the And or Or radio buttons near the top left of the window and for any groups you add.

    4. Click the Down Arrow icon to the right of the Select Filter Field.
    5. Highlight the field you wish to filter by.

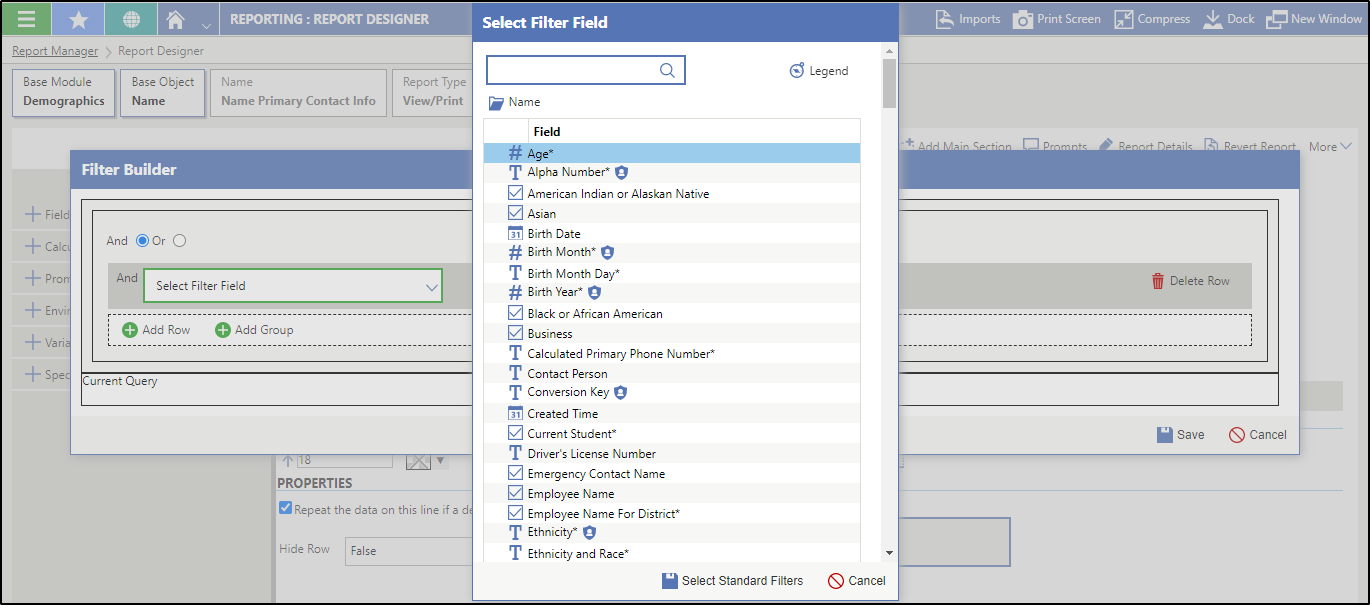
      The select field options you may see include Select Standard Filters or Select Field. For example, in the image below, the Name field folder is the current folder, causing the Select Standard Filters option to display in the Select Filter Field pop-up window.


      If you wish to just select the field and not use either of the other selecting options, you should double click the field. Skip to sub-step g.

      If the Field folder selected at the top of the Select Filter Field pop-up window has a standard filter associated with it, you see the Select Standard Filter option. Standard filters, such as name filters, are filters the system has set up. If the standard filter is selected, the system automatically builds prompts for the standard filter.

      If you highlight a One-to-Many relationship, you see the Select Field option. One-to-Many relationships indicate each record for the folder selected at the top of the screen can have one or more records tied to it. For example, Names has a One-to-Many relationship with NameEmail because each name can be attached to more than one email address.

    6. Click a select option near the bottom of the pop-up window.

      If you clicked Select Field or double-clicked the field to select it, continue to the next sub-step.

      If you clicked Select Standard Filters, skip to sub-step j.

    7. Choose the appropriate Condition Type from the drop-down list.

      If you clicked Select Field and you wish to include names that have an email address attached to them, you would select Exists. This option only displays if you select a One-to-Many relationship.

      One or more fields may display to the right of the condition type based on your selection. If you double clicked the field to select it, continue to the next sub-step.

      If you clicked Select Field above, skip to sub-step i.

    8. Enter a value for the field or click the Down Arrow icon to choose from the drop-down list.

      Skip to sub-step j.

    9. Click the Filter icon near the top right of the inactive summary field if you wish to filter within your One-to-Many relationship.

      You see the Filter Builder window. You can return to sub-step a to build a filter for your selection. Once you have built a filter, you will need to click Save on the additional Filter Builder window before you continue.

    10. Repeat sub-steps c - i if you wish to filter the report by additional fields.
  7. Click Save near the bottom right of the Filter Builder window to save the filter you created.
  8. Choose one of the options at the top of the screen to save your work.
    OptionDescription
    Save & BackSaves the filter you created and you return to the Report Manager screen. This option is located near the top left of the screen.
    Save ChangesSaves the filter you created and you remain on the Report Designer screen. This option is located near the top left of the screen.
    Save And Run ReportSaves the filter you created and runs the report. This option is located near the top right of the screen.
    Save And Run Report With Last ValuesSaves the filter you created and runs the report with the values set on the last run. If there are required prompts with no values set from a previous run, you will see the Run Report screen. This option is located near the top right of the screen.

Result(s)

For more detailed information, please refer to the "Creating Report Filter" article in the Help Center.