Separating Parent/Guardian from Family to Create New Family
Users, such as school administrators, may need to separate a student's family to create two families for a variety of reasons, such as cases where the guardians of a family divorce. You must create a new family and make one parent the guardian of that new family. The student could either be moving to the address of the new family or staying at the same address. If the student is moving to the address of the new family, you must ensure this family is listed as Family 1 to indicate the student's primary place of residence. Family 2 indicates the guardian the student no longer resides with or the guardian the student lives with for less time. If a guardian has a new partner, that partner can be added to the appropriate family.
The student is attached to both families, and a new address can be added for the guardian who is moving, if necessary. If you are not adding a new address, you should remove the existing address from the new family.
Scroll past the video to access the step-by-step instructions.
Audio Transcript
Separating parents or guardians from a student's family record enables you to create two families and update mailing address information. This is helpful for a variety of reasons, such as when guardians of a family divorce. Let's begin the process by navigating to the Student Profile within the Student module. After verifying that we're in the correct student profile, we'll select the Family sub-tab within the Family tab group. Under the Family 1 Guardians heading, we'll click on the drop-down icon next to the guardian we're separating and select the Split from Family/Create New Family option. The Home Language field defaults in based on the home language that was selected for the original family. We can update this field now if it's no longer accurate for this specific guardian. Next, we can enter or verify this guardian's driver's license number if needed. Under the Students Assigned to Original Family heading, we can determine whether we'd like to assign the student to the new family by checking or unchecking the corresponding box. We can also determine whether we'd like this guardian and family to be the student's primary family by checking the Make 1st Family box. For this example, we'll leave this unchecked since the student will continue to live with the primary guardian that is not being removed. The Relationship field can be updated if this guardian's relationship with the student has changed. Scrolling over, we have the options to check or uncheck the boxes for Physical Placement, Legal Decisions, Allow Student Pickup, Emergency Contact, Receives Forms, and Allow Family Access. These boxes default based on the values attached to the guardian in the original family record. This guardian will still have access to the same options as before, so we'll leave all these options as they are. The Age, Default Entity, and Active options default and cannot be changed. After making our revisions, we can click Save & Update Address to update this guardian's address. We're taken to the Name Profile for this guardian. Let's select Add Address since this guardian will have a new permanent residence. We'll need to enter in all of the address details now. The Address Type field defaults to USB - US Street Based but can be updated if we're creating an address that is not US Street Based. We'll then need to enter the Street Number for the new address. This address has a Directional Code of East. Let's enter the new street name for the new address. We can then enter information into the Address Secondary Unit and Secondary Unit Number fields if necessary. Since this address has no secondary address information, we'll leave them blank. The Address Line 2 field can be used to include additional information for this address if applicable. Next, we need to identify the city, state, and ZIP code for this address. We have the option to specify the county and township this address is located in if we'd like. For our example, this address is located within Orbit Creek Township of Cook County. Latitude and longitude information can be entered if we'd like to keep track of the degree measurements of the address's distance from the equator and prime meridian. The GEOID indicates the location of an address through the use of a 12-digit ID number assigned by the United States Census Bureau. This value is a combination of numbers in a set order which includes the two-digit state number, three-digit county number, six-digit census tract number, and a one-digit block group number. If we'd like to keep track of this information as well, we can enter that in now. If this address already exists within our system, we'll see it display under the Search Results heading. For this example, we'll select Save New Address to continue. Since this guardian currently has two addresses attached, we need to identify the address details by checking the boxes that we'd like to enable. For this example, we'll check the Select box to include all the options. A warning message now displays stating that this guardian's old address is not flagged for use and will be removed. Since this is correct, we'll click Save again to confirm these changes. Under the Addresses heading, we'll see the new address we just created listed here. Because we want to see the changes we made to this student's family information, we'll navigate back to the Student Profile within the Student module. Back on the Family sub-tab of the Family tab group, we'll scroll down to see that there are now two separate families attached to this student's profile. After successfully separating guardians from a student's family record, you can ensure that each guardian's address is correct along with their access to the student's information.
Separating parents or guardians from a student's family record enables you to create two families and update mailing address information. This is helpful for a variety of reasons, such as when guardians of a family divorce. Let's begin the process by navigating to the Student Profile within the Student module. After verifying that we're in the correct student profile, we'll select the Family sub-tab within the Family tab group. Under the Family 1 Guardians heading, we'll click on the drop-down icon next to the guardian we're separating and select the Split from Family/Create New Family option. The Home Language field defaults in based on the home language that was selected for the original family. We can update this field now if it's no longer accurate for this specific guardian. Next, we can enter or verify this guardian's driver's license number if needed. Under the Students Assigned to Original Family heading, we can determine whether we'd like to assign the student to the new family by checking or unchecking the corresponding box. We can also determine whether we'd like this guardian and family to be the student's primary family by checking the Make 1st Family box. For this example, we'll leave this unchecked since the student will continue to live with the primary guardian that is not being removed. The Relationship field can be updated if this guardian's relationship with the student has changed. Scrolling over, we have the options to check or uncheck the boxes for Physical Placement, Legal Decisions, Allow Student Pickup, Emergency Contact, Receives Forms, and Allow Family Access. These boxes default based on the values attached to the guardian in the original family record. This guardian will still have access to the same options as before, so we'll leave all these options as they are. The Age, Default Entity, and Active options default and cannot be changed. After making our revisions, we can click Save & Update Address to update this guardian's address. We're taken to the Name Profile for this guardian. Let's select Add Address since this guardian will have a new permanent residence. We'll need to enter in all of the address details now. The Address Type field defaults to USB - US Street Based but can be updated if we're creating an address that is not US Street Based. We'll then need to enter the Street Number for the new address. This address has a Directional Code of East. Let's enter the new street name for the new address. We can then enter information into the Address Secondary Unit and Secondary Unit Number fields if necessary. Since this address has no secondary address information, we'll leave them blank. The Address Line 2 field can be used to include additional information for this address if applicable. Next, we need to identify the city, state, and ZIP code for this address. We have the option to specify the county and township this address is located in if we'd like. For our example, this address is located within Orbit Creek Township of Cook County. Latitude and longitude information can be entered if we'd like to keep track of the degree measurements of the address's distance from the equator and prime meridian. The GEOID indicates the location of an address through the use of a 12-digit ID number assigned by the United States Census Bureau. This value is a combination of numbers in a set order which includes the two-digit state number, three-digit county number, six-digit census tract number, and a one-digit block group number. If we'd like to keep track of this information as well, we can enter that in now. If this address already exists within our system, we'll see it display under the Search Results heading. For this example, we'll select Save New Address to continue. Since this guardian currently has two addresses attached, we need to identify the address details by checking the boxes that we'd like to enable. For this example, we'll check the Select box to include all the options. A warning message now displays stating that this guardian's old address is not flagged for use and will be removed. Since this is correct, we'll click Save again to confirm these changes. Under the Addresses heading, we'll see the new address we just created listed here. Because we want to see the changes we made to this student's family information, we'll navigate back to the Student Profile within the Student module. Back on the Family sub-tab of the Family tab group, we'll scroll down to see that there are now two separate families attached to this student's profile. After successfully separating guardians from a student's family record, you can ensure that each guardian's address is correct along with their access to the student's information.
- Select Split from Family/Create New Family from the menu.You see the Split from Family/Create New Family screen, which displays the guardian to be associated with the new family, as well as the guardian's Physical and Mailing Addresses near the top of the screen.
In the image below, Nathan Asher is being split into a separate student family.

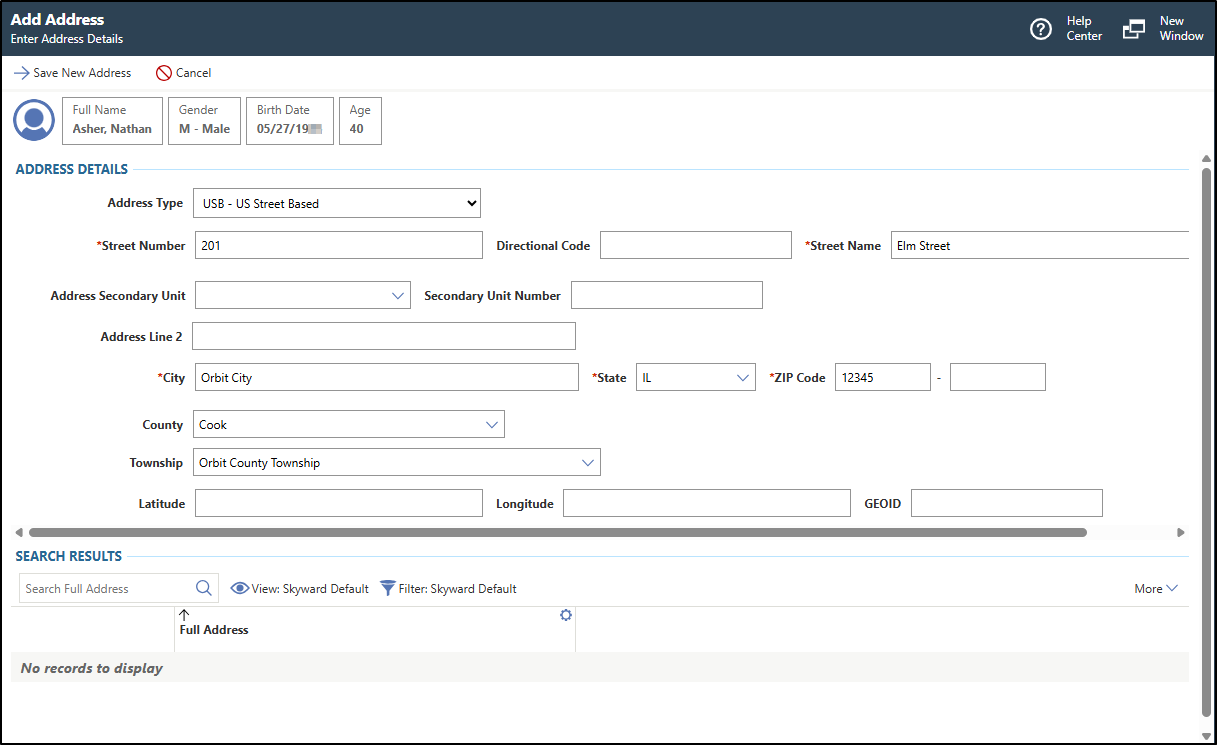
- Click Add Address near the top right of the screen.
You see the Add Address screen.
In the image below a new address is being added to Nathan Asher.