Enrolling Student New To District - WA

Creating students in the software enables you to enroll students in a particular Entity. This helps schedule students and maintain accurate student information records. There are three steps you must complete to enter all the information required to enroll a new student. You must add the student's name to your database if it does not currently exist, complete the student's demographic information such as language, race, and ethnicity, and indicate when the student will be enrolled in which entity.

Scroll past the video to access the step-by-step instructions.

You may see fields in the following media that do not apply to your state. Please reference the written documentation for guidance on fields applicable to your state.

Audio Transcript

Enrolling a new student to your district enables you to add the appropriate details about them in order to maintain accurate student records. This includes demographic information such as language, ethnicity, and more. Let's begin by heading to the Student Profile within the Student module. From here, we can select Add Student near the top right of the screen. Let's enter our student's first name and last name into the corresponding fields. If we needed to refine the search results more to verify if this student already exists in our system, we could continue filling out the remaining fields. For our purposes, we'll be filling these out later in the process, so we'll click Next. Under the Student Details heading, we'll fill out any additional information for this student. If this student only has one name, checking the Name is One Name box will display just the Name field, which can then be updated as needed. We'll leave it unchecked since this does not pertain to our student. We could enter a middle name, name suffix such as Jr. or Sr., or pronunciation information regarding how to pronounce her name. If Jamie has a separate legal name, we could check the associated box where we can then fill out a legal last name, legal first name, legal middle name, and legal name suffix as necessary. We could also check the box for Legal Name is One Name if this student's legal name is only one name. We can specify the legal name and the legal name suffix if needed. We'll uncheck these options for our example since they do not apply to our student. Moving on, we can identify Jamie's gender. Since Jamie is a female, we'll select that option from the drop-down list. We can enter Jamie's gender identity now if this is known. It's important to note that this field only displays if the box for Use Gender Identity is checked in the System Configuration​ of the Demographics​ module. The options available for selection pull from the Gender Identity codes that are set up in the Demographics module. ​Jamie's preferred pronouns are She/Her so let's select this option from the drop-down list. The options available for selection pull from the Pronoun codes that we have set up in the Demographics module. This field only displays if the box for Use Pronouns is checked in the System Configuration of the Demographics module. We could check the State Gender Is Non-Binary box if this is applicable to the student. Let's enter her birth date now. Jamie primarily speaks English, and her native language is also English, so let's specify that information now. We could enter a feeder school now if this is known. This field allows us to identify the school that she came from prior to attending our entity. We'll accept the Allow Student Access as checked since we want to enable the Student Access portal for this student. The Distribute Student Information For options can also be left as checked for our example. These boxes indicate whether student information can be included in a report and distributed to a requesting party. The options that display are based on the selections made on the Distribution Settings​ tab in the Entity Group Year Configuration​ of the Student​ module. ​Let's scroll down to view more fields. We can specify this student's federal race and ethnicity by choosing the appropriate option. If we've verified her race, we can note how it was verified and the date that we verified this information. Any state and federal information can be filled in now if necessary. For our example, we'll leave them as is and click Save & Add Entry Withdrawal. The Entity and School Year fields default appropriately and display information regarding what school she will be attending for this school year. We'll continue by indicating the date she will begin enrolling and attending classes at this school. We could utilize the Effective Start Date field if the Start Date we selected falls on a weekend, when school is not in session. However, since she is new to the school and will be starting school on Monday, we'll leave it blank. She will be enrolled at our school 100% of the time, so we'll accept the default for the Percent Enrolled field. The Grad Year/Grade field defaults based on the birth date we entered for this student but can be modified if needed. We could enter a Grade Level Subcategory if necessary. This field enables organizations to further break down grade levels. For this example, we'll leave it blank. The Graduation Requirement Year field defaults based on the grad year and birth date that was previously entered. This identifies this student's graduation year when they are first enrolled in the organization for graduation requirement purposes. We could modify this if needed. Since she is a new student to our entity, we'll select the Entry code of New. An entry comment can be entered if applicable. This could be the name of the organization the student transferred from, or any additional details we wish to record regarding the student. The School and Calendar fields default based on the entity we're enrolling this student in, so we'll leave these as they are. Let's indicate the Student Type. She will be a General Education student. For our example, the Default Entity box defaults as checked and cannot be updated. This box will only become editable if this student is enrolled in another entity and spends the majority of their time in that entity. If enabled within the Entity Configuration setting of the Fee Management module, we may see additional options under the Fee Management Details heading. We'll leave the Create Customer box checked so we can create customer records for this student. Let's scroll down. The remaining fields on this screen do not need to be filled out at this time, so we'll select Save & Continue. We want to enable Student Access for this student, so we'll leave the corresponding field checked. We can verify the student's user details which include their student username, email address, and email type information. If we wanted to update any of these fields, we could do so now. Since everything looks correct, we'll save to complete this process. After you have enrolled a new student, you can begin scheduling this student into classes and update her information as needed.

Enrolling a new student to your district enables you to add the appropriate details about them in order to maintain accurate student records. This includes demographic information such as language, ethnicity, and more. Let's begin by heading to the Student Profile within the Student module. From here, we can select Add Student near the top right of the screen. Let's enter our student's first name and last name into the corresponding fields. If we needed to refine the search results more to verify if this student already exists in our system, we could continue filling out the remaining fields. For our purposes, we'll be filling these out later in the process, so we'll click Next. Under the Student Details heading, we'll fill out any additional information for this student. If this student only has one name, checking the Name is One Name box will display just the Name field, which can then be updated as needed. We'll leave it unchecked since this does not pertain to our student. We could enter a middle name, name suffix such as Jr. or Sr., or pronunciation information regarding how to pronounce her name. If Jamie has a separate legal name, we could check the associated box where we can then fill out a legal last name, legal first name, legal middle name, and legal name suffix as necessary. We could also check the box for Legal Name is One Name if this student's legal name is only one name. We can specify the legal name and the legal name suffix if needed. We'll uncheck these options for our example since they do not apply to our student. Moving on, we can identify Jamie's gender. Since Jamie is a female, we'll select that option from the drop-down list. We can enter Jamie's gender identity now if this is known. It's important to note that this field only displays if the box for Use Gender Identity is checked in the System Configuration​ of the Demographics​ module. The options available for selection pull from the Gender Identity codes that are set up in the Demographics module. ​Jamie's preferred pronouns are She/Her so let's select this option from the drop-down list. The options available for selection pull from the Pronoun codes that we have set up in the Demographics module. This field only displays if the box for Use Pronouns is checked in the System Configuration of the Demographics module. We could check the State Gender Is Non-Binary box if this is applicable to the student. Let's enter her birth date now. Jamie primarily speaks English, and her native language is also English, so let's specify that information now. We could enter a feeder school now if this is known. This field allows us to identify the school that she came from prior to attending our entity. We'll accept the Allow Student Access as checked since we want to enable the Student Access portal for this student. The Distribute Student Information For options can also be left as checked for our example. These boxes indicate whether student information can be included in a report and distributed to a requesting party. The options that display are based on the selections made on the Distribution Settings​ tab in the Entity Group Year Configuration​ of the Student​ module. ​Let's scroll down to view more fields. We can specify this student's federal race and ethnicity by choosing the appropriate option. If we've verified her race, we can note how it was verified and the date that we verified this information. Any state and federal information can be filled in now if necessary. For our example, we'll leave them as is and click Save & Add Entry Withdrawal. The Entity and School Year fields default appropriately and display information regarding what school she will be attending for this school year. We'll continue by indicating the date she will begin enrolling and attending classes at this school. We could utilize the Effective Start Date field if the Start Date we selected falls on a weekend, when school is not in session. However, since she is new to the school and will be starting school on Monday, we'll leave it blank. She will be enrolled at our school 100% of the time, so we'll accept the default for the Percent Enrolled field. The Grad Year/Grade field defaults based on the birth date we entered for this student but can be modified if needed. We could enter a Grade Level Subcategory if necessary. This field enables organizations to further break down grade levels. For this example, we'll leave it blank. The Graduation Requirement Year field defaults based on the grad year and birth date that was previously entered. This identifies this student's graduation year when they are first enrolled in the organization for graduation requirement purposes. We could modify this if needed. Since she is a new student to our entity, we'll select the Entry code of New. An entry comment can be entered if applicable. This could be the name of the organization the student transferred from, or any additional details we wish to record regarding the student. The School and Calendar fields default based on the entity we're enrolling this student in, so we'll leave these as they are. Let's indicate the Student Type. She will be a General Education student. For our example, the Default Entity box defaults as checked and cannot be updated. This box will only become editable if this student is enrolled in another entity and spends the majority of their time in that entity. If enabled within the Entity Configuration setting of the Fee Management module, we may see additional options under the Fee Management Details heading. We'll leave the Create Customer box checked so we can create customer records for this student. Let's scroll down. The remaining fields on this screen do not need to be filled out at this time, so we'll select Save & Continue. We want to enable Student Access for this student, so we'll leave the corresponding field checked. We can verify the student's user details which include their student username, email address, and email type information. If we wanted to update any of these fields, we could do so now. Since everything looks correct, we'll save to complete this process. After you have enrolled a new student, you can begin scheduling this student into classes and update her information as needed.


  1. Select Menu > Administrative Access > Student.
  2. Select Student Profile under Features.

    Alternatively, you can add a student by selecting Student List under Features.

    You see the Student Profile for the first student listed alphabetically in the entity or for the last student whose profile you had open.

  3. Verify you are in the correct Entity and school year by checking the information at the top left of the screen.
    The entity you are adding the student to defaults based on the entity you are working in. If you are working in the District entity, you must select the entity the student should be added to.
  4. Click Add Student near the top right of the screen.

    You see the Add Student screen.

    The Add Student screen displays details for adding Todd Smith as a student.
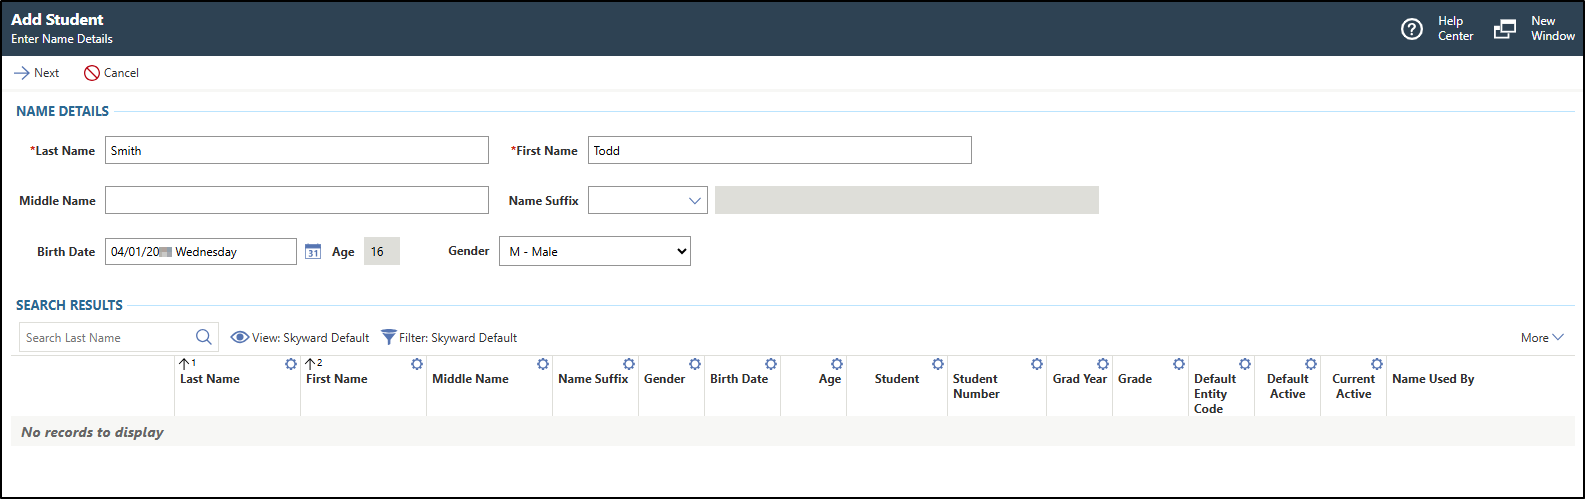
  5. Complete the appropriate fields.

    You must complete required fields before you can save your work. Fields marked as Optional in the documentation are not required to complete.

    1. Note: The fields on this screen enable you to search for existing names in the system. Under the Search Results heading, the results update based on the values you enter. If you find a matching name, you should use the Add as Student option to add the name as a student.
      Under the Name Details heading, enter the Last Name of the student you wish to add.
      Under the Search Results heading, the list displays names that match what you are entering. As you enter more letters, the list narrows until the last name of the student you wish to add displays.
    2. Enter the student's First Name.

      The search results below list names that match what you are entering. As you enter more letters, the list narrows until the first name of the student you wish to add displays.

    3. Optional: Enter the student's Middle Name.

      The search results below list names that match what you are entering. As you enter more letters, the list narrows until the middle name of the student you wish to add displays.

    4. Optional: Enter the student's Name Suffix.

      The search results below list names that match the suffix you entered.

    5. Optional: Enter the student's Birth Date.

      The Age field defaults based on the date of birth you enter.

      The search results below list names that match the date you enter.

    6. Optional: Choose the student's Gender from the drop-down list.

      The search results below list names that match the gender you selected.

    7. Click Next near the top left of the screen.
      This option adds a new name record and then identifies the name as a student.

      You can also select Add as Student to the left of the name under the Search Results heading. You should choose this option if you find an existing name and you wish to identify the person as a student. This only displays when the name exists in the software and is used as something other than a student. For example, a name could be listed as a user but must also be added as a student.

      You can also select Enroll Student to the left of the name under the Search Results heading if the student exists but should be enrolled in another entity.
      If the box for Enforce Address Range Defaults is checked in the District Configuration of the Demographics module, you see fields to enter address information. Continue to the next sub-step.

      If this box is not checked, you see the Add Student screen, which enables you to enter additional student information. Skip to sub-step o.

    8. Under the Address Details heading, choose the Address Type from the drop-down list.
      This field only displays if the box for Enforce Address Range Defaults is checked in the District Configuration of the Demographics module, and if you selected an address that is outside of the address range default for the school.
      Under the Search Results heading, the list displays addresses that match your selection.
    9. Use the additional address fields to search for the address.

      You can enter the appropriate address details for the student.

      The search results below list addresses that match what you entered.

    10. Choose one of the options to continue creating students.
      Save & ContinueThis option is located near the top left of the screen. You should choose this option if you do not find a matching address under the Search Results heading. This option adds a new address to the system. If address range defaults are enforced and the address is not within the address range defaults determined in the District Configuration of the Demographics module, you will need to enter a school and permit for the student. Continue to the next sub-step. If address range defaults are not enforced, skip to sub-step o.
      Select AddressThis option is located under the Search Results heading to the left of the address. You should choose this option if you see the address you wish to use for the student. If address range defaults are enforced and the address is not within the address range defaults determined in the District Configuration of the Demographics module, you will need to enter a school and permit for the student. Continue to the next sub-step. If address range defaults are not enforced, skip to sub-step o.
    11. Enter the School.
    12. Click Next near the top left of the screen.

      You see the Permit field.

    13. Enter the Permit.
      This field only displays if the box for Enforce Address Range Defaults is checked in the District Configuration of the Demographics module, and if you selected an address that is outside of the address range default for the school.
    14. Click Next near the top left of the screen.

      You see fields that enable you to enter student information.

      The Add Student screen displays student details fields to enter.
    15. Optional: Verify the Template near the top right of the screen or click the Chevron down icon to choose the correct template from the drop-down list.

      If the workflow template you wish to use does not exist, you can create a new Workflow Template. If necessary, you can click Template near the top right of the screen to expand the workflow template area.

    16. Optional: Under the Student Details heading, verify the box for Name is One Name is checked or unchecked.

      When checked, the Last Name, First Name, and Middle Name fields no longer display and the Name field displays. Skip to sub-step t.

      If you did not check this box, continue to the next sub-step.

    17. Verify the Last Name or enter the correct name.
    18. Verify the First Name or enter the correct name.
    19. Optional: Verify the Middle Name or enter the correct name.

      Skip to sub-step u.

    20. Verify the student's Name or enter the correct name.
    21. Optional: Verify the Name Suffix or enter the correct suffix.
      For example, you could enter III, Jr., or Sr.
    22. Optional: Enter the Pronunciation.
    23. Optional: Verify the box for Specify Separate Legal Name is checked or unchecked.

      If you checked the box, the Legal Name is One Name, Legal Last Name, Legal First Name, Legal Middle Name, and Legal Name Suffix fields display. Continue to the next sub-step.

      If you did not check the box, skip to sub-step ad.

    24. Optional: Verify the box for Legal Name is One Name is checked or unchecked.

      If you checked the box, the Legal Last Name, Legal First Name, and Legal Middle Name fields no longer display and the Legal Name field displays. Skip to sub-step ab.

      If you did not check the box, continue to the next sub-step.

    25. Enter the student's Legal Last Name.
    26. Enter the student's Legal First Name.
    27. Optional: Enter the student's Legal Middle Name.

      Skip to sub-step ac.

    28. Enter the student's Legal Name.
    29. Optional: Enter the student's Legal Name Suffix.
    30. Verify the Gender or choose the correct gender from the drop-down list.
      This defaults based on the selection you made in step 5, sub-step f.
    31. Optional: Enter the Gender Identity.

      This field only displays if the box for Use Gender Identity is checked in the System Configuration of the Demographics module. Additionally, Gender Identity codes must exist in the Demographics module.

    32. Optional: Enter the student's Pronouns.

      This field only displays if the box for Use Pronouns is checked in the System Configuration of the Demographics module.

    33. Verify the Birth Date or enter the correct date.

      The Age field populates based on the selected date and cannot be modified.

    34. Optional: Enter the SSID.
    35. Enter the student's Primary Language.
    36. Enter the student's Native Language.
    37. Enter the Student Language Spoken at Home or click the Down Arrow icon to choose from the drop-down list.
    38. Optional: Enter the Feeder School.
    39. Optional: Verify the box for Allow Student Access is checked or unchecked.

      This option defaults based on the security user creation setting in the System Configuration of the Student module, but can be modified if necessary.

    40. Optional: Verify the Distribute Student Information For boxes are checked or unchecked according to your organization's policy.
      These boxes indicate whether student information can be included in a report and distributed to a requesting party. The options that display are based upon the selections made on the Distribution Settings tab in the Entity Group Year Configuration of the Student module.

      You can use the Select checkbox if you wish to check or uncheck all options.

    41. Under the Race / Ethnicity heading, enter the State Ethnicity Collection Method or click the Down Arrow icon to choose from the drop-down list.
    42. Enter one or more State Ethnicities or click the Magnifying Glass icon to choose from the drop-down list.

      You can click outside of the selection box once you have made your selections.

      You can select as many State Ethnicities as necessary, unless you select the Not Hispanic/Latino option. If you select this option, no other ethnicity values can be selected.

      If the State Ethnicities option you choose is a Hispanic/Latino ethnicity, then the Ethnicity box for Hispanic/Latino defaults as checked.

      If you selected Hispanic/Latino Write in, the Hispanic/Latino Write In field displays. Continue to the next sub-step.

      If you did not select Hispanic/Latino Write in, skip to sub-step ar.

    43. Enter the Hispanic/Latino Write In value.
    44. Verify the box for Ethnicity is checked or unchecked as necessary.

      This defaults based on the State Ethnicities field and cannot be modified. If you wish to adjust this box, you must modify the State Ethnicities field.

    45. Enter the State Race Collection Method or click the Down Arrow icon to choose from the drop-down list.
    46. Enter one or more State Races or click the Magnifying Glass icon to choose from the drop-down list.

      You can click outside of the selection box once you have made your selections.

      If you select a Write In option for the State Race, you see the corresponding Write In field display. For example, if you selected Alaska Native Write in, you would see the Alaska Native Write In field. Continue to the next sub-step.

      If you did not select a state race with a write in option, skip to sub-step av.

    47. Enter the Write In value.

      The name of this field depends on the State Race write in value you selected. For example, if the State Race you selected is American Indian Write in, this field displays as American Indian Write In.

    48. Under the Race / Ethnicity Details heading, verify the box for each Federal Race / Ethnicity that applies to the student is checked or unchecked.

      This defaults based on the State Races field and cannot be modified. If you wish to adjust this box, you must modify the State Races field.

    49. Choose the Race Verified By value from the drop-down list.

      This is an optional value and is not reported to the state. It is for your organization to track who verified race, how race was verified, and when it was verified.

      The Family Access option is automatically selected when this race value comes from a family selection made in Family Access.

      If you chose an option other than N - Not Verified, the Race Verification Date field is enabled. Continue to the next sub-step.

      If you chose N - Not Verified, skip to sub-step ay.

    50. Verify the Race Verification Date or enter the correct date.

      This defaults to the current date, but can be modified as needed.

    51. Optional: Under the Federal Reporting heading, verify the box for IB Diploma Programme is checked or unchecked.
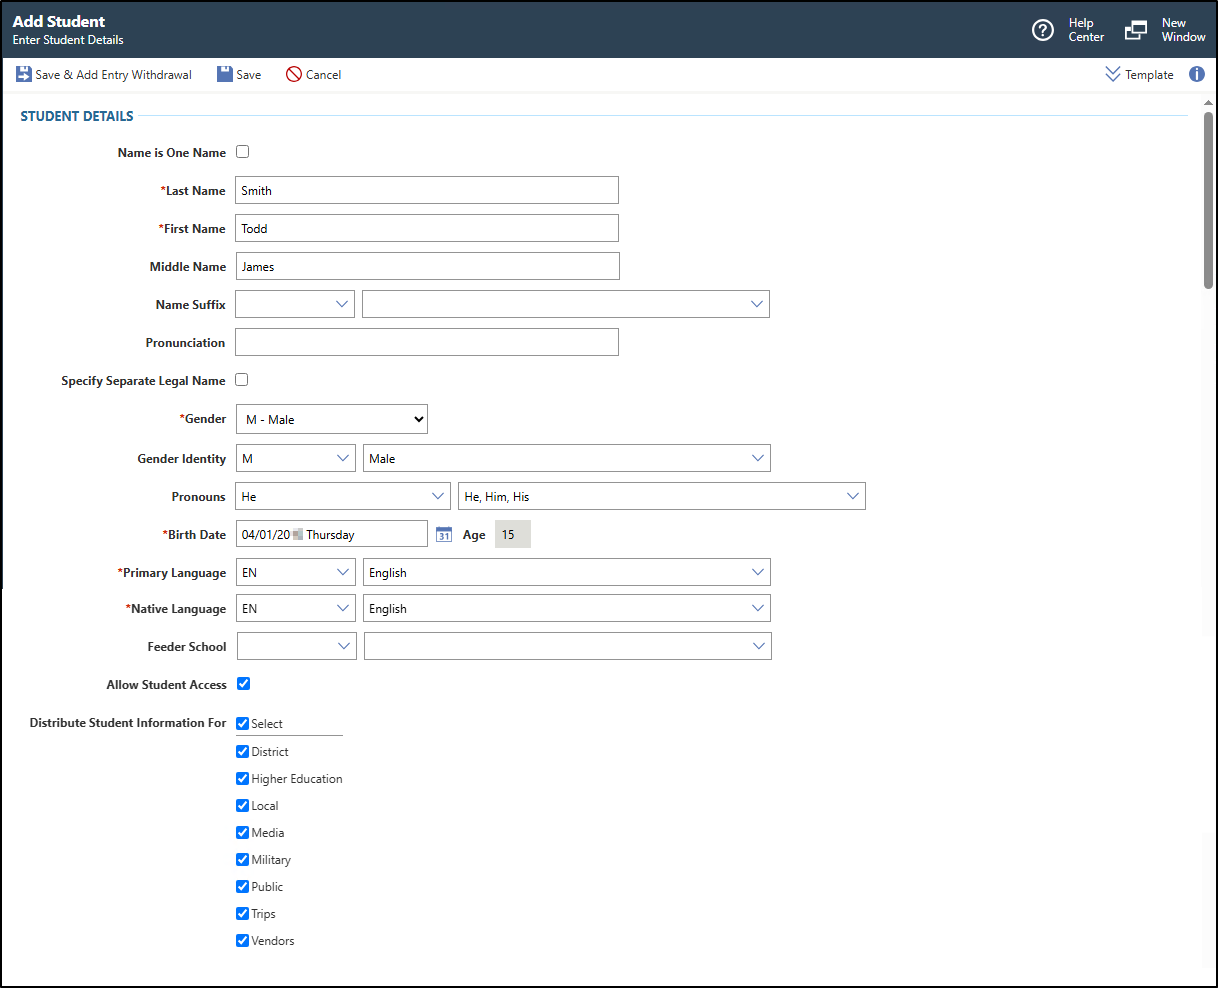
    52. Click Save & Add Entry Withdrawal near the top left of the screen to save your work.

      If you are working at the district level and do not wish to add an entry withdrawal at this time, you would select the Save option.

      You see the Add Entry Withdrawal screen, which enables you to enter the student's enrollment information. Typically, you would not complete the fields for withdrawal information unless you are creating a historical record.
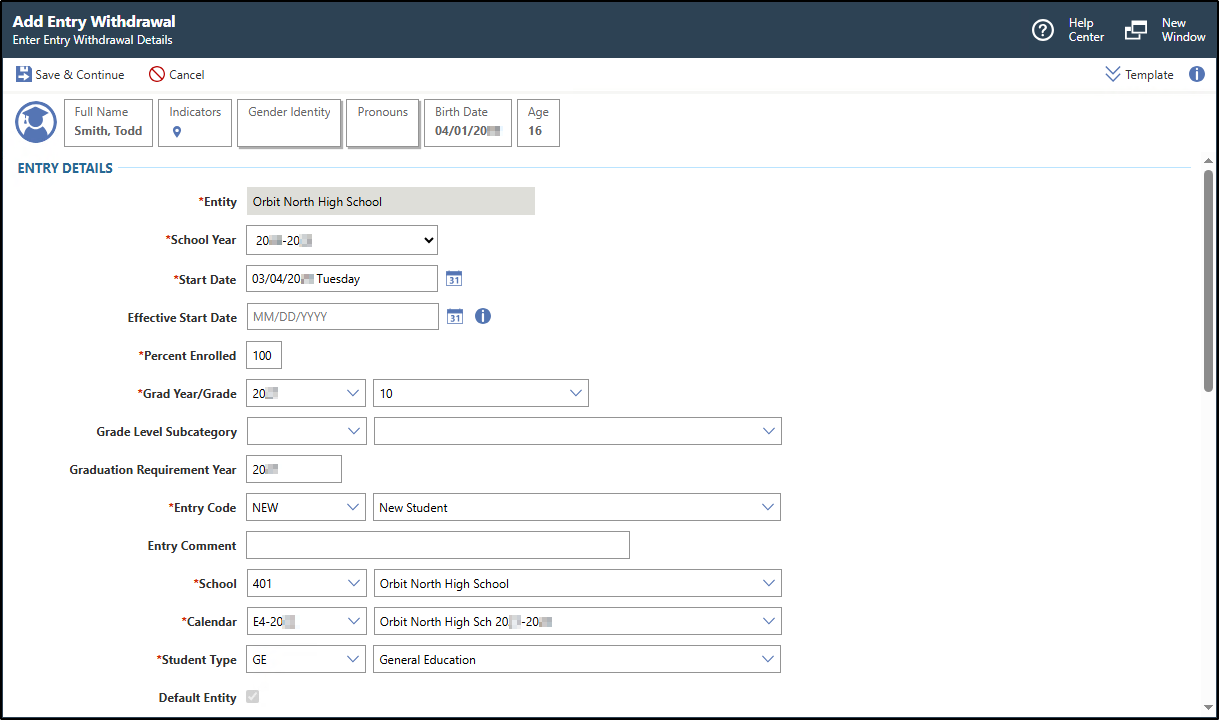
      The Add Entry Withdrawal screen displays student entry details.
    53. Optional: Verify the Template near the top right of the screen or click the Chevron down icon to choose the correct template from the drop-down list.

      If the workflow template you wish to use does not exist, you can create a new Workflow Template. If necessary, you can click Template near the top right of the screen to expand the workflow template area.

    54. Under the Entry Details heading, verify the Entity or enter the correct entity.
      You can only edit this field if you are working in the district entity. If you are working in a specific entity, this field defaults to that entity and cannot be changed. If you are working in the district entity, you must enter the entity.
    55. Verify the School Year or choose the correct school year from the drop-down list.
      This defaults to the school year you are working in, but can be modified if necessary, and identifies the year the student is being enrolled in. For example, if your school's registration opens in the spring of the current year for the upcoming school year, you would select the upcoming school year, so the student is enrolled in the school year they will be attending.
    56. Enter the student's Start Date.
    57. Optional: Enter the Effective Start Date.

      You can click the Information icon to the right of the field to view additional information.

    58. Verify the Percent Enrolled or enter the correct percent.

      Typically, most students will be 100% enrolled in the entity. However, if a student is enrolled in multiple entities, you would enter the appropriate percentage of time the student spends in this entity.

    59. Verify the Grad Year/Grade or enter the correct grade.

      This defaults based on the birth date you entered for the student but can be modified if necessary.

      The Grade Level code entered in this field must be cross walked to a Grade Reference code that has the appropriate State Grade Level attached to it.
    60. Optional: Enter the Grade Level Subcategory.
    61. Verify the Graduation Requirement Year or enter the correct year.
      This defaults based on the grad year and student birth date you entered but can be modified if necessary.
    62. Enter the Entry Code.

      The Entry Code must be tied to a state crosswalk in order to pull for the Demographic Enrollment submission. While the Entry Codes themselves are locally defined, the state value attached to that code will pull for the extract.

    63. Optional: Enter an Entry Comment.
      Typically, you would enter the name of the organization the student transferred from, or any additional details you wish to record regarding the student's enrollment.
    64. Verify the School or enter the correct school.

      This defaults to the entity's default school but can be modified if necessary. If address ranges are being enforced, this field defaults with the school you previously entered. You cannot modify this field if address ranges are being enforced in the District Configuration of the Demographics module.

    65. Verify the Calendar or enter the correct calendar.

      If you are working at the district level, this field only displays if an entity has been selected.

      This defaults to the entity's default calendar but can be modified if necessary.

    66. Enter the Student Type.
    67. Optional: Verify the box for Default Entity is checked or unchecked.
      When unchecked, the Promotion Status field no longer displays under the Withdrawal Details heading. You should only uncheck this box if the student is enrolled in another entity and spends the majority of their time in that entity. If this is the student's only active enrollment record for the school year, this box defaults to checked and cannot be modified.
    68. Under the Permit Details heading, verify the Permit or enter the correct permit.

      This defaults based on the permit you selected but can be modified if necessary.

      This field only displays if the box for Enforce Address Range Defaults is checked in the District Configuration of the Demographics module, and if you selected an address that is outside of the address range default for the school.
    69. Optional: Under the Fee Management Details heading, verify the box for Create Customer is checked or unchecked.
    70. Optional: Verify the box for Transfer Unpaid Customer Fees is checked or unchecked.

      You would check this box if you were transferring fees for a student who is transferring from one entity to another in the same district.

      This field only displays if the box for Allow Customer Create on Enrollment is checked in the Entity Configuration of the Fee Management module, and the individual is an existing fee customer.

    71. Optional: Verify the box for Transfer Unapplied Payments is checked or unchecked.

      You would check this box if you were transferring unapplied payments for a student who is transferring from one entity to another in the same district.

      This field only displays if the box for Allow Customer Create on Enrollment is checked in the Entity Configuration of the Fee Management module, and the individual is an existing fee customer.

    72. Optional: Under the Food Service Details heading, verify the box for Create Customer is checked or unchecked.

      You would uncheck this box if the student already has a food service customer account.

    73. Optional: Under the WA State Reporting (Entry) heading, check the box for Exclude From CEDARS.
    74. Optional: Verify the box for Primary School is checked or unchecked.

      If you modify this box at a later time, the school's primary responsibility changes for the entire enrollment date span. If the primary responsibility changes for a school, you must complete a withdrawal and re-entry, or status change, which ensures the Primary School is reported correctly as Yes or No on the CEDARS report for each enrollment date range.

    75. Verify the P223 Resident District or check the box for Override if necessary. If you checked the Override box, enter the P223 Resident District Override.

      The Office of Superintendent of Public Instruction (OSPI) states that this value indicates the district where the student is expected to live for the majority of the time the student is enrolled.

    76. Verify the Home District or check the box for Override if necessary. If you checked the Override box, enter the Home District Override.

      The Office of Superintendent of Public Instruction (OSPI) states that this value indicates the district location where the student physically resides.

    77. Optional: Enter the Confirmed Transfer In or click the Down Arrow icon to choose from the drop-down list.

      This value identifies where the student transferred from when entering a school. You should only enter a Confirmed Transfer In code if the student has transferred from outside of Washington, from a private school, or from a home school. If the student transfers from another school within Washington, you should leave this field blank.

      You can enter a U in this field if you are unsure if the student is a transfer, until you are sure of the student's status. Until then, if the U is selected, the U is treated by CEDARS as a blank entry, and is reported as blank.

    78. Optional: Under the Federal Reporting heading, verify the box for Report To CRDC is checked or unchecked.

      This box defaults to checked, but can be unchecked if necessary.

    79. Note: Typically, you would not complete the next five sub-steps unless you are creating a historical record.
      Under the Withdrawal Details heading, enter the End Date.

      This value should reflect the last day the student attended school.

    80. Verify the Withdrawal Date is correct.
    81. Enter the Withdrawal Code.
    82. Optional: Enter a Withdrawal Comment.
    83. Optional: Choose the Promotion Status from the drop-down list.

      This field only displays if the box for Default Entity is checked.

  6. Click Save & Continue near the top left of the screen.
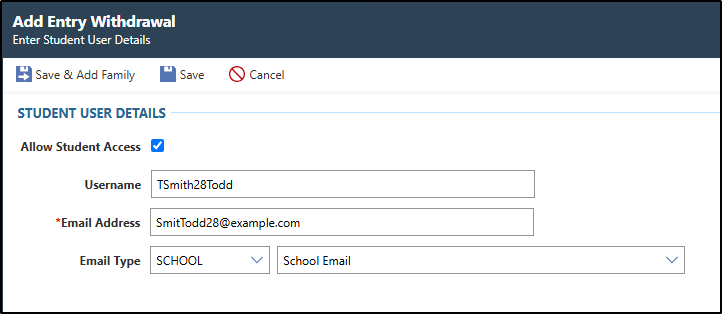
    You should only click Save if you do not wish to enter user information. This option only displays if the Username Generation Type is Optional in the System Configuration of the Student module. If you click Save, you return to the Student Profile. No further steps are required.

    You see fields for entering user information.

    The Add Entry Withdrawal screen displays Todd Smith's Student Access details.
  7. Verify the box for Allow Student Access is checked or unchecked.

    This box defaults based on the selection you made in step 5, sub-step am.

  8. Verify the Username or enter the correct username.
    This username defaults based on the username structure set up in the System Configuration of the Student module. This field can only be modified if the Username Generation Type is Optional or Required and Editable in the System Configuration of the Student module.

    If the Username Generation Type is Never in the System Configuration of the Student module, the Username field will not display.

  9. Verify the Email Address or enter the correct email.
    This email address defaults based on the email address structure set up in the System Configuration of the Student module. This field can only be modified if the Email Generation Type is O - Optional or R - Required and Editable in the System Configuration of the Student module.

    If the Email Generation Type is N - Never in the System Configuration of the Student module, this field does not display.

  10. Verify the Email Type or enter the correct type.

    The email type defaults based on the email type selected in the System Configuration of the Student module. This field can only be modified if the Email Generation Type is O - Optional or R - Required and Editable in the System Configuration of the Student module.

    If the Email Generation Type is N - Never in the System Configuration of the Student module, this field does not display.

  11. Choose one of the options near the top left of the screen to save your work.
    OptionDescription
    Save & Add Family Saves the user information and you see the Add a Family to the Student screen, which enables you to attach a family to the student. Adding a family will be discussed in a separate lesson. If you choose not to add a family at this time, you can always add one later.
    Save Saves the user information and you see the Student Profile for the student you added.