Entering Attendance by Student
The Attendance Entry by Student option enables an office staff member to enter attendance for a student for the current day, a future day, or a previous day. You would use this option when a parent or guardian calls the attendance office to report a student will be late or absent. You can mark the student absent for an entire day or enter an attendance entry for one or more periods.
You can also view a browse list of all attendance in reverse date order, with the most recent attendance occurrence at the top of the list. You can open records and make modifications if necessary.
After entering attendance data, you can update student attendance as needed through the Student Profile.
Scroll past the video to access the step-by-step instructions.
Before you begin
-
Attendance periods must be set up.
-
Students must be scheduled into classes.
-
Attendance types must be set up.
-
If you wish to use attendance reasons, they must be set up.
-
The calendar must be set up to enter attendance.
Audio Transcript
As an office staff member, you can enter attendance for individual students for the current day, a future day, or a previous day. You can also enter attendance for a full day or for certain periods as needed. We'll begin by navigating to the Attendance Entry by Student feature within the Attendance module. Let's add attendance for our student, Jeff Baker. We'll use the Student field to locate him now. Under the Quick Entry heading, the start and end dates default to today's date but can be updated if we're adding attendance for a different day. For this example, we'll leave them as they are. The All Day box can be checked if Jeff is going to be absent for the entire day. By selecting it, the Start Period and End Period fields are disabled. For this example, Jeff will only be missing periods 1 to 3 due to a dentist appointment, so we'll uncheck this box. We can indicate the periods he'll be missing within the Start Period and End Period fields. The Type field can be used to help us identify how a student is absent. The options available for selection are based on the Attendance Type codes set up in our system. Since his guardian called in to the school about the absence, we can select a type of Absent Excused. We'll notice on the right side of the screen that the periods for when Jeff will be absent from his scheduled classes automatically update with our selection. The same will occur as we enter a reason and comment. The Reason field is optional, but we'd like to use it to indicate the reason why Jeff will be gone from his first three classes. The options available for selection pull from the Attendance Reason codes set up in our system. Since Jeff will be gone due to a dentist appointment, we can select that option now. We can enter additional information regarding this absence into the Comment field. As we enter a comment, we'll notice an Eye icon display to the right of the field. Selecting this option will display the Mass Attendance Comment Privacy Settings which allow us to hide this comment from certain portals of the software if we'd like. Since we want to keep this comment visible, we'll click Cancel. We'll check the box for Guardian Notified to indicate that Jeff's guardians are aware of this absence. If we have attachments we'd like to add to this absence, we could do so by selecting or dragging and dropping files. Additional information regarding this student's current attendance can be found near the bottom of the screen. Once we've completed entering in our information, we can save. By entering attendance records for your students, you can keep track of when students will be absent from school.
As an office staff member, you can enter attendance for individual students for the current day, a future day, or a previous day. You can also enter attendance for a full day or for certain periods as needed. We'll begin by navigating to the Attendance Entry by Student feature within the Attendance module. Let's add attendance for our student, Jeff Baker. We'll use the Student field to locate him now. Under the Quick Entry heading, the start and end dates default to today's date but can be updated if we're adding attendance for a different day. For this example, we'll leave them as they are. The All Day box can be checked if Jeff is going to be absent for the entire day. By selecting it, the Start Period and End Period fields are disabled. For this example, Jeff will only be missing periods 1 to 3 due to a dentist appointment, so we'll uncheck this box. We can indicate the periods he'll be missing within the Start Period and End Period fields. The Type field can be used to help us identify how a student is absent. The options available for selection are based on the Attendance Type codes set up in our system. Since his guardian called in to the school about the absence, we can select a type of Absent Excused. We'll notice on the right side of the screen that the periods for when Jeff will be absent from his scheduled classes automatically update with our selection. The same will occur as we enter a reason and comment. The Reason field is optional, but we'd like to use it to indicate the reason why Jeff will be gone from his first three classes. The options available for selection pull from the Attendance Reason codes set up in our system. Since Jeff will be gone due to a dentist appointment, we can select that option now. We can enter additional information regarding this absence into the Comment field. As we enter a comment, we'll notice an Eye icon display to the right of the field. Selecting this option will display the Mass Attendance Comment Privacy Settings which allow us to hide this comment from certain portals of the software if we'd like. Since we want to keep this comment visible, we'll click Cancel. We'll check the box for Guardian Notified to indicate that Jeff's guardians are aware of this absence. If we have attachments we'd like to add to this absence, we could do so by selecting or dragging and dropping files. Additional information regarding this student's current attendance can be found near the bottom of the screen. Once we've completed entering in our information, we can save. By entering attendance records for your students, you can keep track of when students will be absent from school.
- Under the Student Attendance heading, click Add Student Attendance near the top right of the screen.Expected Result
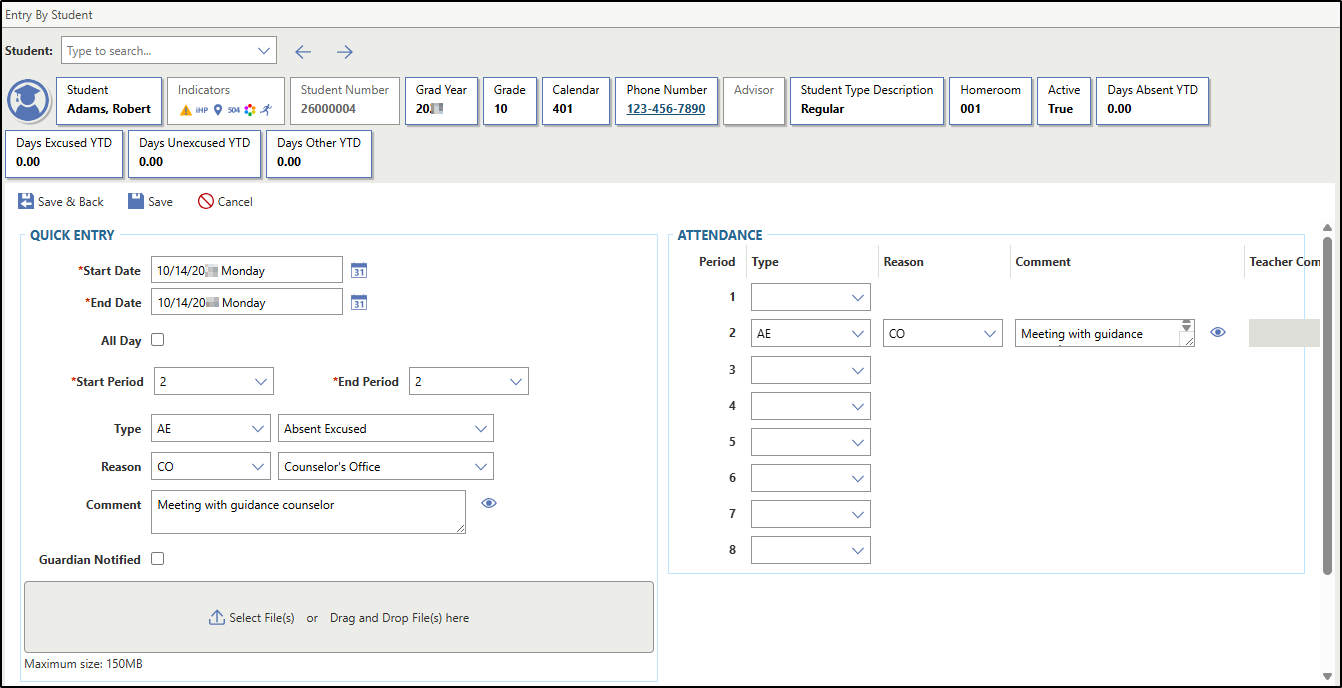
You see the Entry by Student screen, which displays three areas: Quick Entry, Attendance, and Current Attendance. Quick Entry is the area you will use most often. This is where you enter attendance for the student for all day or from a start to an end period.
To the right of the Quick Entry area, you see the Attendance area and a column of period numbers. This column populates based on what you enter in the Quick Entry area. This is where you can make modifications for individual class periods if you need to update student attendance records further. As you enter the attendance entry information in the Quick Entry area, the system auto-fills the Attendance area to the right with appropriate entries. Grayed-out periods indicate the student is not scheduled into class during those periods.
Under those two areas, you see a Current Attendance display for the student. This is useful if you wish to verify the attendance on the selected date was recorded correctly. The display includes absent or tardy days only for the school year you are working in. For each record, you see the date, Day Rotation code, and the guardian notified indicator. The attendance recorded for each period for that day displays in a row across the screen. This area is view-only.You can review the student's current year attendance at the bottom of the screen. You can see any previously entered attendance records for the day, as well as historical records, which can help you identify patterns in the student's attendance.
The image below shows the Entry by Student screen, which displays an attendance entry for Robert Adams, who was excused for period 2 on October 14 due to a meeting with a counselor and whose guardian was not notified of the absence.