Configuring Teacher Entry for Attendance in Teacher Access
Listed below are the sections for configuring teacher entry for attendance in Teacher Access.
-
Configuring Teacher Entry and General Attendance Options
-
Adding Teacher Entry Column Headers
Scroll past the video to access the step-by-step instructions.
You may see fields in the following media that do not apply to your state. Please reference the written documentation for guidance on fields applicable to your state.
Audio Transcript
Configuring teacher entry for attendance in Teacher Access enables you to determine the functionality and permissions your teachers will have when entering attendance in Teacher Access. To begin, we’ll navigate to the Entity Group Year Configuration setting within the Attendance module. For our example, the options on the General tab here can be left at their default. Heading over to the Teacher Entry tab, we can begin configuring the fields on this screen as necessary. The Teacher Entry Cutoff Type field lets us specify when teachers can enter attendance. The No Cutoff Time option enables teachers to enter attendance from midnight until 11:59 p.m. Selecting Specific Time will display the Specific Time field where we would specify the time that teachers have to save their attendance. The # Minutes After Period Start and # Minutes After Period End options give us the # Minutes field where we would enter how many minutes teachers have after the start or end of a period to enter attendance. With the Attendance Window option, we’ll get the Start Time and End Time fields. This enables us to determine the time range teachers have for entering attendance. For example, if we wanted teachers to have from 8 a.m. until 4 p.m. to enter attendance, we would specify those times. The Duration option enables us to specify the number of minutes after the start of each period that teachers can begin entering attendance, along with how long the attendance-taking period will be open for. For example, teachers can start entering attendance three minutes after a period starts and they must have their attendance saved within the next five minutes. The last option is By Period. This enables us to specify certain cutoff types for each period. For our example, we want all teachers to have until 4 p.m. to enter attendance, so we’ll select the Specific Time option and enter the time. Checking the Restrict Teacher Attendance Updates box tells the system that once a teacher saves their attendance, they won’t be able to go in and update their selections. We’ll need to specify which attendance periods to restrict. Let’s select all periods. The Allow Teachers to Modify Previous Attendance box enables teachers to go back and modify attendance from a previous day. If we check the box, we’ll need to specify how many previous days teachers can modify attendance for. We can also choose to limit the attendance periods where previous days' attendance can be updated. Because we want this to apply to all periods, we’ll leave this blank. The Use Mark All Students Present on Tile option enables teachers to mark students as present from the tile screen, without having to go into the list of student names. Let’s check this box to enable this option. Let’s check the Use Teacher Perfect Attendance Confirmation box. This allows teachers to confirm that all students are present. We then need to determine if we want to use special class counts. Checking the corresponding box will allow teachers to view the total number of any attendance records that are flagged to include special class counts. We can then enter the Special Class Counts Label. What we enter here will display as the header of that column in our teachers' attendance area. Next, we need to choose our Multi Period Class Count Method. This option only impacts how attendance is counted in the Excused, Unexcused, and the optional Special Class Count columns of the Daily Attendance screen in Teacher Access. For example, if we wanted any class that meets for more than one period to only have attendance taken, we would select the A – All Multi Periods as One option. The C – Consecutive Periods as One option is only going to let teachers take attendance for a class that meets for two or more periods and will count as one period present or absent. The E – Each Period option would allow teachers to take attendance during each period individually. Let’s select this option for our example. We’ll check the box for Allow Teacher Comments. The Default Attendance Type option is what is recorded in Teacher Access if no modifications are made to a student’s record. Typically, the default is Present, but we can override that and specify the override if necessary. We’ll accept the default for this example. The Present Background Color specifies what color students’ desks will be when teachers take attendance via the seating chart option. This defaults to white, but we’ll select green to easily represent students being present for the day. Let’s save our changes. Next, we need to specify our teacher entry columns. These are the different columns that teachers have available for how to mark their students. The system provides a present column by default. We’re going to create a column for Absent and a column for Tardy. We’ll click Add Teacher Entry and enter in Absent for the Teacher Entry Column field. This will be our first column, so the Display Order field can be left as is. If teachers are taking attendance via seating chart, students will display as red once they’re flagged as absent. Let’s click Save & Select Attendance Types to select which attendance types teachers will have available for selection. In our case, we’ll choose Teacher Absence Unexcused. We could save this selection and select attendance reasons, but most of the time teachers won’t know the reason why their students are absent. We’ll simply click Save. We’ll repeat these steps to create our Tardy column. The Display Order can be left at 2, and we’ll choose the color we want to display when students are marked as tardy. Let’s save and select the attendance type. We’ll choose Tardy Unexcused and save our selection. We see that our teacher entry columns have been created. Now that you know how to configure teacher entry for attendance in Teacher Access, you can be sure that your teachers are set up to take student attendance.
Configuring teacher entry for attendance in Teacher Access enables you to determine the functionality and permissions your teachers will have when entering attendance in Teacher Access. To begin, we’ll navigate to the Entity Group Year Configuration setting within the Attendance module. For our example, the options on the General tab here can be left at their default. Heading over to the Teacher Entry tab, we can begin configuring the fields on this screen as necessary. The Teacher Entry Cutoff Type field lets us specify when teachers can enter attendance. The No Cutoff Time option enables teachers to enter attendance from midnight until 11:59 p.m. Selecting Specific Time will display the Specific Time field where we would specify the time that teachers have to save their attendance. The # Minutes After Period Start and # Minutes After Period End options give us the # Minutes field where we would enter how many minutes teachers have after the start or end of a period to enter attendance. With the Attendance Window option, we’ll get the Start Time and End Time fields. This enables us to determine the time range teachers have for entering attendance. For example, if we wanted teachers to have from 8 a.m. until 4 p.m. to enter attendance, we would specify those times. The Duration option enables us to specify the number of minutes after the start of each period that teachers can begin entering attendance, along with how long the attendance-taking period will be open for. For example, teachers can start entering attendance three minutes after a period starts and they must have their attendance saved within the next five minutes. The last option is By Period. This enables us to specify certain cutoff types for each period. For our example, we want all teachers to have until 4 p.m. to enter attendance, so we’ll select the Specific Time option and enter the time. Checking the Restrict Teacher Attendance Updates box tells the system that once a teacher saves their attendance, they won’t be able to go in and update their selections. We’ll need to specify which attendance periods to restrict. Let’s select all periods. The Allow Teachers to Modify Previous Attendance box enables teachers to go back and modify attendance from a previous day. If we check the box, we’ll need to specify how many previous days teachers can modify attendance for. We can also choose to limit the attendance periods where previous days' attendance can be updated. Because we want this to apply to all periods, we’ll leave this blank. The Use Mark All Students Present on Tile option enables teachers to mark students as present from the tile screen, without having to go into the list of student names. Let’s check this box to enable this option. Let’s check the Use Teacher Perfect Attendance Confirmation box. This allows teachers to confirm that all students are present. We then need to determine if we want to use special class counts. Checking the corresponding box will allow teachers to view the total number of any attendance records that are flagged to include special class counts. We can then enter the Special Class Counts Label. What we enter here will display as the header of that column in our teachers' attendance area. Next, we need to choose our Multi Period Class Count Method. This option only impacts how attendance is counted in the Excused, Unexcused, and the optional Special Class Count columns of the Daily Attendance screen in Teacher Access. For example, if we wanted any class that meets for more than one period to only have attendance taken, we would select the A – All Multi Periods as One option. The C – Consecutive Periods as One option is only going to let teachers take attendance for a class that meets for two or more periods and will count as one period present or absent. The E – Each Period option would allow teachers to take attendance during each period individually. Let’s select this option for our example. We’ll check the box for Allow Teacher Comments. The Default Attendance Type option is what is recorded in Teacher Access if no modifications are made to a student’s record. Typically, the default is Present, but we can override that and specify the override if necessary. We’ll accept the default for this example. The Present Background Color specifies what color students’ desks will be when teachers take attendance via the seating chart option. This defaults to white, but we’ll select green to easily represent students being present for the day. Let’s save our changes. Next, we need to specify our teacher entry columns. These are the different columns that teachers have available for how to mark their students. The system provides a present column by default. We’re going to create a column for Absent and a column for Tardy. We’ll click Add Teacher Entry and enter in Absent for the Teacher Entry Column field. This will be our first column, so the Display Order field can be left as is. If teachers are taking attendance via seating chart, students will display as red once they’re flagged as absent. Let’s click Save & Select Attendance Types to select which attendance types teachers will have available for selection. In our case, we’ll choose Teacher Absence Unexcused. We could save this selection and select attendance reasons, but most of the time teachers won’t know the reason why their students are absent. We’ll simply click Save. We’ll repeat these steps to create our Tardy column. The Display Order can be left at 2, and we’ll choose the color we want to display when students are marked as tardy. Let’s save and select the attendance type. We’ll choose Tardy Unexcused and save our selection. We see that our teacher entry columns have been created. Now that you know how to configure teacher entry for attendance in Teacher Access, you can be sure that your teachers are set up to take student attendance.
-
To add teacher entry column headers, complete the
following sub-steps.
Step InformationTeacher entry column headers enable you to determine the types of attendance teachers can record for students in Teacher Access. You must attach at least one Attendance Type to the teacher entry record to enable teachers to enter attendance. You can also attach Attendance Reasons if you wish to grant teachers the ability to specify reasons when taking attendance through Teacher Access.
Before you begin, attendance types must be created if you want to link each teacher entry to an attendance type as you are adding them.
-
Click Save near the top left of the screen to save your work.
Expected Result
You return to the Teacher Entry tab of the Entity Group Year Configuration Details screen, which displays the teacher entry column you added under the Teacher Entry Restrictions heading.
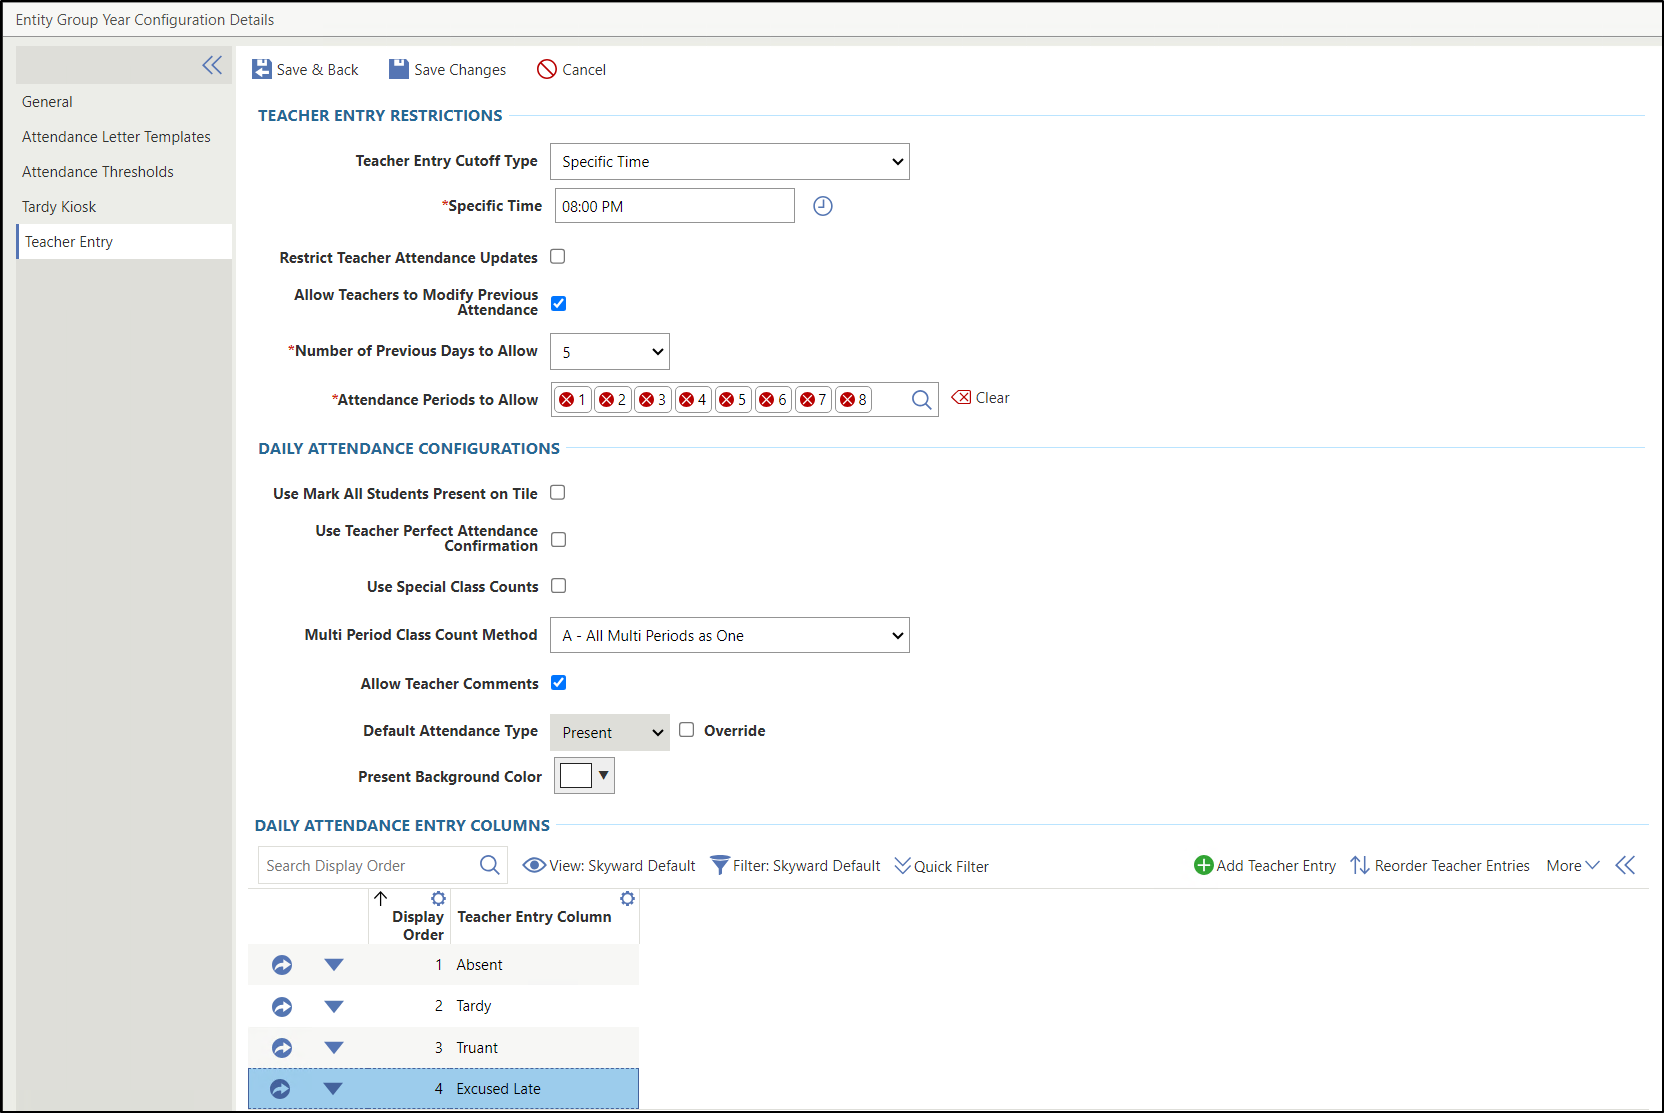
The image below displays the Teacher Entry tab. Under the Teacher Entry Restrictions heading, Specific Time is selected for the Teacher Entry Cutoff Type. The box for Restrict Teacher Attendance Updates is unchecked and the Allow Teachers to Modify Previous Attendance is checked. The Number of Previous Days to Allow field is set to 5 and the Attendance Periods to Allow field displays the selected periods of 1-8. Under the Daily Attendance Configurations heading, the boxes for Use Mark All Students Present on Tile, Use Teacher Perfect Attendance Confirmation, and Use Special Class Counts are unchecked. A - All Multi Periods as One is selected for the Multi Period Class Count Method. The box for Allow Teacher Comments is checked and the Default Attendance Type is hard-coded as Present with the Override box unchecked. The Present Background Color is white.
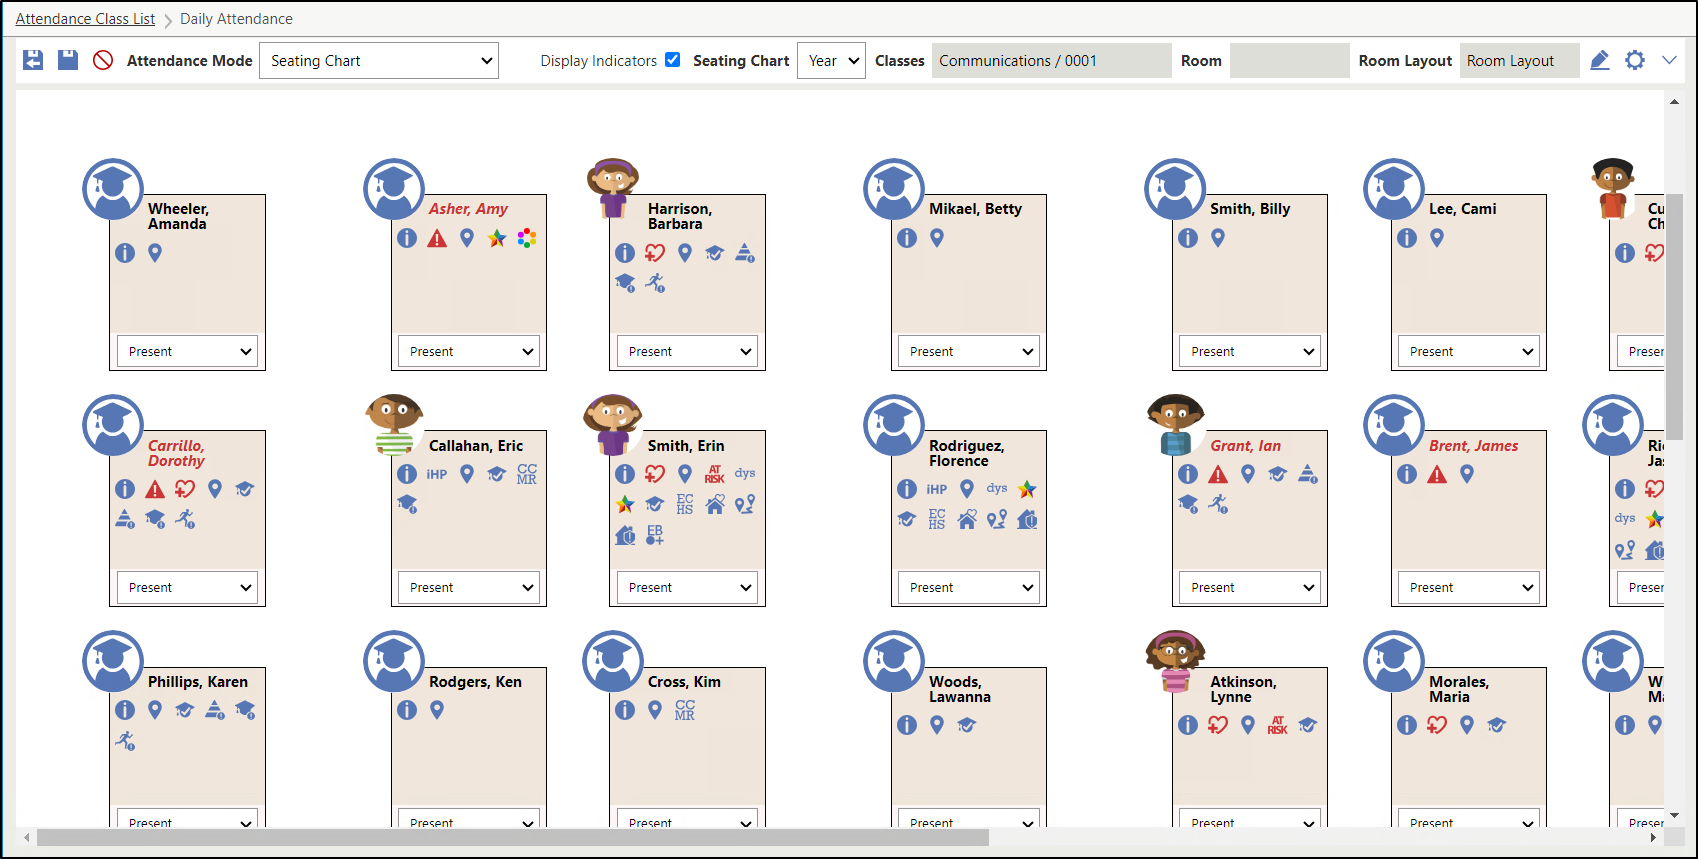
The Daily Attendance screen in Teacher Access will display with the configured settings for taking attendance. The image below displays the Daily Attendance screen with the Seating Chart attendance mode for Communications 0001 with drop-down menus to indicate attendance for each student.
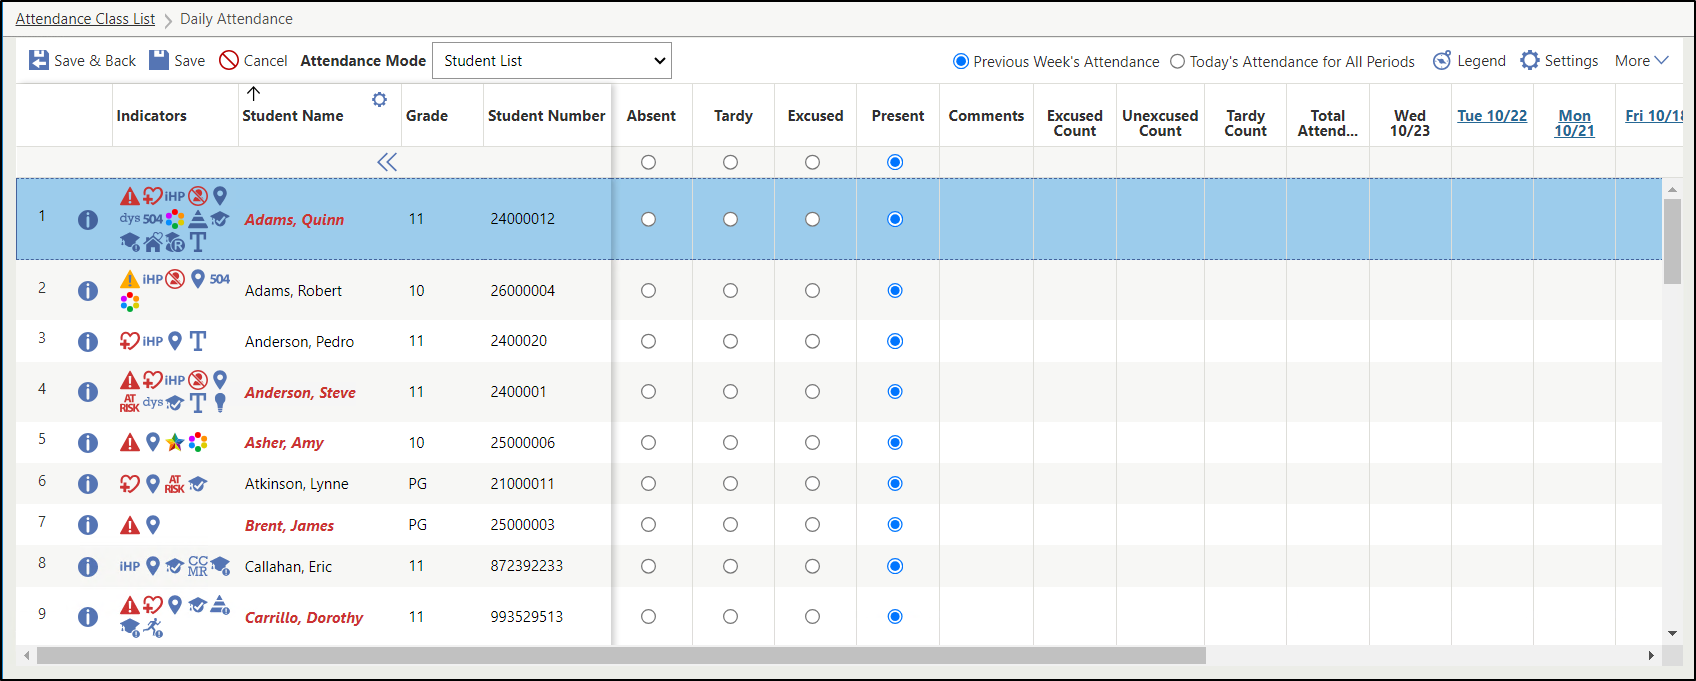
The image below displays the Daily Attendance screen, which displays the Student List attendance mode with a radio button for each student indicating if the student is absent, tardy, excused, or present.
-
Click Save near the top left of the screen to save your work.
Result(s)
You have successfully configured teacher entry for attendance in Teacher Access.