The re-enrolling student for current school year process allows administrative access users, such as office assistants, to re-enroll a withdrawn or no-show student and reactivate their previous schedule if necessary. For example, if a student does not show up for the first week of classes, the student may be withdrawn from the Entity
. However, when the student shows up for the second week of classes, you must re-enroll the student and reactivate their previously scheduled and requested courses. This prevents you from having to re-enter the student's schedule manually and enables the student to attend class more quickly.
Scroll past the video to access the step-by-step instructions.
You may see fields in the following media that do not apply to your state. Please reference the written documentation for guidance on fields applicable to your state.
Before you begin
The student you wish to re-enroll must have a withdrawal record for the current year.
Audio Transcript
If you have a student who withdrew from your entity and returns within the same year, you can re-enroll that student for the current year and reactivate their schedule. To begin the process, let's head to the Student Profile within the Student module. Since we will be updating this student, we can select the Student Enrollment sub-tab within the Enrollment tab group to add our enrollment record. Because we are re-enrolling this student from the entity level, the Entity field defaults and cannot be modified. The School Year defaults to the current year, but this can be changed if necessary. The appropriate start date for when this student will return to our entity can be identified now. We can select an Effective Start Date to indicate the first day this student will begin attending classes if the start date is not a school day. For this example, this student's first day of classes will be the same as the Start Date we just entered, so we'll leave this blank. However, this field can be helpful in other scenarios such as when a student may be advancing to a different grade mid-year that would require a status change. The Percent Enrolled defaults to 100, which is correct because we want the student to be enrolled 100% of the time in this entity. The Grad Year/Grade field defaults to the grade level the student should be in based on the school year we are enrolling the student into. Since this is the correct year, we'll leave it as is. We also have the option to select a grade level subcategory. For our example, we will leave it blank. The Graduation Requirement Year defaults to the year that is specified within the Graduation Details sub-tab of the Student Profile, but could be changed if necessary. Now, let's enter an Entry Code. Since we are re-enrolling this student back into our entity, we'll select Re-Enroll. An entry comment can be included to give further information about the enrollment if necessary. The School and Calendar fields default to the entity's default school and calendar but can be updated if needed. Because this student will be a general education student, we'll select that option for the Student Type field. If this student will be enrolled in another entity and spend the majority of her time there, we could uncheck the Default Entity box. However, this will be her only active enrollment record for the school year so the Default Entity box is checked and cannot be modified. For our example, we see information regarding fee management. The fields under this area will only display during this process if the box for Allow Customer Create on Enrollment is checked within the Entity Configuration of the Fee Management module. We'll leave the Create Customer box checked to indicate that we want to create customer records for this student. The Transfer Unpaid Customer Fees and the Transfer Unapplied Payments boxes can be checked if we'd like to transfer any unpaid fees or unapplied payments this student may have. Let's scroll down to view more fields. Since we are not withdrawing our student for this example, we'll leave the fields under the Withdrawal Details heading blank and continue by saving and reactivating the student's schedule. Here, we can see all the available courses our student can be scheduled back into. Let's check the Schedule box next to each course we wish to schedule her in. Once finished, we'll click Next, where we can see the list of courses we just scheduled for her. After we've verified the information displaying is correct, we can click Run Process. Let's click Close. With the ability to re-enroll students back into your entity for the current school year, you can be sure that you are setting your students up for success.
If you have a student who withdrew from your entity and returns within the same year, you can re-enroll that student for the current year and reactivate their schedule. To begin the process, let's head to the Student Profile within the Student module. Since we will be updating this student, we can select the Student Enrollment sub-tab within the Enrollment tab group to add our enrollment record. Because we are re-enrolling this student from the entity level, the Entity field defaults and cannot be modified. The School Year defaults to the current year, but this can be changed if necessary. The appropriate start date for when this student will return to our entity can be identified now. We can select an Effective Start Date to indicate the first day this student will begin attending classes if the start date is not a school day. For this example, this student's first day of classes will be the same as the Start Date we just entered, so we'll leave this blank. However, this field can be helpful in other scenarios such as when a student may be advancing to a different grade mid-year that would require a status change. The Percent Enrolled defaults to 100, which is correct because we want the student to be enrolled 100% of the time in this entity. The Grad Year/Grade field defaults to the grade level the student should be in based on the school year we are enrolling the student into. Since this is the correct year, we'll leave it as is. We also have the option to select a grade level subcategory. For our example, we will leave it blank. The Graduation Requirement Year defaults to the year that is specified within the Graduation Details sub-tab of the Student Profile, but could be changed if necessary. Now, let's enter an Entry Code. Since we are re-enrolling this student back into our entity, we'll select Re-Enroll. An entry comment can be included to give further information about the enrollment if necessary. The School and Calendar fields default to the entity's default school and calendar but can be updated if needed. Because this student will be a general education student, we'll select that option for the Student Type field. If this student will be enrolled in another entity and spend the majority of her time there, we could uncheck the Default Entity box. However, this will be her only active enrollment record for the school year so the Default Entity box is checked and cannot be modified. For our example, we see information regarding fee management. The fields under this area will only display during this process if the box for Allow Customer Create on Enrollment is checked within the Entity Configuration of the Fee Management module. We'll leave the Create Customer box checked to indicate that we want to create customer records for this student. The Transfer Unpaid Customer Fees and the Transfer Unapplied Payments boxes can be checked if we'd like to transfer any unpaid fees or unapplied payments this student may have. Let's scroll down to view more fields. Since we are not withdrawing our student for this example, we'll leave the fields under the Withdrawal Details heading blank and continue by saving and reactivating the student's schedule. Here, we can see all the available courses our student can be scheduled back into. Let's check the Schedule box next to each course we wish to schedule her in. Once finished, we'll click Next, where we can see the list of courses we just scheduled for her. After we've verified the information displaying is correct, we can click Run Process. Let's click Close. With the ability to re-enroll students back into your entity for the current school year, you can be sure that you are setting your students up for success.
Select Menu > Administrative Access > Student.
Select Student Profile under Features.
You see the Student Profile for the first student listed alphabetically in the entity or for the last student whose profile you had open.
is checked within the District Configuration of the Demographics module.
If the box for Enforce Address Range Defaults is not checked, you see fields for entry withdrawal information for the student. Skip to sub-step e.
If the box for Enforce Address Range Defaults is checked and the student's address is within an address range default that contains the default school for the entity, skip to sub-step e.
If the box for Enforce Address Range Defaults is checked and the student's address is within an address range default that does not include the default school for the entity or the student's address is not included in any address ranges, you must complete sub-step a.
If the student's address is not included in any address range defaults, skip to sub-step e.
If the student's address is within a range that does not include the default school for the entity, continue to the next sub-step.
Under the Address School Path Override heading, verify the school in the New School Path field or enter the correct school path.
Verify the school in the School Path Overridden field or enter the correct school.
Click Next near the top left of the screen.
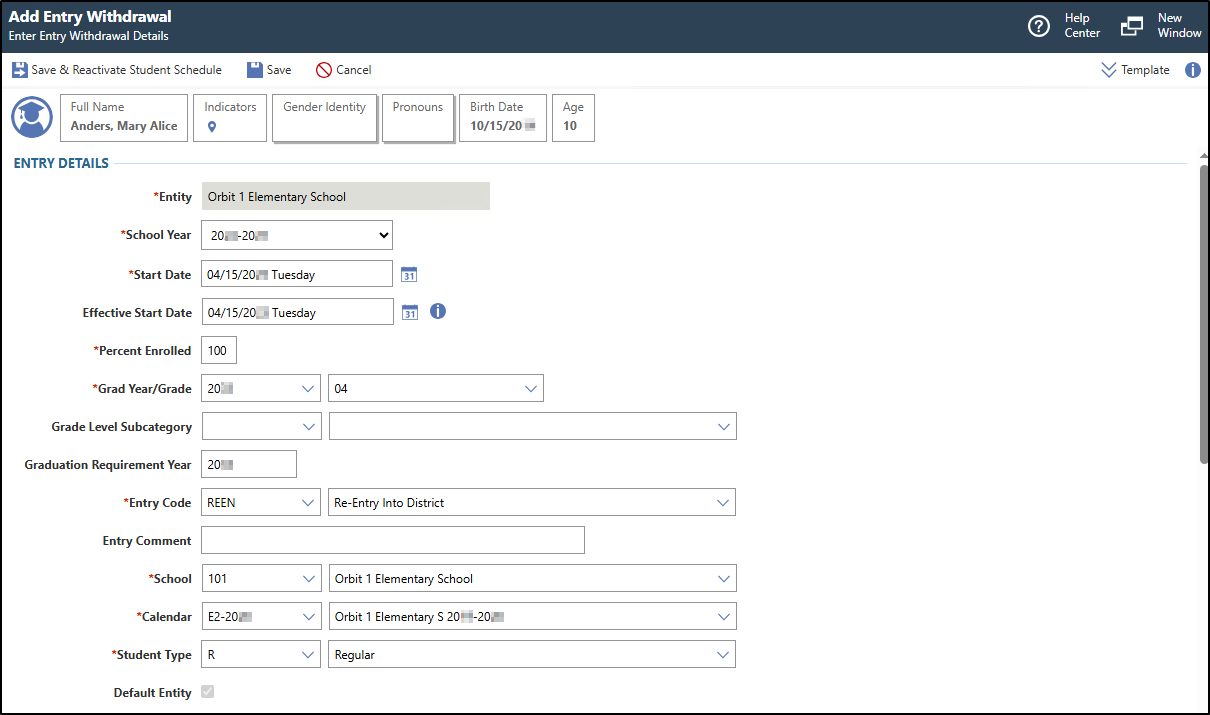
You see fields for entering information about the student's enrollment.
Optional: Verify the Template near the top right of the screen or click the Chevron down icon to choose the correct template from the drop-down list.
If the workflow template you wish to use does not exist, you can create a new Workflow Template. If necessary, you can click Template near the top right of the screen to expand the workflow template area.
Under the Entry Details heading, verify the Entity or enter the correct entity.
You can only edit this field if you are working in the district entity. If you are working in a specific entity, this field defaults to that entity and cannot be changed. If you are working in the district entity, you must enter the entity.
Typically, most students will be 100% enrolled in the entity. However, if a student is enrolled in multiple entities, you would enter the appropriate percentage of time the student spends in this entity.
You would enter a grade level subcategory if the student's grade level needs additional clarification. For example, if a special education student is in grade 12, but is 20 years old, you could enter a subcategory that explains this.
For example, you could enter, "Re-enroll Student."
Verify the School or enter the correct school.
This defaults to the entity's default school but can be modified if necessary. If address ranges are being enforced, this field defaults with the school you previously entered. You cannot modify this field if address ranges are being enforced in the District Configuration of the Demographics module.
You should only uncheck this box if the student is enrolled in another entity and spends the majority of their time in that entity. If this is the student's only active enrollment record for the school year, this box defaults to checked and cannot be modified.
You are only required to enter a permit if the school the student will attend is not the school the student would have attended based on their address.
Optional: Under the Fee Management Details heading, verify the box for Create Customer is checked or unchecked.
is checked in the Entity Configuration of the Fee Management module.
This box defaults to checked, but can be unchecked if necessary.
All students must have a fee management account, so leaving this box checked will create a customer account for the student.
You would uncheck this box if the student already has a fee management customer account.
Optional: Verify the box for Transfer Unpaid Customer Fees is checked or unchecked.
This field only displays if the box for Allow Customer Create on Enrollment is checked in the Entity Configuration of the Fee Management module, and the individual is an existing fee customer.
You would check this box if you wish for any of the student's unpaid fees to transfer to the next school year.
Optional: Verify the box for Transfer Unapplied Payments is checked or unchecked.
This field only displays if the box for Allow Customer Create on Enrollment is checked in the Entity Configuration of the Fee Management module, and the individual is an existing fee customer.
You would check this box if you wish for any of the student's unapplied payments to transfer to the next school year.
Optional: Under the Food Service Details heading, verify the box for Create Customer is checked or unchecked.
You would uncheck this box if the student already has a food service customer account.
Optional: Under the Federal Reporting heading, verify the box for Report To CRDC
This box defaults to checked, but can be unchecked if necessary.
You would uncheck this box if the student is exempt from CRDC reporting.
Click Save & Reactivate Student Schedule near the top left of the screen to continue the process.
You should only click Save if you plan to reactivate the student schedule at a later time.
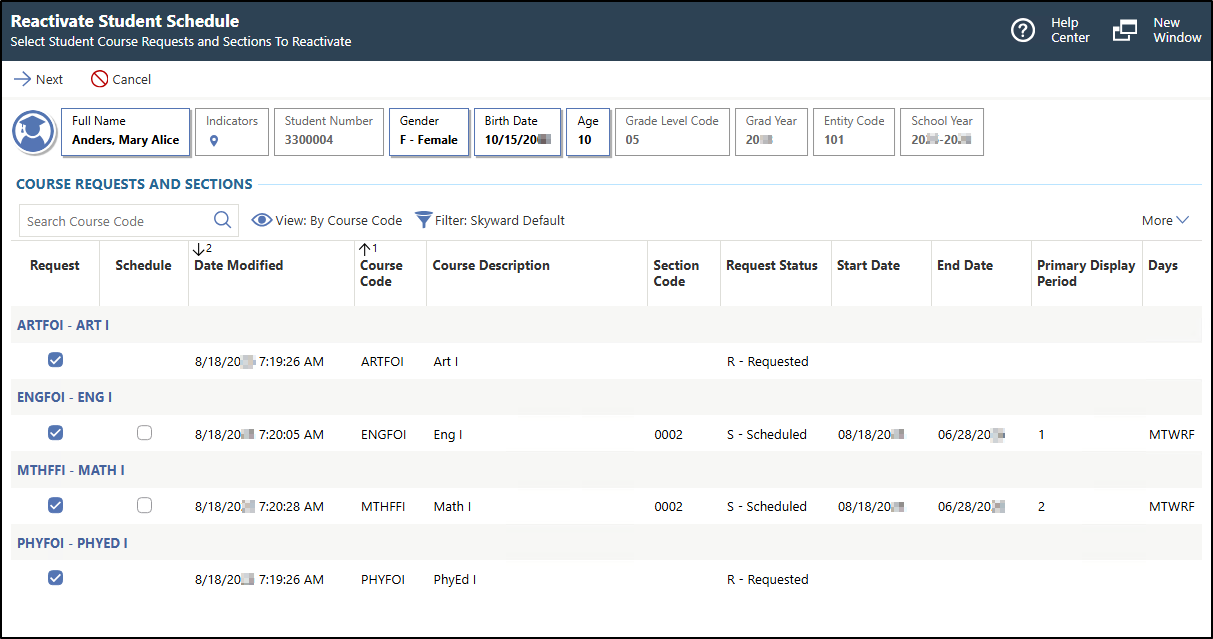
In the image below, you see the Reactivate Student Schedule screen, which displays a list of schedule transactions for the student. Records display for each Course
in which the student was scheduled or had requested, with each row identifying a separate transaction.
Check each box under the Request or Schedule column headings for each course you wish to restore for the student.
If you wish to reschedule a course immediately, check the corresponding box under the Schedule column heading. If you wish to change a formerly scheduled course into a course request, check the corresponding box under the Request column heading. If a course was requested but the student was not previously scheduled into the course, you can reactivate the request for that course but cannot schedule the student into it.
Verify the current enrollment number is below the number in the Maximum Student Count column to ensure you are not scheduling the class over its Maximum Student Count
capacity. You may need to scroll right to see the appropriate column.
You can select one or more of the transaction records, but the student will only be re-added to the course once. Selecting multiple records will not add the student to the course more than once.
Checkboxes only display in the Request column for transactions where the student had previously requested or been scheduled in the course. Checkboxes will only display in the Schedule column for transactions where the student had previously been scheduled in the course.
Click Next near the top left of the screen.
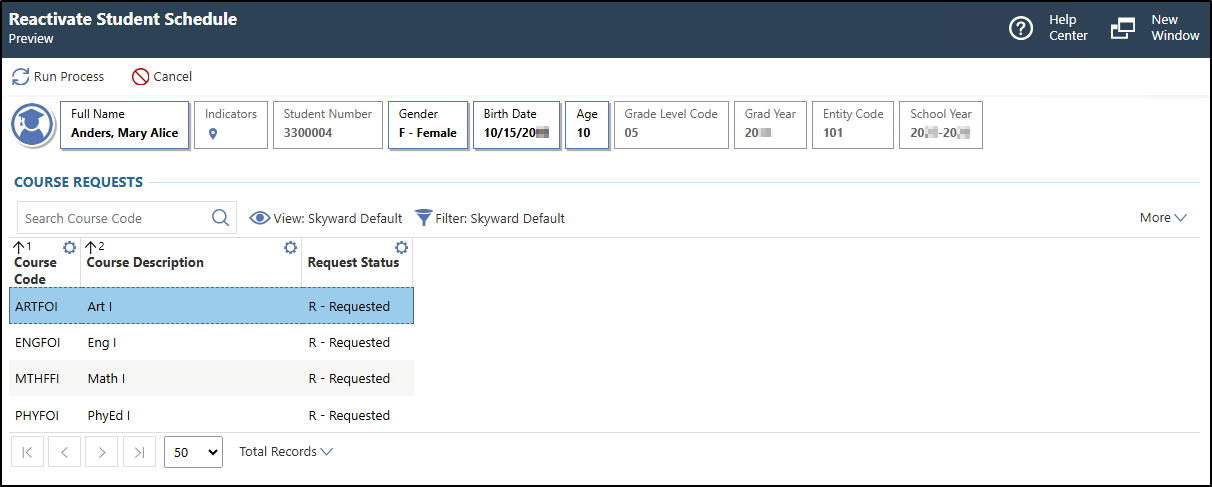
You see the courses to be processed. The top browse displays courses with a request status of R - Requested. The bottom browse displays courses with a request status of S - Scheduled.
Click Run Process near the top left of the screen.
Click Close near the top left of the screen.
You return to the Student Enrollment tab of the Student Profile.
Result(s)
You have successfully re-enrolled a student for the current school year.