Attaching Alerts to Students
Scroll past the video to access the step-by-step instructions.
Audio Transcript
You can add an alert to a student’s profile to note important information teachers and staff members may need to know. By doing so, corresponding icons will appear next to the student’s name within the Student Profile. Let’s begin by navigating to the Student Profile feature within the Student module. After selecting the Alerts sub-tab, we’ll see any existing alerts for the student. Let’s add an alert to this student. The Start Date field defaults to the current day but can be updated if needed. If we know when this alert will no longer be active, we can enter that into the End Date field. Since we don’t have this information, we’ll leave it blank. This student is allergic to bees; let’s enter this into the Information field. Checking the Critical box enables us to identify between severe alerts and less severe ones. Any alert marked as critical will display the student’s name in red along with a red banner and a red alert indicator within the Student Profile. A non-critical alert will only display a yellow alert indicator. If we wanted to require acknowledgment of this alert, we could do that here as well. Once we’ve completed configuring our alert details, we’ll click Save. We see that the alert has been added to the list. We’ll also see that her name is highlighted in red along with a red alert indicator. If we navigate to other areas of the Student Profile, we’ll be asked to acknowledge the alert attached to the student. Once we do so, we’ll also see the red alert banner. Now that you know how to attach alerts to students, you can be sure that teachers and staff members are made aware of student alerts.
You can add an alert to a student’s profile to note important information teachers and staff members may need to know. By doing so, corresponding icons will appear next to the student’s name within the Student Profile. Let’s begin by navigating to the Student Profile feature within the Student module. After selecting the Alerts sub-tab, we’ll see any existing alerts for the student. Let’s add an alert to this student. The Start Date field defaults to the current day but can be updated if needed. If we know when this alert will no longer be active, we can enter that into the End Date field. Since we don’t have this information, we’ll leave it blank. This student is allergic to bees; let’s enter this into the Information field. Checking the Critical box enables us to identify between severe alerts and less severe ones. Any alert marked as critical will display the student’s name in red along with a red banner and a red alert indicator within the Student Profile. A non-critical alert will only display a yellow alert indicator. If we wanted to require acknowledgment of this alert, we could do that here as well. Once we’ve completed configuring our alert details, we’ll click Save. We see that the alert has been added to the list. We’ll also see that her name is highlighted in red along with a red alert indicator. If we navigate to other areas of the Student Profile, we’ll be asked to acknowledge the alert attached to the student. Once we do so, we’ll also see the red alert banner. Now that you know how to attach alerts to students, you can be sure that teachers and staff members are made aware of student alerts.
-
Complete the appropriate fields.
Required fields are identified with an asterisk. You must complete required fields before you can save your work.
-
Check the box for Critical if appropriate.
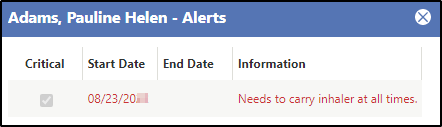
You would check the Critical box to indicate a severe alert, such as a peanut allergy. You might leave this box unchecked for less severe alerts, such as vision problems that require a student to sit near the front of the classroom. For critical alerts, the hazard icon displays in red and the student's name on the Student Profile also displays in red and in italics. Additionally, a banner will display on the Student Profile with the alert if your District has configured the appropriate security.
The image below displays a critical alert for Pauline Adams indicating she must have an inhaler with her at all times.
When checked, the Require Acknowledgment field displays. Continue to the next sub-step.
If you did not check this box, skip to step 10.
-
Check the box for Critical if appropriate.