Attaching families to students in the Student Profile enables users, such as school administrators, to determine the relationship students have with various guardians and siblings. A family is a group consisting of one or more guardians who have a relationship to a student. A student may have multiple families if necessary. If a student has multiple families, the family assigned as the student's first family will be the primary family and controls the primary address of the student.
Guardians may be kin, a family friend, legal guardian of the student, or other relation. For all guardians, you must define who they are and what information you can share with them. To define who the guardian is, you must add, at a minimum, a first and last name. You can also add an address, birth date, gender, and relationship to the student if you wish. To define what information you may share with the guardian, you must decide if they can use Family Access, be listed as an Emergency Contact
If a student returns to your organization as a guardian, Skyward recommends adding a new name record as a guardian, instead of selecting the existing student name record. If the name record already exists in the system but is not a student record, you should use the existing name record and add it as a guardian. You can verify the name information by locating the Name Used By column in the Name List of the Demographics module.
Scroll past the video to access the step-by-step instructions.
Audio Transcript
You can attach families to students in your organization by ensuring you’re in Administrative Access, heading to the Student module, and clicking on the Student Profile feature. This enables you to determine the relationship your students have with different guardians. A student may have multiple families in the system if necessary. After ensuring that we’re in the correct Student Profile, we’ll scroll down to the Family tab group and select the Family sub-tab. We’ll notice that no families exist for this student, so we’ll click Add Family. Under the Student Family Details heading, we’ll enter the first and last name of the guardian we’re adding. As we enter in this information, the search results will look in our system to see if any matching names already exist. For this example, no matching records display. If we need to add an existing family to a student, it is important to locate one of the guardians of the existing family in the search results and choose the Add as Guardian option next to their name. We can enter additional information into any of the rest of the fields on this screen. For our example, we’ll only specify the Gender field as we’ll be filling out some of the other fields on the next screen. It’s important to note that any information we add here will pull into the next screen. Let’s click Add New Name & Guardian to continue. Under the Name Details heading, we can enter a title for this guardian if they have a title associated with their name. If applicable, we could check the Name is One Name box. When checked, this means that this guardian has a name that is one word. Since this is not the case, we’ll leave it unchecked. The Last Name and First Name fields default based on what we previously entered. We could change these if needed. The Middle Name and Name Suffix fields can be entered if this guardian has a middle name or a name suffix such as Jr. or Sr. We could check the box for Specify Separate Legal Name if this guardian has a separate legal name. Next, we can enter the birth date for this guardian if we’d like to note when this guardian was born within the system. The Gender field defaults since we specified this on the previous screen. We have the option to check the Use Freeform Employer box or enter information into the Place Of Employment and Occupation fields. These fields are used to help us keep track of what the guardian does and where they work. Because this guardian name is new, no address is attached yet. Let’s click on Add Address. We’re brought to the Add Address process where we can start to enter address information about where they live. For this example, we’ll enter the Street Number, Street Name, City, and ZIP Code fields. Let’s save this new address. Because this is the first address being attached, all the Address Types details default as checked and cannot be modified. Let’s save. Under the Phone Numbers heading, we’ll enter this guardian’s phone number and specify the phone type. We’ll also enter their email address and the email type for this guardian. Let’s click Next. We’ll double check the Guardian Name field is correct. This field defaults and cannot be modified. We will also double check the Username. This field can only be modified if the Username Generation Type field is set to Optional or Required and Editable in the System Configuration of the Family module. This username defaults based on the username structure set up in the System Configuration of the Family module. The Driver’s License Number for this guardian can be entered if needed. Because this is the first family being added to this student, the Family Primary Guardian (Rank 1) box defaults as checked and cannot be modified. This means that this guardian will be the primary guardian for this family. We’ll check the box for Send Family Access Email so this guardian can receive an email through Family Access. It’s important to note that this field only displays if we entered an email address for this guardian and if the box for Family Access is checked under the Guardian Details For heading further down on this screen. We can then select the correct home language, so we know what the primary language is that this student and guardian speak at home. The Receives Forms box defaults as checked and indicates that this guardian will be getting forms. The Student’s First Family box defaults as checked and cannot be modified for this example. This is because this is the first guardian being attached to this student. Let’s specify the relationship between this guardian and student. The Allow Student Pickup box can be left checked for our example, so we know that this guardian is allowed to pick up this student from school. We can check the Emergency Contact box to specify that this guardian will be an emergency contact for this student. Since this is the initial emergency contact added for this student, the Primary Emergency Contact (Rank 1) box defaults as checked and cannot be modified. They will be the emergency contact for this student. Checking the Physical Placement box indicates that this student lives with this guardian. With the Legal Decisions box checked, this means that the guardian is able to make legal decisions regarding this student. We’ll leave them both checked for our example. The Family Access box can be left as checked. We should verify that this box is checked for any guardian who should be able to access student information through Family Access. Let’s click Save. We’ll get a warning stating that by having the Family Access box checked, this guardian will become a Family Access user and will receive an email. Since this is what we’d like to enable, we’ll click Save again to complete this process. By attaching families to students, you can be sure that you can determine how guardians are related to students at your organization.
You can attach families to students in your organization by ensuring you’re in Administrative Access, heading to the Student module, and clicking on the Student Profile feature. This enables you to determine the relationship your students have with different guardians. A student may have multiple families in the system if necessary. After ensuring that we’re in the correct Student Profile, we’ll scroll down to the Family tab group and select the Family sub-tab. We’ll notice that no families exist for this student, so we’ll click Add Family. Under the Student Family Details heading, we’ll enter the first and last name of the guardian we’re adding. As we enter in this information, the search results will look in our system to see if any matching names already exist. For this example, no matching records display. If we need to add an existing family to a student, it is important to locate one of the guardians of the existing family in the search results and choose the Add as Guardian option next to their name. We can enter additional information into any of the rest of the fields on this screen. For our example, we’ll only specify the Gender field as we’ll be filling out some of the other fields on the next screen. It’s important to note that any information we add here will pull into the next screen. Let’s click Add New Name & Guardian to continue. Under the Name Details heading, we can enter a title for this guardian if they have a title associated with their name. If applicable, we could check the Name is One Name box. When checked, this means that this guardian has a name that is one word. Since this is not the case, we’ll leave it unchecked. The Last Name and First Name fields default based on what we previously entered. We could change these if needed. The Middle Name and Name Suffix fields can be entered if this guardian has a middle name or a name suffix such as Jr. or Sr. We could check the box for Specify Separate Legal Name if this guardian has a separate legal name. Next, we can enter the birth date for this guardian if we’d like to note when this guardian was born within the system. The Gender field defaults since we specified this on the previous screen. We have the option to check the Use Freeform Employer box or enter information into the Place Of Employment and Occupation fields. These fields are used to help us keep track of what the guardian does and where they work. Because this guardian name is new, no address is attached yet. Let’s click on Add Address. We’re brought to the Add Address process where we can start to enter address information about where they live. For this example, we’ll enter the Street Number, Street Name, City, and ZIP Code fields. Let’s save this new address. Because this is the first address being attached, all the Address Types details default as checked and cannot be modified. Let’s save. Under the Phone Numbers heading, we’ll enter this guardian’s phone number and specify the phone type. We’ll also enter their email address and the email type for this guardian. Let’s click Next. We’ll double check the Guardian Name field is correct. This field defaults and cannot be modified. We will also double check the Username. This field can only be modified if the Username Generation Type field is set to Optional or Required and Editable in the System Configuration of the Family module. This username defaults based on the username structure set up in the System Configuration of the Family module. The Driver’s License Number for this guardian can be entered if needed. Because this is the first family being added to this student, the Family Primary Guardian (Rank 1) box defaults as checked and cannot be modified. This means that this guardian will be the primary guardian for this family. We’ll check the box for Send Family Access Email so this guardian can receive an email through Family Access. It’s important to note that this field only displays if we entered an email address for this guardian and if the box for Family Access is checked under the Guardian Details For heading further down on this screen. We can then select the correct home language, so we know what the primary language is that this student and guardian speak at home. The Receives Forms box defaults as checked and indicates that this guardian will be getting forms. The Student’s First Family box defaults as checked and cannot be modified for this example. This is because this is the first guardian being attached to this student. Let’s specify the relationship between this guardian and student. The Allow Student Pickup box can be left checked for our example, so we know that this guardian is allowed to pick up this student from school. We can check the Emergency Contact box to specify that this guardian will be an emergency contact for this student. Since this is the initial emergency contact added for this student, the Primary Emergency Contact (Rank 1) box defaults as checked and cannot be modified. They will be the emergency contact for this student. Checking the Physical Placement box indicates that this student lives with this guardian. With the Legal Decisions box checked, this means that the guardian is able to make legal decisions regarding this student. We’ll leave them both checked for our example. The Family Access box can be left as checked. We should verify that this box is checked for any guardian who should be able to access student information through Family Access. Let’s click Save. We’ll get a warning stating that by having the Family Access box checked, this guardian will become a Family Access user and will receive an email. Since this is what we’d like to enable, we’ll click Save again to complete this process. By attaching families to students, you can be sure that you can determine how guardians are related to students at your organization.
Select Menu > Administrative Access > Student.
Select Student Profile under Features.
You see the Student Profile for the first student listed alphabetically in the entity or for the last student whose profile you had open.
and school year by checking the information at the top left of the screen.
Begin entering the student's name in the Student search field near the top left of the screen.
Select the student from the drop-down list.
You see the Student Profile for the student you selected.
Select the Family tab group at the left of the screen.
Select the Family sub-tab.
You see existing guardians, family information, and any siblings the student may have.
Click Add Family near the top right of the screen.
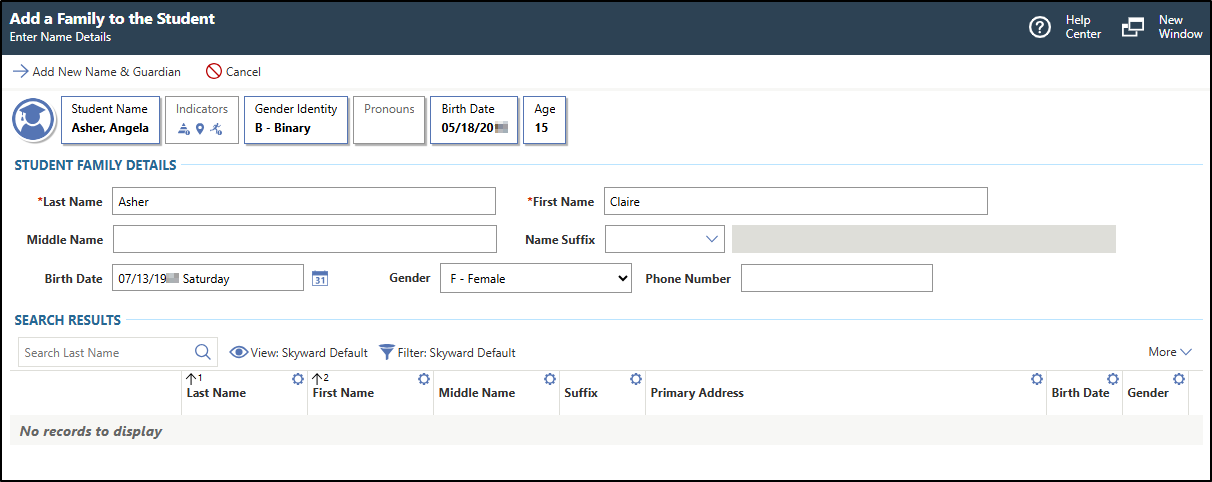
You see the Add a Family to the Student screen.
In the image below, a new family is being added to Angela Asher.
Complete the appropriate fields.
You must complete required fields before you can save your work. Fields marked as Optional in the documentation are not required to complete.
Under the Student Family Details heading, enter the guardian's Last Name.
Under the Search Results heading, the list displays names that match what you are entering. As you enter more letters, the list narrows until the last name of the guardian you wish to add displays.
Enter the guardian's First Name.
The search results below list names that match what you are entering. As you enter more letters, the list narrows until the first name of the guardian you wish to add displays.
Optional: Enter the guardian's Middle Name.
The search results below list names that match what you are entering. As you enter more letters, the list narrows until the middle name of the guardian you wish to add displays.
The search results below list names that match the suffix you entered.
Optional: Enter the guardian's Birth Date.
The search results below list names that match the birth date you enter.
Optional: Choose the guardian's Gender from the drop-down list.
The search results below list names that match the gender you selected.
Optional: Enter the guardian's Phone Number.
The search results below list names that match the phone number you entered.
Choose the appropriate option to continue.
Option
Description
Add New Name & Guardian
This option is located near the top left of the screen. You would choose this option if you did not find a matching name under the Search Results heading or the matching name is used as a student. You can add a new name record and identify the person as a guardian. Skip to step 11, sub-step b.
Add as Guardian
This option is located to the left of the name under the Search Results heading. You would choose this option if you find an existing name that is not already used as a student and you want to identify the person as a guardian for the selected student.
If the guardian is already attached to a family, you see the options to create a new family or add a family. Continue to the next step.
If the guardian is not attached to a family, you see the Add Guardian screen, which defaults with the guardian's information. Some fields that default can be modified if necessary, such as addresses, phone numbers, and email addresses. Skip to step 11, sub-step b.
Complete the appropriate fields.
You must complete required fields before you can save your work. Fields marked as Optional in the documentation are not required to complete.
Choose one of the options to associate a family with the guardian.
Option
Description
Create new Family
This option is located near the top left of the screen. You should choose this option to create a new family for an existing guardian. If you create a new family, the system does not link siblings from the family the guardian currently exists for.
Add Family
This option is located under the Existing Families heading. You should choose this option to link the guardian to an existing family.
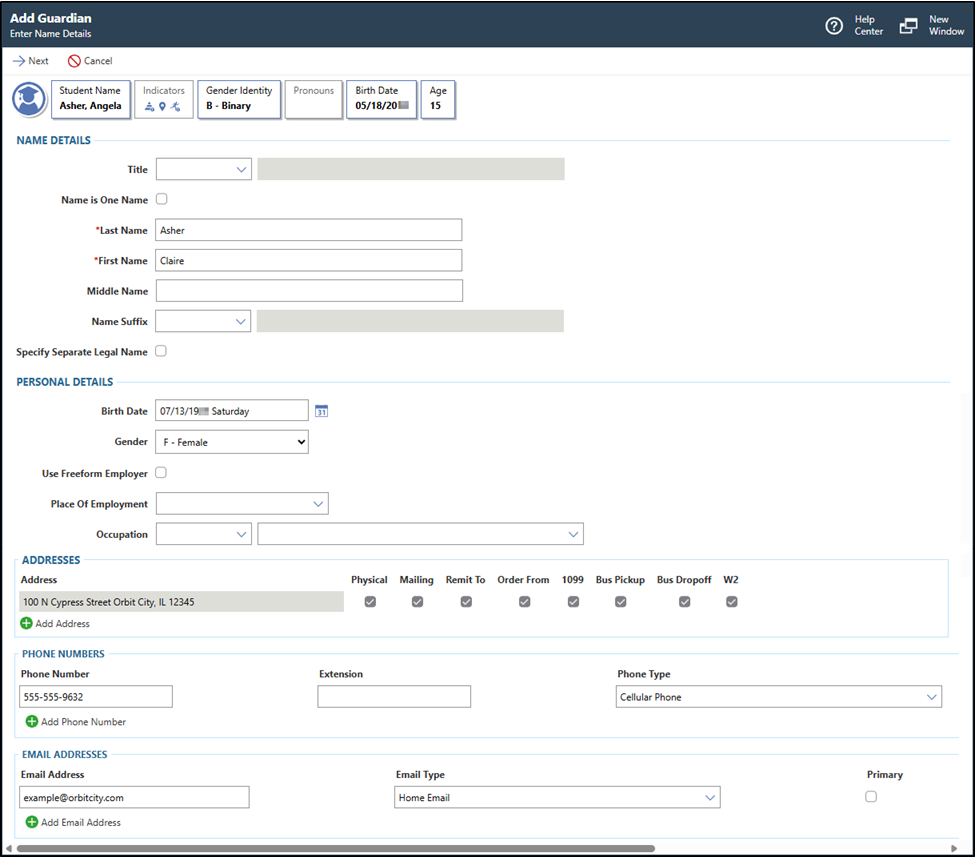
You see the Add Guardian screen.
In the image below, the Add Guardian screen displays guardian details for Claire Asher.
Note: Any information previously saved for the name record or that you added on the previous screen defaults on this screen. If you chose the Add as Guardian option, the information on this screen defaults based on the information specified on the guardian's name record and some values cannot be modified. You must verify the information is correct.
Optional: Under the Name Details heading, verify the guardian's Title
When checked, the Last Name, First Name, and Middle Name fields no longer display and the Name field displays. Continue to the next sub-step.
If you did not check this box, skip to sub-step e.
Optional: Verify the guardian's Name or enter the correct name.
Skip to sub-step h.
Verify the Last Name or enter the correct name.
Verify the First Name or enter the correct name.
Optional: Verify the Middle Name or enter the correct name.
Optional: Verify the Name Suffix or enter the correct suffix.
For example, you could enter III, Jr., or Sr.
Optional: Verify the box for Specify Separate Legal Name is checked or unchecked.
When checked, the Legal Title, Legal Name is One Name, Legal Last Name, Legal First Name, Legal Middle Name, and Legal Name Suffix fields display. Continue to next sub-step.
If you did not check the box, skip to sub-step q.
Optional: Enter the guardian's Legal Title.
Optional: Verify the box for Legal Name is One Name is checked or unchecked.
When checked, the Legal Last Name, Legal First Name, and Legal Middle Name fields no longer display and the Legal Name field displays. Continue to the next sub-step.
If you did not check the box, skip to sub-step m.
Enter the guardian's Legal Name.
Skip to sub-step p.
Enter the guardian's Legal Last Name.
Enter the guardian's Legal First Name.
Optional: Enter the guardian's Legal Middle Name.
Optional: Enter the guardian's Legal Name Suffix.
Under the Personal Details heading, verify the Birth Date or enter the correct date.
Verify the Gender or choose the correct gender from the drop-down list.
Optional: Verify the box for Use Freeform Employer is checked or unchecked.
If you checked the box, the Place of Employment field updates to a freeform field.
Optional: Enter the Place Of Employment.
If you checked the box for Use Freeform Employer, this field displays as Place of Employment and is a freeform field.
If you selected the Add New Name & Guardian option, you must click Add Address to enter address information. You see the Add Address screen. Continue to the next sub-step.
If this is the first address for the family, all boxes default to checked and cannot be unchecked. If this is a subsequent address for the family, you can choose the address types for the address.
The address information to verify or to attach to the student includes:
If you do not need to enter a new address or add an additional address to the guardian, skip to sub-step ac.
You can click Add Address at the left of the screen if you wish to enter a new address or add additional addresses for the guardian. You see the Add Address screen. Continue to the next sub-step.
Under the Address Details heading, choose the Address Type
The fields you see below may change based on the Address Type you select.
Under the Search Results heading, the list displays addresses that match your selection.
Use the additional address fields to search for the address.
The search results below list addresses that match the values you enter.
The fields you see below may change based on the Address Type you select. For additional information regarding the options you can select, you can review the Addresses topic.
Click Save New Address near the top left of the screen.
You see the address types to be attached to the student.
Verify the box for each of the Address Types is checked or unchecked.
If this is the first address for the family, all boxes default to checked and cannot be unchecked. If this is a subsequent address for the family, you can choose which address types are used by the address.
You can use the Select checkbox if you wish to check or uncheck all options.
The boxes you can check include:
Physical
Mailing
A/P Remit To
PO Order From
1099
Bus Pickup
Bus Dropoff
W2
Click Next near the top left of the screen.
If address range defaults are configured and the address is outside of the address range defaults, you see a message indicating no address school path overrides are required for the address. If address range defaults are not configured, you see a message indicating no permit is required as the guardian is currently not attached to the student.
Choose one of the options near the top left of the screen to save your work.
Option
Description
Save & Add Another
Saves the address and the Add Address screen refreshes so you can add another.
Save
Saves the address and you return to the Add Guardian screen. Continue to the next sub-step.
Under the Phone Numbers heading, verify the information for each phone number is correct.
If you selected the Add New Name & Guardian option, continue to the next sub-step.
The phone number information defaults if you selected the Use as Guardian option. The information to verify includes:
Phone Number
Extension
Phone Type
International
Confidential
Primary
If the existing phone number information is correct or if you do not need to add an additional phone number to the guardian, skip to sub-step aj.
You can click Add Phone Number at the left of the screen if you wish to enter a new phone number or add additional phone numbers for the guardian.
If multiple phone numbers exist for this guardian, you would check the box for the phone number you wish to be used as the primary contact for the guardian.
You can click Add Phone Number at the left of the screen and repeat sub-steps ad - ai until you have added all the necessary phone numbers.
Under the Email Addresses heading, verify the information for each email address is correct.
If you selected the Add New Name & Guardian option, continue to the next sub-step.
The email address information defaults if you selected the Use as Guardian option. The information to verify includes:
Email Address
Email Type
Primary
If existing email address information is correct or if you do not need to add an additional email address for the guardian, skip to sub-step an.
You can click Add Email Address at the left of the screen if you wish to enter a new email address or add additional email addresses for the guardian.
If multiple emails exist for this guardian, you would check the box for the email you wish to be used as the primary contact for the guardian.
You can click Add Email Address at the left of the screen and repeat sub-steps ak - am until you have added all the necessary email addresses.
Click Next near the top left of the screen.
You see fields that enable you to enter additional guardian details.
Optional: Verify the Template near the top right of the screen or click the Chevron down icon to choose the correct template from the drop-down list.
If the workflow template you wish to use does not exist, you can create a new Workflow Template. If necessary, you can click Template near the top right of the screen to expand the workflow template area.
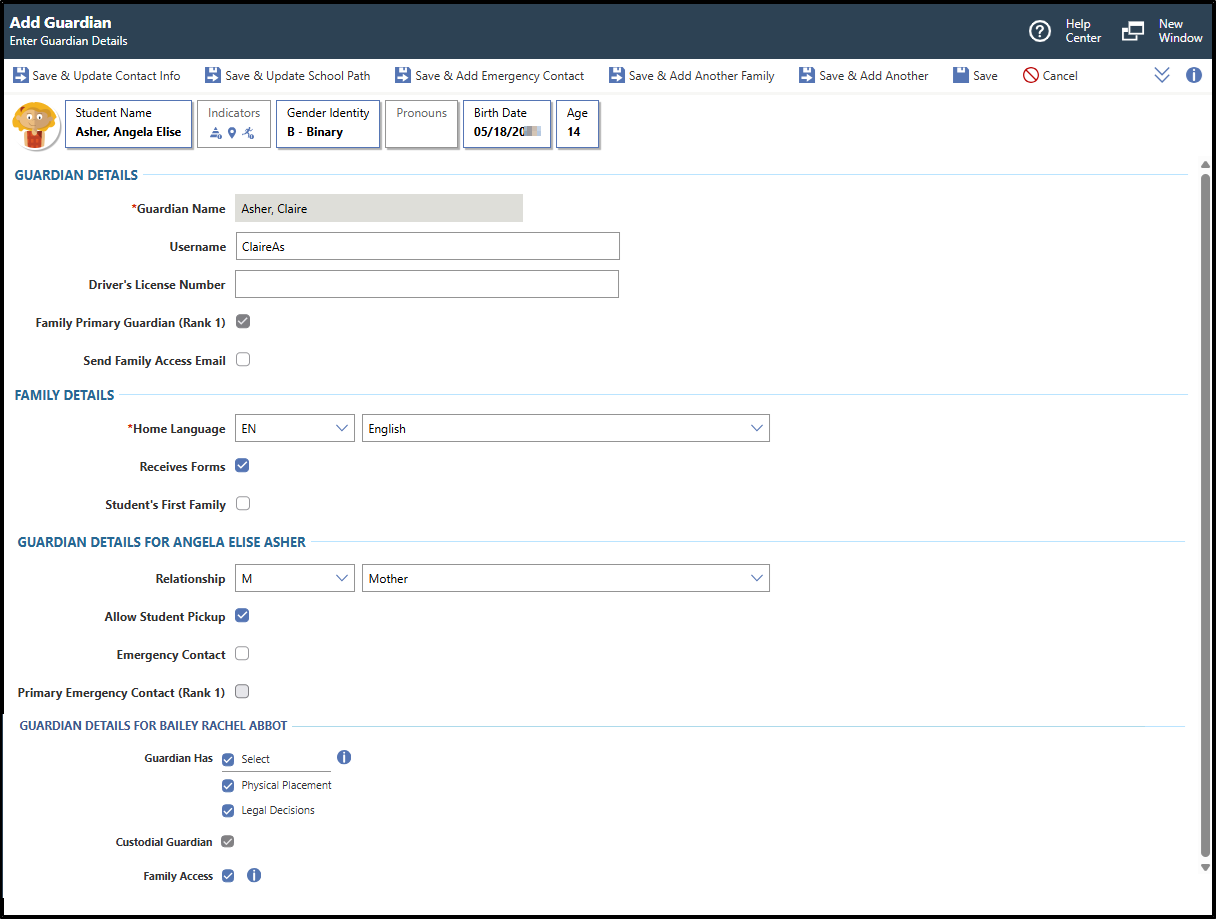
Under the Guardian Details heading, verify the Guardian Name is correct.
This defaults and cannot be modified.
Optional: Verify the Username or enter the correct username.
in the System Configuration of the Family module. The username defaults based on the username structure set up in the System Configuration of the Family module.
Optional: Verify the box for Family Primary Guardian (Rank 1) is checked or unchecked.
If you are adding the first guardian to a new family for the student, this defaults to checked and cannot be modified. The first guardian added to a family must be the primary guardian.
If you are adding a subsequent guardian, this field can be checked if you wish to make this guardian the primary guardian of the family. When you save this record, the existing primary guardian will no longer be flagged as the primary.
Optional: Verify the box for Send Family Access Email is checked or unchecked.
This field only displays if there is more than one student in the family, an email address exists for the guardian, and at least one of the boxes for Family Access is checked under one of the Guardianship Details For headings.
Under the Family Details heading, verify the Home Language
This field is used for report filtering in modules such as Attendance, Discipline, and Grading. If this box is unchecked for a family, a report may not be generated for that student's family, even if the student meets the other ranges of the report. Typically, this box should remain checked unless the family should not receive reports such as attendance letters and report cards.
Optional: Verify the box for Student's First Family is checked or unchecked.
This defaults to checked and cannot be modified if this is the first family you are adding to the student. If you are adding a subsequent family to the student, this box defaults to unchecked, but can be modified if necessary. This indicates the family the student will usually reside with.
Optional: Under the Guardian Details For heading, enter the Relationship
This box defaults to checked, but can be unchecked if necessary.
If you are attaching the guardian to an existing family, you may need to repeat sub-steps ax - bc for each additional student in the family.
You can click the Information icon to the right of the field for additional information.
If you unchecked this box for all students in the family, the Send Family Access Email checkbox no longer displays under the Guardian Details heading.
Choose one of the options near the top left of the screen to save your work.
Option
Description
Save & Update Contact Info
Saves the family in the system and you see the Contact Information tab of the Student Guardian Details screen, which enables you to update the guardian's phone number, email address, and address.
Save & Update School Path
Saves the family in the system and you see the School Path sub-tab of the Student Profile, so you can update the student's school path.
Save & Add Emergency Contact
Saves the family in the system and you see the Add Emergency Contact screen where you can attach an emergency contact to the student.
Save & Add Another Family
Saves the family in the system and you return to the Add a Family to the Student screen, so you may add another family to the student.
Save & Add Another
Saves the family in the system and refreshes the Add Guardian screen, so you may add another guardian to the family.
Save
Saves the family in the system and you return to the Family sub-tab of the Student Profile. If the address you select does not include the school the student attends, a banner may display indicating you must verify the Permits